background image

Pour toute 

assistance, appeler 

le 1.800.762.1142. 

Ne pas 

retourner au 

point de 

vente.

page 

4

1

3

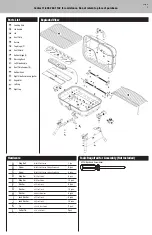
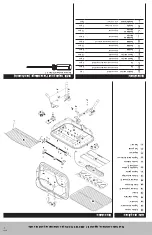
Liste des pièces 

1

Grille de cuisson

2

Poignée du couverc

le

3

Couvercle

4

Plaque chauffante

5

Brûleur

6

Charnière supérieure (2)

7

Écran thermique

8

Charnière inférieure (2)

9

Grille de réchauffage

10

Poignée gauche

11

Support de la plaque  

chauffante (2)

12

Cuve du barbecue

13

Poignée droite et allumeur

14

Régulateur

15

Pied gauche

16

Pied droit

Quincaillerie

A

Boulon à oreilles 

Galvanisé M6x15 

1 pc

B

Vis

Galvanisée à tête bombée Philips M5x12

6 pcs

C

Vis

Galvanisée à tête bombée Philips M6x12

4 pcs

D

Écrou à oreilles

Galvanisé M5 

6 pcs

E

Écrou à oreilles

Galvanisé M6

10 pcs

F

Rondelle

Galvanisée ø5

6 pcs

G

Rondelle

Galvanisée ø6

10 pcs

H

Rondelle

Rondelle résistante à la chaleur ø6

8 pcs

I

Rondelle de 

blocage

Galvanisée ø5

6 pcs

J

Rondelle de 

blocage

Galvanisée ø6

10 pcs

K

Goupille

ø5 x 30 Zinc Plated

2 pcs

L

Goupille fendue

ø1.4 x 30 Steel

2pcs

Outils requis pour l’assemblage (non fournis)

Tournevis cruciforme Phillips nº 2

15

7

12

11

10

13

14

16

9

2

Vue éclatée 

5

11

6

8

Содержание UniFlame NBC1218G-C

Страница 1: ...could result in fire or explosion which could cause property damage personal injury or death Save these instructions for future reference If you are assembling this unit for someone else give this manual to him or her to read and save for future reference WARNING FOR YOUR SAFETY For Outdoor Use Only outside any enclosure Table of Contents Important Safeguards Page 2 Exploded View Hardware 3 Assemb...

Страница 2: ...ep the grill s valve compartment burners and circulating air passages clean Inspect grill before each use 22 Do not alter grill in any manner 23 Do not use the grill unless it is COMPLETELY assembled and all parts are securely fastened and tightened 24 This grill should be thoroughly cleaned and inspected on a regular basis 25 Use only the regulator provided The replacement regulator shall be that...

Страница 3: ... A Wing Bolt M6x15 Zinc Plated 1 pc B Screw M5x12 Zinc Plated Phillips Truss Head 6 pcs C Screw M6x12 Zinc Plated Phillips Truss Head 4 pcs D Wing Nut M5 Zinc Plated 6 pcs E Wing Nut M6 Zinc Plated 10 pcs F Washer ø5 Zinc Plated 6 pcs G Washer ø6 Zinc Plated 10 pcs H Washer ø6 Heat Resistant 8 pcs I Lock Washer ø5 Zinc Plated 6 pcs J Lock Washer ø6 Zinc Plated 10 pcs K Pin ø5 x 30 Zinc Plated 2 pc...

Страница 4: ...ble for reference 5 Attach Legs C x 4 E x 4 G x 4 J x 4 6 Attach Heat Shield Burner Regulator and Ignitor Wire A x 1 For Easiest Assembly To avoid losing any small components or hardware assemble your product on a hard level surface that does not have cracks or openings 1 Attach Lid Handle and Top Hinges B x 2 D x 2 E x 2 F x 2 J x 2 G x 2 H x 4 I x 2 2 Attach Bottom Hinges B x 4 D x 4 F x 4 H x 4...

Страница 5: ...ough to layout all components and hardware When applicable tighten all hardware connections by hand first Once the step is completed go back and fully tighten all hardware Follow all steps in order to properly assemble your product 3 Attach Side Handles E x 4 G x 4 J x 4 7 Attach Lid K x 2 L x 2 8 Attach Warming Rack ...

Страница 6: ...C1218G C 9 Insert Heat Plate and Cooking Grid Assembly Instructions continued 11 Fold Up Legs Note Always lock lid before folding legs Unfold Legs Note Always open legs completely and are secured in place before lighting 10 Lock Lid Unlock Lid ...

Страница 7: ...ls packaging and protective films have been removed from the grill 2 Remove manufacturing oils before cooking on this grill for the first time by operating the grill for at least 15 minutes on HIGH with the lid closed This will heat clean the internal parts and dissipate odors Cooking 1 Open lid and ignite burner per lighting instructions 2 Close lid and preheat grill on HIGH 3 Wear protective glo...

Страница 8: ...g LLC Vendor warrants to the original retail purchaser of this product and to no other person that if this product is assembled and operated in accordance with the printed instructions accompanying it then for a period of one 1 year from the date of purchase all parts in such product shall be free from defects in material and workmanship Vendor may require reasonable proof of your date of purchase...

Страница 9: ...tout accident mauvais usage entretien incorrect de cet article ou toute modification mauvaise installation ou négligence comme il a été établi dans ce manuel De plus cette garantie limitée ne couvre pas les dommages au fini à savoir les rayures les bosses les traces de décoloration de rouille ou les dommages résultant des intempéries après achat de l article Cette garantie remplace toute autre gar...

Страница 10: ... d allumer le barbecue Éteindre le barbecue 1 Réglez le bouton de réglage sur Lock Off fermé et verrouillé 2 Retirez la bouteille de propane et remisez la comme il se doit Utiliser le barbecue pour la première fois 1 A ssurez vous d avoir retiré toutes les étiquettes ainsi que tout le matériau d emballage et le film protecteur du barbecue 2 A vant de cuire quoi que ce soit sur le barbecue pour la ...

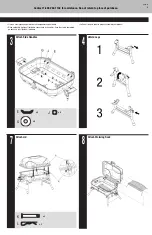
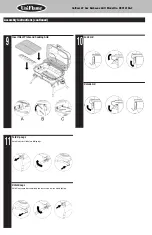
Страница 11: ...que chauffante et la grille de cuisson 11 Repliez les pieds Remarque Assurez vous de toujours verrouiller le couvercle avant de replier les pieds Dépliez les pieds Remarque Assurez vous de toujours ouvrir complètement les pieds avant d allumer l appareil 10 Verrouillez le couvercle Déverrouillez le couvercle ...

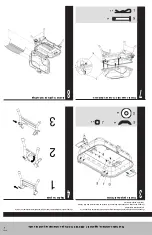
Страница 12: ...aillerie d installation L orsque nécessaire serrez toute les fixations et la visserie en premier puis une fois l étape terminée serrez les à bloc S uivez toutes les étapes dans l ordre afin d assembler correctement cet article 4 Dépliez les pieds 3 Fixez les poignées latérales E x 4 G x 4 J x 4 7 Fixez le couvercle à la cuve du barbecue K x 2 L x 2 8 Insérez la grille de réchauffage ...

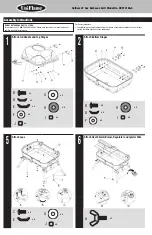
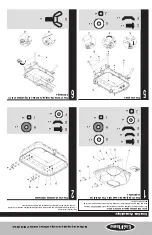
Страница 13: ...ir vous y référer Pour faciliter l installation P our éviter de perdre des petites pièces ou la quincaillerie d installation assemblez cet article sur une surface dure et plane qui ne comporte pas de trous ou de fissures 5 Fixez les pieds C x 4 E x 4 G x 4 J x 4 6 Fixez l écran thermique le brûleur le régulateur et le fil d allumage A x 1 1 Fixez la poignée du couvercle et les charnières supérieur...

Страница 14: ...Quincaillerie A Boulon à oreilles Galvanisé M6x15 1 pc B Vis Galvanisée à tête bombée Philips M5x12 6 pcs C Vis Galvanisée à tête bombée Philips M6x12 4 pcs D Écrou à oreilles Galvanisé M5 6 pcs E Écrou à oreilles Galvanisé M6 10 pcs F Rondelle Galvanisée ø5 6 pcs G Rondelle Galvanisée ø6 10 pcs H Rondelle Rondelle résistante à la chaleur ø6 8 pcs I Rondelle de blocage Galvanisée ø5 6 pcs J Rondel...

Страница 15: ...e non protégée 21 I l est primordial que le compartiment de la commande du barbecue les brûleurs et les orifices permettant la circulation de l air demeurent propres Vérifier le barbecue avant chaque utilisation 22 N e modifier en aucune façon le barbecue 23 N e pas utiliser le barbecue à moins qu il ne soit COMPLÈTEMENT assemblé et que les pièces ne soient toutes fixées et serrées 24 C e barbecue...

Страница 16: ...l absence de codes locaux suivez le Code national du gaz et des combustibles les normes ANSI Z223 1 NFPA 54 CAN CGA B149 1 et le Code d installation du gaz naturel et du propane MANUEL D UTILISATION AVERTISSEMENT POUR VOTRE SÉCURITÉ 1 T oute installation défectueuse ou modification incorrecte ainsi que tout mauvais réglage ou entretien incorrect risque d entraîner des blessures ou des dégâts matér...

Отзывы: