background image

10

3. Stand upright, do not lean

forward and pay attention to

posture. Keep both  feet apart to

help retain your balance.
4. Never hold the cutting  head

higher  than your hip; the higher

you hold the cutting head, the

greater the risk for obj ects being

thrown.

5. Carefully plunge the bl ade from

above when cutting long

undergrowth.
6. Move the cutting head towards

the base of young trees or thicker

vegetation.
TRIMMING
1. Use the trimmer head (37) to cut

smaller types of weed, lawn grass,

or similar soft vegetation.
2. Hold the product firmly so that it

sits with a gap between the

product and your right side.
3. Stand upright. Do not lean

forward and pay attention to

posture. Keep both  feet apart to

help retain your balance.
4. Hold the trimmer head just

above the ground at an angle of

appro ximately 30
5. Move the product with a slow

and regular arc from the left t o right

before moving back to the starting

position  before trimming the next

area.
6. Ensure the cutting head remains

clean and free from off-cuts that

may cause it to jam. Check

regularly. Stop the engine, switch

the ignition s witch (29) to STOP 

and remove the spark plug

connect or (2) before checking.

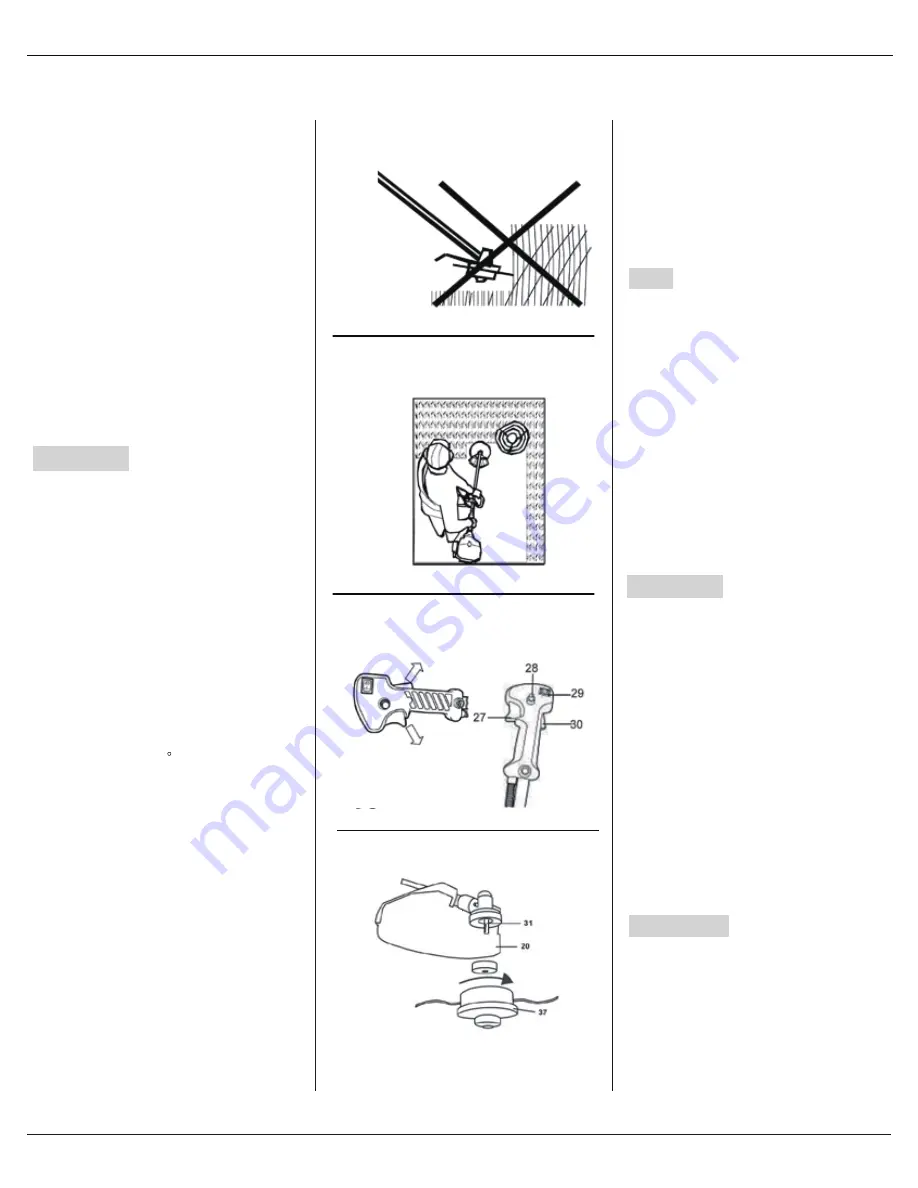
7. Trim longer grass in stages.

DO NOT cut long grass in one

cut (Fig. 23).
8. Feed the trimming line if it is

worn-out or ripped by  tapping

the bumper (38) on stable

ground.
TIPS
1. For best results, do not cut

wet grass because it tends to

stick to the cutting heads and

guard, prevents proper

discharge of grass  trimmings,

and could cause you to slip and

fall.
2. Pay special attention when

performing the work close to

trees and bushes. The cutting

heads could damage sensitive

bark, and damage fence posts

(Fig. 24).
STOPPING
1. Release the throttle interlock

(30) and throttle control  (27) and

let the product run at its idle

speed for 10-15 seconds (Fig.

25).
2. Set the ignition switch (29) to

position  “O”.
WARNING: The cutting heads 

will continue to rotate  for 

some time after the engine 

has been switched off. Wait 

until the head has come to a 

complete stop before  placing 

the product on the ground.
AFTER USE

1. Switch th e product OFF,

disconnect the spark plug

connector, and let it cool down.

2. Check, clean, and store the

product as described.

FIG. 23

FIG. 24

FIG. 25

FIG. 26

1-800-348-5004

[email protected]

Содержание 52623

Страница 1: ...yourself and others Failure to observe the instructions may result in property damage and or personal injury Please keep instructions for future reference For warranty purchases please keep your dated proof of purchase File or attach to the manual for safe keeping For Customer Service Call 1 800 348 5004 or e mail customerservice focus ontools com 52623 03 2017 2 IN 1 BRUSH CUTTER STRING TRIMMER ...

Страница 2: ...ngine Type Air cooled 2 stroke Displacement 42 6cc Engine Speed 9000 RPM Blade Speed 6800 RPM Torque 1 1 ft lb Line Coil Cutting Diameter 14 96 Any failures made in following the safety regulations and and instructions may result in an electric shock fire and or serious injury UNPACK 1 Unpack all parts and lay them on a flat stable surface 2 Remove all packing materials and shipping devices if app...

Страница 3: ...TION 1 This product can cause serious injuries Read the instructions carefully for proper handling preparation maintenance starting and stopping of the product Become familiar with all controls and the proper use of the product 2 Beware of power lines 3 Avoid operating while people especially children are nearby 4 Dress properly Do not wear loose clothing or jewelry which can get caught in moving ...

Страница 4: ...efueling the product Do not refuel the product if there is an open fire in the vicinity 6 Always use suitable aids such as funnels and filler necks Do not spill any fuel on the product or its exhaust system There is a risk of ignition However if fuel should be spilled then you must remove it carefully from all parts of the product Any residue which may be present must be completely removed before ...

Страница 5: ...duct 1 Health defects resulting from vibration emission if the product is being used over long periods of time or not adequately managed and properly maintained 2 Injuries and damage to properly due to broken accessories or the sudden impact of hidden objects during use 3 Danger of injury and property damage caused by flying objects 4 CAUTION You may be burned if you touch hot surfaces WARNING Thi...

Страница 6: ...uard and the cutter blade match Ensure that the cutter blade sits flush on the extruded ring on the backing flange 6 Place the locking flange 34 and the washer onto the cutter blade 33 7 Secure the cutter blade 33 with the nut 36 Fig 8 TRIMMER HEAD 1 Make sure that the safety guard 19 has been attached properly 2 Locate the backing flange 32 on the spindle 31 3 Rotate the backing flange until its ...

Страница 7: ...ave any doubts about its suitability for its intended purpose WARNING For your own and the safety of other people you must read and follow the safety instructions in this manual INTENDED USE This brush cutter string trimmer is designated with a maximum power output of maximum 42 6cc With the cutter blade attached this product is intended to cut small types of weeds lawn grass or similar soft veget...

Страница 8: ...g the securing clip ensuring that the angle of the cutting head is parallel to the surface being cut WARNING Always attach the product to the harness Do not carry it only with your hands 5 In case of emergency release the product from the harness by opening the securing clip AUXILIARY HANDLE Adjust the position and angle of the auxiliary handle 12 on the upper shaft 23 1 Loosen the bolts on the br...

Страница 9: ... engine started 5 Operate Fig 21 WARNING Always attach the product to the harness Do not carry it only with your hands CUTTING 1 Use the cutter blade 33 to cut heavier weeds brush and similar vegetation with a thickness of up to 20mm WARNING To avoid hazards never cut heavier weeds brush and similar vegetation with a thickness of over 20mm Avoid contact with stones wires glass etc that may cause i...

Страница 10: ... jam Check regularly Stop the engine switch the ignitions witch 29 to STOP and remove the spark plug connect or 2 before checking 7 Trim longer grass in stages DO NOT cut long grass in one cut Fig 23 8 Feed the trimming line if it is worn out or ripped by tapping the bumper 38 on stable ground TIPS 1 Forbest results do not cut wet grass becauseit tends to stick to the cutting heads and guard preve...

Страница 11: ...nd both ends into the hook shape and respectively insert them into the corresponding holes Reserve about 10cm outside the holes Step 7 Align the holes of the roll and the small holes of the groove and install the cover Step 8 Pull the line out of the cover A Pull out one end of the line out of the corresponding hole of the roll B Install the line through the corresponding hole of the groove Step 9...

Страница 12: ...customerservice focus ontools com 12 ...

Страница 13: ...customerservice focus ontools com 13 ...

Страница 14: ...Replace cutting head Cutting head is not fitted correctly Fit cutting head correctly Cutting height is wrong Adjust cutting height Guard is clogged Clean guard Cutting head is damaged Replace cutting head Flanges on cutting head are loose Tighten flanges Flanges on cutting head are broken Replace flanges Fuel oil mixture is incorrect or the wrong oil has been used Empty out unused fuel and refill ...

Страница 15: ...s try starting the unit until you hear a pop then let go of the throttle lever Follow start up procedure An alternative to the above steps is to remove the spark plug and allow the cylinder and spark plug to dry out The factory setting for this unit is at 1 1 1 2 turns out counter clockwise This unit it equipped with only one carburetor adjuster Allow unit to run and warm up If idle is rough use 1...

Страница 16: ...Brush Cutter Model 52623 For Customer Service please call 1 800 348 5004 or email customerservice focus ontools com 16 18 19A 1 800 348 5004 Parts List ...

Страница 17: ...07 15 40 41 42 43 44 40 41 42 43 44 1 800 348 5004 For Customer Service please call 1 800 348 5004 or email customerservice focus ontools com 1 800 348 5004 17 Parts List ...

Страница 18: ...ith ON OFF k c o l r e t n I e l t t o r h T 0 3 r e v e L e k o h C 0 1 e l d n i p S 1 3 e l b a C l o r t n o C 1 1 12 Auxiliary Handle 32 Backing Flange e d a l B r e t t u C 3 3 t e k c a r B 3 1 e g n a l F g n i k c o L 4 3 s s e n r a H 4 1 r e h s a W 5 3 p m a l C 5 1 t u N 6 3 b o n K g n i k c o L 6 1 17 Locking Lever 37 Trimmer Head r e p m u B 8 3 4 x t e S g n i t n u o M 8 1 e n i ...

Страница 19: ...s due directly or indirectly to misuse abuse negligence or accidents repairs or alterations or a lack of maintenance FOT shall in no event be liable for death injuries to persons or property or for incidental special or consequential damages arising from the use of our products To receive service under warranty the original manufacturer part must be returned for examination by an authorized servic...

Отзывы: