CARE AND MAINTENANCE
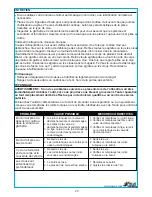
TROUBLESHOOTING
10
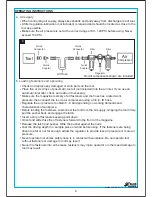
Nail gun must be well-cleaned and lightly lubricated before storing
Place 2 to 6 drops of pneumatic tool oil into the air inlet before each work day or after 2 hours of
continuous use depending on the characteristics of workpiece or type of fasteners.
Inspect trigger and safety mechanism to ensure system is safe and functional. Make sure there
are no loose or missing parts and no binding or sticking parts.
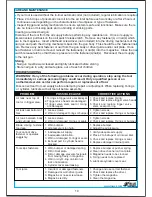
WARNING: If any of the following problems occur during operation, stop using the tool
immediately or serious personal injury could result. Only a qualified person or an
authorized service center can perform repairs or replacement of tool.
Disconnect tool from air supply before attempting repair or adjustment. When replacing O-rings
or cylinder, lubricate with air tool oil before assembly.
Air leak near top of
tool or in trigger area.
1. O-rings in trigger valve are damaged.
2. Trigger valve heads are damaged.
3. Trigger valve stem, seal or O-ring
are damaged.
1. Check and replace O-ring.
2. Check and replace trigger valve heads.
3. Check and replace trigger valve
stem, seal or O-ring.
Air leak near bottom of
tool.
1. Loose screws.
2. Worn or damaged O rings or bumper.
-
1. Tighten screws.
2. Check and replace O-rings or bumper.
Air leak between body
and cylinder cap.
1. Loose screws.
2. Worn or damaged O-rings or seals.
1. Tighten screws.
2. Check and replace O-rings or bumper.
Blade driving fastener
too deep.
1. Worn bumper.
2. Air pressure is too high.
1. Replace bumper.
2. Adjust the air pressure.
Tool: cannot drive
fastener or operates
sluggishly.
1. Inadequate air supply.
2. Inadequate lubrication.
3. Worn or damaged O
-
rings or seals.
4. Exhaust port in cylinder head is
blocked.
1. Verify adequate air supply.
2. Place 2 to 6 drops of oil into air inlet.
3. Check and replace O-rings or seal.
4. Replace damaged internal parts.
Tool skips fasteners.
1. Worn bumper or damaged spring.
2. Dirt in front plate.
3. Dirt or damage prevents fasteners
from moving freely in magazine.
4. Worn or dry O
-
ring on piston or
lack of lubrication.
5. Cylinder cover seal leaking.
1. Replace bumper or pusher spring.
2. Clean drive channel on front plate.
3. Magazine needs to be cleaned.
4. O-ring needs to be replaced.
5. Lubricate cylinder cover seal.
PROBLEM
POSSIBLE CAUSE
CORRECTIVE ACTIONS
Tool jams.
1. Incorrect or damaged fasteners.
2. Damaged or worn driver guide.
3. Magazine or nose screw loose.
4. Magazine is dirty.
2. Check and replace the driver.
3. Tighten the magazine.
4. Clean the magazine.
1. Change and use correct fastener.
If your tool is used without the in-liner automatic oiler (not included), regular lubrication is required.
Store nail gun in a dry and safe place, out of reach of children
Storing
R
www.lowes.com
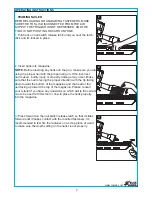
Clearing a jammed nail gun:
Disconnect the tool from the air supply before performing any maintenance. Once air supply is
disconnected, pull back on the nail switch release latch. Remove any fastener(s) or nail(s) which
are in the magazine. Insert a flathead screwdriver (not included) into the driving mechanism of the
nail gun and push the driving mechanism back into the gun body.
This should free the fastener/nail
jam. Remove any bent fastener or nail from the gun body or driver guide and/or nail plate. Once
bent fastener or nail is removed, reinsert the fastener(s) or nail(s) into the magazine. Close the nail
switch release latch so that there is pressure on the fastener(s)/nail(s). Reconnect the air supply
to the nail gun.


