9
OPERATING INSTRUCTIONS
1
PALM NAILER
2. Air supply
3. Loading fasteners and operating
When connecting air supply, always keep hands and body away from discharge area of tool.
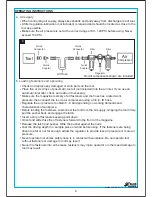
A filter regulator-lubrication (not included) is required and should be located as close to the
Make sure the air pressure is set at the correct range of 70 - 90 PSI before using. Never
exceed 100 PSI.
tool as possible.
Not all components shown are included.
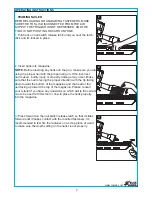
Insert one piece of required nail into fixed set. Use one hand to hold the nail and the other
hand to hold the body of the tool. Press the tool until ram pin upwards 1 mm and attach
movement in succession.
Use clean, dry and regulated compressed air at 70-90 PSI.
After the nail is steady, remove the hand holding the nail and continue to drive the nail into
place.
Place some drops of lubrication into the air inlet before use, and clean the tool after use.
Tool
Quick
Quick
Coupler
Quick
Coupler
Air Hose
Regulator
Air
Compressor
Connector
Quick
Oiler
Filter
Connector
2
KEEP YOUR HAND AND FINGERS AWAY FROM THE BASE
OF PALM NAILER WHILE IN USE. BEFORE PERFORMING
ANY MAINTENANCE, MAKE SURE THE TOOL IS
DISCONNECTED FROM THE AIR SUPPLY.
When setting a nail, it is recommended that the sides of the nail
are held under the head of the nail
When holding the nail properly, align the head of the nail with
the fix set at the base of the palm nailer. Make sure the nail is
aligned properly. Slightly apply pressure to the top of palm nailer
and the palm nailer will begin to fire. Once the nail is slightly
inserted into the surface pull your hand away from the nail. Keep
consistent pressure on the top of the palm nailer to continue to
drive the nail deeper into the surface.
NOTE
: The palm nailer is designed to continuously fire when the
nail head and fix set make contact until the nail is flush into the surface you plan to nail into. You
can set a nail to any depth. To stop the nailer, release pressure from the top of the palm nailer.
R
www.lowes.com


