OPERATING INSTRUCTIONS
4. Air supply
5. Loading fasteners and operating
When connecting air supply, always keep hands and body away from discharge area of tool.
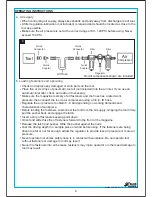
A filter regulation-lubrication (not included) is required and should be located as close to the
Make sure the air pressure is set at the correct range of 80 - 120 PSI before using. Never
exceed 130 PSI.
tool as possible.
Not all components shown are included.
Place five or six drops of pneumatic tool oil (not included) into the air inlet. If you use an
automatic inlet oiler, check and add oil if necessary.
Check and replace any damaged or worn parts on the tool.
Make sure the magazine is empty of all fasteners and the hose has a rated work
pressure, then connect the tool to air compressor using a 3/4 in. ID hose.
Regulate the air pressure to obtain 5 - 8 bar depending on working demands and
characteristics of workpiece.
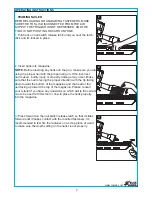
Before loading the fasteners, disconnect the tool from the air supply. Gripping the tool firmly,
pull the pusher back and engage the latch.
Insert a strip of fasteners keeping point down.
Orient and slide this strip of fasteners forward to the front of the magazine.
Release the latch and pusher. Slide the pusher against the nails.
Test the driving depth in a sample piece of wood before using. If the fasteners are being
driven too far or not far enough, adjust the regulator to provide less air pressure or more air
pressure.
Tool
Quick
Quick
Coupler
Quick
Coupler
Air Hose
Regulator
Air
Compressor
Connector
Quick
Oiler
Filter
Connector
4
8
Never operate tool unless safety nose is in contact with workpiece. Do not operate tool
without fasteners or damage to tool may result.
Never fire fasteners into air because fasteners may injure operator or others and damage to
tool may result.
R
www.lowes.com


