background image

127

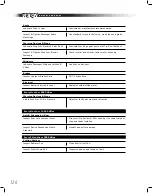
s c h e d u l e d


m a i n t e n a n c e

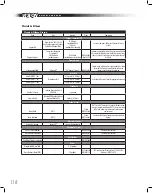
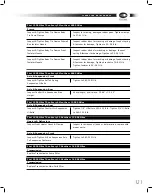
 Every 3 Months or 5000 Miles

Brakes

Lubricate Air Brakes S-Cam

See Meritor Cam Brakes Appendix in Air Brakes Chapter for 
guidelines.

Lubricate Hydraulic Brakes Calipers

Lube per meritor specs.

Driveline

Lubricate Driveshafts Slip Joint

Grease meeting NLGI Grade #2 grease specifications.

Lubricate Driveshafts U-Joint Bolts

Grease meeting NLGI Grade #2 grease specifications.

Inspect & Tighten Driveshafts U-Joint Bolts

Tighten to 45–50 ft lb.

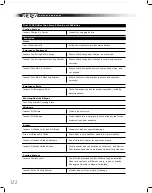
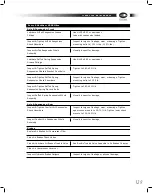
Electrical

Inspect Alternator Connections

Inspect for loose wires, damaged terminals, damaged
insulators.

Inspect Battery Ground Strap

Check for solid connection, tight fasteners and absense of
corrosion.

Fuel System

Inspect Fuel Lines

Inspect for leaks or signs of abrasion.

Inspect Fuel Tank Vent

Inspect for obstruction.

Intake System

Inspect Air Cleaner Filter Element

Inspect for proper seating, secure lid. Replace if soiled,
wet, or damaged.

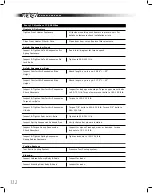
Inspect Intake Tract All Fasteners

Inspect for signs of contaminate infiltration, loose clamps,
wear spots, holes in piping

Inspect Intake Tract Charged Air Tubing

Inspect for signs of contaminate infiltration, loose clamps,
wear spots, holes in piping

Inspect & Tighten Intake Tract Hose
Clamps

Tighten to 10 in lb. 

Inspect & Tighten Intake Tract Spring
Loaded Clamps

Tighten to near full spring compression.

Inspect Intake Tract Support Bracket

Visual inspection. Repair damaged parts immediately.

Inspect & Tighten Intake Tract T-Bolt
Clamps

Tighten to 50 in lb.

Содержание VISION 2011

Страница 1: ...10013333 2011 BBCV D R I V E R S H A N D B O O K 10013333 BBCV BLUE BIRD VISION 2011 ...

Страница 2: ......

Страница 3: ...10013333 Revision B ...

Страница 4: ...nd or service information conflicts with the component manufacturer s documentation the manufacturer s documentation prevails In the event of any conflict between the requirements of this publication and any applicable legal requirement the legal require ment prevails Technical requirements that exceed the legal requirements are not considered to conflict Blue Bird Corporation continually endeavor...

Страница 5: ...n Rear 13 Batteries 13 Braking System 13 Bumpers 14 Controls 14 Cooling System 14 Drive Line 14 Engines 14 Intake 15 Exhaust 15 Frame Chassis 15 Fuel System 15 Horn 16 Instruments Gauges 16 Steering 16 Tires 16 Tow Hooks 16 Transmission 16 Wheels 16 Wiring 16 General Specification Body 17 Panels Compartments 17 Emergency Doors 17 Entrance Doors 17 Electrical 17 Fans optional 17 Floor 18 Heater Def...

Страница 6: ... 47 Driver s Seat Standard 48 Driver Lap Shoulder Belt 48 Driver s Seat Air 50 Driver Lap Shoulder Belt 50 Interior Compartments 52 Passenger Seats 54 Passenger Area Heaters 55 Passenger Windows 56 Emergency Exits 57 Rear Emergency Door 57 Vandal Lock 57 Emergency Pushout Windows 58 Emergency Roof Hatch 59 Entrance Door Emergency Release 60 Exterior Compartments 61 Engine Compartment 61 Battery Co...

Страница 7: ...ion Gear Selection 93 Range Inhibit Feature 94 Allison Automatic Transmission Driving Tips 95 Electric Retarder If Equipped 96 Transmission Indicator Lights 97 Exhaust System 98 DPF Regeneration In Blue Bird Buses 99 Aftertreatment Terms 99 Levels of Notification 100 Stationary Regeneration Precautions 103 SCR System in Blue Bird Buses 104 DEF Levels of Priority Notification 105 General Propane Ta...

Страница 8: ...VISION D R I V E R S H A N D B O O K 6 ...

Страница 9: ... of school bus experience applied to the C Type category What kind of innovation For 2008 the Vision receives a handsome new engine hood mounted to a rugged torsion pivot mount Opening and closing the hood is a light as a feather breeze Yet this new engine hood sacrifices none of the Vision s legendary field of view The Driver s area has received multiple improvements for 2011 you are sure to enjo...

Страница 10: ...ol Bus Training The Training staff of Blue Bird Technical Comunications conducts an ongoing program of Field Service Factory Service and Focussed Training classes and seminars to ensure that service technicians of Dealers are always up to date on the latest service information and techniques Some of these training classes are open to the service personnel of customers Blue Bird Parts Sales Blue Bi...

Страница 11: ...involved in individual problems be tween you your dealer or Blue Bird Corporation To contact NHTSA you may call the Vehicle Safety Hotline toll free at 1 888 327 4236 TTY 1 800 424 9153 or go to http www safercar gov or write to Administrator NHTSA 400 Seventh Street SW Washington DC 20590 You can also obtain other information about motor vehicle safety from http www safercar gov Driver Certificat...

Страница 12: ...al action on the part of the Driver Removing particulate matter soot from the exhaust stream through regenera tion alone will not satisfy the more stringent 2010 emission standard This standard requires reduced levels of Nitrogen Oxide NOx To achieve this a Selective Catalytic Reduction system SCR is added downstream to the diesel particulat filter The SCR system uses a chemical reactant in this c...

Страница 13: ...tain compliance of the modified vehicle with any and all applicable regulations The en tity performing modification of this product must certify that all applicable regula tions are met In order to certify a modified vehicle the upfitter or other entity per forming the modification must be a licensed vehicle manufacturer or must objtain the services of a licensed vehicle manufacturer for that purp...

Страница 14: ...acquaint the bus Driver with the Blue Bird bus model it describes It is recommended that after being thoroughly read by the Driver it be stored in the bus Although not a service manual it contains general information that may be of value in situations of roadside hazard assistance such as the location of jacking points or the location of fuses Scheduled Maintenance tables are included as a conveni...

Страница 15: ...ed radius leaf permits axle adjustment for dog track ing Batteries Three Group 31 batteries with 3375 CCA 0 F 4 0 gauge battery cables Heavy duty slide out battery compartment tray Braking System Service Brakes Air Optional Meritor air powered cam operated 4 front 7 rear internal expanding single leading shoe drum brakes Meritor automatic slack adjust ers 4 channel Bendix ABS 3 tank air system wit...

Страница 16: ...dem at vehicle front A 24 dia nylon cooling fan with nine blades equipped with an electrically operated viscous fan clutch driven by polyvee fan belt with spring loaded tensioner Fan controlled by Engine ECM Transynd TS295 SyntheticTransmission fluid cooled by heat exchanger in lower radiator tank Premium rubber coolant hoses with constant torque clamps Drive Line Spicer SPL series 70 shafts with ...

Страница 17: ... affected by using biodiesel Intake High volume canister type air cleaner with replaceable pleated fiber cartridge Charge Air intake circuit by exhaust driven turbocharger Charge Air cooler mounted in front of engine coolant radiator Intake restriction indicator Exhaust 4 O D 16 Gauge aluminized steel tubing from engine turbo charge to in line diesel particulate filter and selective catalytic redu...

Страница 18: ...dout for volts amps transmission temperature and applied air pressure air brakes Interactive LCD display also provides system alerts such as regen needed low DEF fluid levels voltage error water in fuel engine warning J1939 communi cation failure stop engine turn signal on and also displays service diagnostic fea tures Steering Full power Ross THP 60 integral unit with 20 4 to 1 ratio with TRW Pow...

Страница 19: ...f so equipped Emergency Doors Rear center door with 37 7 wide x 52 5 high opening Single point bar lock latch with inside handle and guard 6 chrome plated recessed exterior handle Upper and lower clear tempered 5 black upholstered header pad Buzzers Two buzzers one located in the Driver s area and one near the rear emer gency door sound when any emergency exit is engaged Entrance Doors Standard Bl...

Страница 20: ...front and rear caps Yellow reflective back ground optional Vinyl lettering on top of emergency windows and rear emergency door on both interior and exterior of vehicle according to federal regulations Opera tion instructions decal on all emergency exits French decals options available Lights Backing Two 5 clear incandescent right and left rear Clearance Two amber front and two amber rear single Sw...

Страница 21: ...are located so as to be visible through the wiped area of the windshield Left rearview mirrors are located so as to be viewed through the Driver s window Both right and left rearview mirrors feature a breakaway indexed pivot and are adjustable without tools Interior Rearview 6 x 30 with 3 16 clear safety glass laminated to steel backing plate 1 3 4 radius rounded corners Perimiter of mirror edged ...

Страница 22: ...or A removable 18 gauge steel front upper inner panel is provided to allow access to the front roof cap area A removable 20 gauge steel rear upper inner panel is provided to allow access to the rear roof cap area Removable composite wire moldings right and left are provided to allow access to body wiring harnesses Wire moldings are provided in sections Textured aluminized fully hemmed steel inside...

Страница 23: ...zed triangular roadside warning devices enclosed in a plastic storage container secured to the floor near Driver 5 lb fire estinguisher in entrance door area Two roof escape hatches mounted above aisle Seats Driver s Seat National NS2000 pedestal standard or air adjustable optional Seat belt is three point floor mounted anti cinch emergency locking retractor Passenger Seats All Passenger seats and...

Страница 24: ... sash laminated green tinted safety glass Side Spectal 12 split sash with clear standard or tinted optional tempered glass Four vertically hinged push out windows Rear Vision Fixed clear tempered Windshield The windshield consists of four separate pieces of flat shaded safety plate glass Black grip handles and fold up step on right and left cowls to facillitate windshield clean ing Windshield Wipe...

Страница 25: ... 50 Tire Size 10R22 5 LRG G149RSA Goodyear GVWR Up to 31 000 lbs Front Overhang 36 5 including bumper FCA Front Cowl to Axle 25 CB Cowl to Bumper 64 5 CH Cowl Height 33 A 21 17 B 26 75 C 9 5 D 41 97 E 18 Dimensions Payload Weight standard equipment wheelbase body model capacity payload curb weight total weight overall length rear overhang turn radius rca cf 189 BBCV2311 48 5910 15 100 21 010 351 1...

Страница 26: ...VISION D R I V E R S H A N D B O O K 24 ...

Страница 27: ...ea of the first aid kit However each state has specific requirements for the location and labeling of this equipment Know your state s requirements and maintain the kit accordingly Fire Extinguisher The fire extinguisher on most Vision buses is located near the floor forward of the entrance door stepwell or mounted to the floor near the Driver s seat States require ments vary for the type and size...

Страница 28: ... inventoried every 30 days or as required by your state and local regulations The mounting fasteners should be checked monthly to ensure security Fire Axe and Crowbar If the bus is equipped with fire axe and or crowbar options on most Vision buses they are typically mounted on the floor behind the Driver s seat and left side seat barrier The location may differ according to state specs The Fire ax...

Страница 29: ...endent upon specific state specifications For example some states require additional switches for red and amber Warning Light pilots Shown are the standard and most common configurations If your bus differs from the diagarms shown check with your local specifications and familiarize your self with each switch function An all new tilt telescope steering column provides improved adjustability range ...

Страница 30: ...contains three switch panel banks The exact arrange ment of switches in all switch panels is somewhat dependent upon specific state specifications For example some states require additional switches for red and am berWarning Light pilots Shown are the standard and most common configurations If your bus differs from the diagarms shown check with your local specifications and familiarize yourself wi...

Страница 31: ... Radio Switch Panel The radio console switch panel located to the left of the driver and shown below includes a Panasonic AM FM stereo cassette or CD player with PA system depend ing on option ordered The panel contains switches for standard and optional equip ment and will be equipped only with switches for options that are included on your bus and therefore may differ from the panel shown here T...

Страница 32: ...ion heaters in the passenger area a switch is provided to toggle these heaters on and off This switch operates an electric valve which controls the flow of engine heated water Upper Left Switch Panel The upper left switch panel located directly below the driver s window and shown below includes switches that control the heater systems installed on your bus The panel contains switches for standard ...

Страница 33: ... the vehicle Heater Fan This knob adjusts the speed of the fan which circulates the air in the system In the counter clockwise position the blower is off By turning clockwise 3 speeds can be achieved low medium and high Defrost Bus This knob adjusts the air flow balance between the vehicle passenger compartment and the windshield By turning knob clockwise a damper is moved and air is diverted towa...

Страница 34: ... Dome Lights Right Side Dome Lights Driver s Dome Light Turns on off the over head light in the Driver area Door Switch Press and hold the top of this mo mentary rocker switch to open the entrance door The door stops automati cally when it reaches the end of its travel Press and hold the bottom of the switch to close the door Warning Light Start Switch with orange bezel A momentary switch which in...

Страница 35: ...Controls the roof mounted strobe light Mirror Defrost Activates defrosting system for exterior rearview mirrors Step De Ice Activates de icing system for entrance door steps Noise Suppression Includes yellow bezel Momentary or on off When pressed and held certain noisy devices such as auxilliary fans heater blowers and radio are momentarily turned off to enable the Driver to bet ter hear ambient s...

Страница 36: ...ow engine speed during deceleration Tire Chains Drops tire chains into position for icy conditions Diagnostic Switch Provides diagnostic func tions for the IO Control Multiplex system and the ABS system For use by qualified personnel for diagnostic purposes only Warning Light Indica tors Red and yellow Electctric Entrance Door Switch with blue bezel Press and hold the top of this momentary rocker ...

Страница 37: ...iving conditions which cause a high battery drain such as very frequent stop go while multiple acces sories are on This function is also useful when the bus is parked and left running for long periods of time or when elec trical system demands are high such as running the AC or operating a wheel chair lift Place the transmission in Neu tral and set the Parking Brake before switching the engine to ...

Страница 38: ...plays additional information to the vehicle op erator See Message Display Center 4 Fuel Gauge Indicates fuel level in tank Fuel gauge bank includes illuminat ed Low Fuel Indicator and Low Fuel Pressure Indicator 5 Coolant Temperature Gauge Indicates engine coolant temperature and in cludes an engine coolant temperature warning indicator 6 Oil Pressure Gauge Indicates engine oil pressure and includ...

Страница 39: ...lay control panel on the lower right side of the tachometer Quad 1 Displays the Odometer Trip 1 Odometer andTrip 2 Odometer The odometer registers the mileage on the vehicle and the trip odometers may be set to register mileage from destination to destination On the message display control panel press and release the bottom button to toggle between odometer and trip odometer set tings Press the to...

Страница 40: ...lect 12 or 24 hour clock setting Warning Bank Indicators Two arrangements of LED illuminated warning lights provide feedback to the Driver about various systems These are located to the right and left sides of the instrument panel indicator definitions are shown on the following page An audible sound speaker is incorporated into the back of the instrument cluster and sounds to accompany the indica...

Страница 41: ...icates front brake air pressure outside of normal operat ing range Brake Air Rear Indicates rear brake air pressure outside of normal operat ing range Low Fuel Indicates fuel level at 12 percent of max imum capacity Low Fuel Pressure Indi cates low fuel pressure on compressed natural gas vehicles High Coolant Temp Indi cates coolant temperature out of normal operating range Seat Belt Indicates dri...

Страница 42: ...and the headlight switch is in the ON position In either case the new setting will be stored in memory When the bus is stationary and the park brake is set dimming the instrument cluster is achieved through a menu in the drivers display in the cluster Set the park brake then press and hold the bottom button on the face of the instrument cluster for approximately 5 seconds This will display the Set...

Страница 43: ... previous screen automatically Backlight Color Adjustment The backlight color can be adjusted to illuminate in any of five different colors Red Green Blue Lt Blue White To change the backlight color set the park brake then press and hold the bottom button on the face of the instrument cluster for approxi mately 5 seconds This will display the Settings and Diagnostics screen Press either the top or...

Страница 44: ...nd in ths manual For additional information on optional air conditioning see your Comfort Aire publication supplied with your air conditioned bus ComfortAireManualControls TemperatureControls UpperKnobs Off Low MediumandHigh FanControls LowerKnobs Off Low MediumandHigh ComfortAireElectronicControls FrontFanControl Off Low MediumandHigh RearFanControl Off Low MediumandHigh DisplaySettingsControl Sy...

Страница 45: ...Panel The filters in the heater system must be maintained and changed on a regular basis to maintain the airflow across the heater cores The main heater filter is located be hind a small panel at the driver s left This panel is held in place by luggage type over the center clasps To remove the filter pull upward and outward To replace the filter press it firmly into position and replace the cover ...

Страница 46: ...me lever at the base of the stalk Cancel the flasher by using a turn signal or pressing the hazard lever in Right Switch Stalk The right stalk contains the cruise controls Cruise Control The Cruise Control is provided to to improve fuel economy and lessen driver fatigue during long periods of uniform speed travel To operate the Cruise Control 1 Attain the desired speed in the normal manner with th...

Страница 47: ... RightSwitchStalk CruiseControlSet Resume Accelerate On Off LeftSwitchStalk TurnSignals High LowBeam Wipe Wash IntermittentWindshieldWipe Wash TurnforWipe Pressforwash HazardFlasherControl Tilt TelescopicRelease SteeringColumnPositioning ...

Страница 48: ...rking brake The parking brake knob is an air valve which when pulled outward releases air pressure from the rear wheel chambers This allows the springs to apply the rear brakes Pushing the parking brake knob inward allows air brake system air pressure to retract cage the coil springs If air pressure is insufficient for safe normal air brakes operation the air pressure is also insufficient to disen...

Страница 49: ...ed parking brake to the right of the driver s seat mounted on the floor To apply the parking brake grasp the grip handle of the lever and pull firmly upward When properly adjusted a detent resistance is felt at the end of the lever s travel The lever is designed to require 90 100 pounds of pressure to fully apply the parking brake Always apply the brake fully pulling it upward to the full extent o...

Страница 50: ...he seat track allowing the seat to be adjusted fore or aft While seated pull the lever toward the left Slide the seat fore or aft to the desired position and release the lever Slide the seat slightly to ensure the lever latches into one of its locking notches Seat Bottom length Under the front edge of the seat bottom directly above the slide release lever is a handle which allows the seat bottom t...

Страница 51: ...49 d r i v e r o r i e n t a t i o n StandardDriverSeat HeightAdjustment LumbarAdjustment BackTiltAdjustment Fore AftSlideRelease RearPosition FrontPosition FlippedOpen ...

Страница 52: ...ver latches into one of its locking notches Seat Bottom length Under the front edge of the seat bottom directly above the slide release lever is a handle which allows the seat bottom to be pivoted forward effectively lengthening the seat bottom for Drivers with longer legs To move the seat base to the forward position stand beside the seat Grasp the front handle with your right hand and the side o...

Страница 53: ...51 d r i v e r o r i e n t a t i o n AirRideDriverSeat Lumbar HeightAdjustments BackTiltAdjustment Fore AftSlideRelease ...

Страница 54: ...ction used by service technicians The PDU contains most of the fuses used in theVision A chart on the inside of the cover identifies the individual fuses The PDU cover is easily removable without tools secured by two thumbscrews one on each side of the cover near the top Entrance Door Header A removable panel above the entrance door provides ser vice access to the door opening closing mechanism wh...

Страница 55: ...53 d r i v e r o r i e n t a t i o n ElectricEntranceDoorHeader PowerDistributionUnit WiringChannels LeftConsoleDriverCompartment RightGloveBox OverheadStorage ...

Страница 56: ... The Vision s passenger seats are through bolted to the floor of the passenger compartment WARNING School bus seat spacing is strictly regulated The seat dimen sions and spacing are engineered to provide compartmentalization of the passengers according to stringent safety requirements and testing Do not alter the pasenger seat spacing or configuration ...

Страница 57: ...dividual heater units mounted to the underside of strategically located seats in the passenger area Engine heated water reaches these heating assemblies via tubes running in the body at the floor Each underseat heater unit has its own electrically driven circulation fan The fans are controlled by 3 position High Off Low rocker switches mounted in the upper panel of the Driver s side console Heater...

Страница 58: ...in one of the intermediate positions the sash can be pushed upward to close without first retract ing the latches However the notches of the fully opened positions are designed to latch more securely To close a window that is fully open slide the latches inward and then slide the sash The windows are designed for maintenance free operation However a light sili cone spray lube may be applied to the...

Страница 59: ...creen also identifies the open exit s WARNING All Emergency Exits should be inspected and tested daily The labels and decals should be considered part of this inspection and should be maintained in a clearly legible condition Rear Emergency Door The rear emergency door is opened by lifting the long horizontal handle all the way upward and pushing the door outward The door is equipped with a hold o...

Страница 60: ...cal hinging pushout windows are hinged at the front side and swing outward like a gate Horizontally hinged pushout windows are hinged at the top and push outward and upward To open the pushout window rotate the red handle parallel to the glass and away from the window frame as indicated by the nearby decal Then push the win dow outward The emergency windows should be operated daily as part of the ...

Страница 61: ...edknob Rotatetheredknobfromthepositionmarked LATCHED tothe positionmarked TOEXIT Pushsharplyupwardontheredknob Pushthehatchallthewayopen Pushthewhitebarupwardwiththeheelofyourhand snappingitin itsupwardposition Pullthehatchdownward engagingitsopeningsidewiththewhite bar Graspthetwohandholdsonthesidesofthehatchandpullfirmly downward Turntheredknobtothepositonlabled LATCHED ToOpen ToClose ...

Страница 62: ...o disengage the drive gear mechanism so that the door can be manually pushed open or shut This serves a dual purpose To allow the driver to close the door after parking and leaving the vehicle and to serve as a quick door release in the case of emergency To release the door push the lever upward to rotate it 90 counterclockwise The door can then be pushed open or closed manually To re engage the d...

Страница 63: ...ertical A spring cushioned cable on the engine compart ment side stops the hood at its open position A latch strut on the right side of the hood trips to prevent the hood from accidently falling shut after being opened fully To close the engine hood 1 Standing just forward of the right front tire grasp the engine hood overhead with the right hand With the left hand rotate the release cam of the ho...

Страница 64: ...chassis frame rails in the rear over hang portion of the vehicle The fuel filler door is located on the right side of the vehicle body rearward of the rear axle Read and abide by the warnings on the decal on the inside of the filler door WARNING Remove the fuel cap slowly Observe fueling instructions that are printed on the inside of the fuel access door to avoid fire and or explosion that could r...

Страница 65: ... once every 3 months Wash the vehicle in lukewarm or cold water Use a lamb s wool or paint safe microfiber washing mitt to prevent scratching the surface Do not use hot water or wash in the direct rays of the sun Do not use strong soap or chemical detergents Only cleaners with an HMIS rating of 1 0 0 0 or less should be used to clean the buses This HMIS rating is available on all product MSDS To w...

Страница 66: ...ct sunlight or if the paint is hot to the touch The sun can soften the paint and make it more susceptible to scratching Use a lamb s wool mitt for washing and soft cotton rags or microfiber towels for waxing Do not use rags for waxing they can trap dirt and scratch the fin ish Synthetic fabrics and brushes can also scratch the finish Wash and wax in small sections This saves time and if the wax st...

Страница 67: ...roducts should be removed from the surface as soon as possible Continuous care must be exercised in the stepwell area where foreign objects can create a safety hazard The accumulation of dirt and foreign material in the stepwell area creates a hazard for passengers and could prevent the doors from operating properly Ensure that screws for floor trims and aisle trims are seated tightly Hinges Windo...

Страница 68: ...oward the right side It contains the serial numbers of the bus chassis and several major chassis components These numbers are important references when ordering parts or seeking bus specific service information from your Blue Bird distributor Body Serial Number and Service Number Plate Also located above the windshield on the front upper panel This plate contains the Body Number and several specif...

Страница 69: ...SERVICE NO FORT VALLEY GEORGIA BODY NO MODEL YEAR MFG BODY DATE STATE PROVINCE EQUIPPED CAPACITY SPECIFICATION YEAR MAX DESIGN CAPACITY BLUE BIRD FORTVALLEY Data Plates Reference The illustrations below replicate the data fields on the Chassis and Body data plates To create a convenient reference fill in the data from the plates of the bus in which this manual is stored This information is essenti...

Страница 70: ...VISION D R I V E R S H A N D B O O K 68 ...

Страница 71: ...ip exterior walkaround inspection involves visual inspection of tires and areas under the bus Do not perform an exterior walk around inspection unless it is certain that the bus is prevented from movement Before performing the exterior inspection enter the bus and make sure the transmission is in neutral and that the parking brake is fully on Exterior Walkaround 1 Approach bus from the front to be...

Страница 72: ... not take the wheel or rim capacities into consideration Tires should not be inflated above the pressure listed on the Federal Certification plate without consulting your tire wheel distributor 2 2 Check the Stop Arm for any signs of physical damage 2 3 Open the battery compartment door and inspect the batteries Check for corrosion on the battery terminals and for loose connec tions Close the comp...

Страница 73: ...ts or signs of axle lubricant leakage 4 3 Look under the bus behind the rear tires and view along the back of the axle all the way across to the opposite side Be watchful for any signs of oil leakage on the rear side of the axle missing bent misaligned or broken axle suspension fasteners Look on the ground for any signs of leaking fuel broken glass or other debris 5 Proceed around to the rear of t...

Страница 74: ... and across to the other side of the axle Visually inspect for any missing suspension bolts signs of cracks misalignment or other physical damage on the opposite side View the shock absorber for signs of oil seepage 6 5 Step back for an overall view of the right side Check that all markings are legible and in good condition including emergency exit signs and reflective tapes Check for broken windo...

Страница 75: ...spect the inner side of the wheel If equipped with hydrau lic brakes inspect the calipers for any sign of brake fluid leakage In spect the front axle and suspension for missing bent misaligned or broken fasteners Inspect the shocks for signs of oil leakage 8 2 Visually inspect the steering gear mechanism Look for signs of fluid leakage 8 3 Check the engine oil level 8 4 Check the brake fluid level...

Страница 76: ...ant reservoir fluid level 9 5 Check the washer reservoir fluid level 9 6 Inspect the engine fan alternator belt for tightness and any signs of excessive wear or damage 9 7 Inspect both sides of the radiator for debris and signs of damage 10 Turn the cam lever of the engine hood hold open strut Close and latch the right side hood latch 10 1 Reach up and inspect the condition of the right windshield...

Страница 77: ...ncy exit may cause audible alerts Audible alerts may also be heard if the Message Display Center has recorded error codes 11 2 Note the condition of the battery charge as indicated by the instru ment panel voltmeter Fully charged batteries are necessary to com plete the pre trip inspection 11 3 Turn on the interior dome lights Walk toward the rear of the bus correcting any conditions such as unlat...

Страница 78: ...eration of all running lights marker and clearance lights and warning lights on the front of the bus 12 3 Note operation of all side marker and clearance lights on the left side of the bus 12 4 Note operation of all side marker and clearance lights on the right side of the bus 12 4 Note operation of all running lights marker and clearance lights and warning lights on the rear of the bus ...

Страница 79: ...atch fully open it ensuring proper operation and that the audible alert sounds Close it securely ensur ing that the audible alert stops 14 4 Similarly open and close the two rear emergency exit windows en suring proper operation and that the audible alert sounds when un latched and stops when fully closed and latched 14 5 Proceed forward checking condition of each seat window and floor area betwee...

Страница 80: ...or Driveaway 16 Return to the Driver s seat 16 1 Adjust the seat height back and position 16 2 Press the steering column release pedal and adjust the steering wheel position 16 3 Check the alignment and positioning of all rearview mirrors interior and exterior for optimum view Adjust as necessary ü Fireestinguishercharged securelystowed ü Firstaid bodyfluidkit s stocked securelystowed ü Axe crowba...

Страница 81: ... mirrors are mounted near the bottom left hand corner of the windshield Two hood mounted crossview mirrors provide view in front of the bus and along each side The hardware for the fender mounts must be maintained at 20 25 Ft lb torque to minimize vibration CAUTION Do not over torque the mirror mounting hardware The outside rearview mirrors are designed to allow the seated driver a comprehen sive ...

Страница 82: ...of FMVSS 111 The driver must be able to see the entire test cylinder in each location The driver must be able to see the entire top surface of cylin ders M and N The driver must have a view of at least 200 feet from the surface of the mirror The elliptical cross view mirrors should be adjusted so the seated driver has a complete view of all cylinders A through P when they are positioned as shown i...

Страница 83: ...tedinawidevarietyofconditionsrangingfromSouthwestern desert roads to tight inner city alleyways Refer to the dimensions chart in the Gen eral Specifications chapter to understand some of the considerations imposed by the physical size and geometry of the bus which may come into play in your school route environment The proportionally long wheelbase means that the height of rises and humps which th...

Страница 84: ...erate the bus in a well ventilated area If the engine must be operated in an enclosed area vent the exhaust to the outside Perform the required daily under the hood inspection and maintenance Also per form any other periodic maintenance prior to starting the engine This routine can help avoid costly major repairs later Starting the Engine WARNING Never use ether as an aid in trying to start the en...

Страница 85: ...n Once a normal engine oil pressure and air pressure are established the vehicle may be operated at a light load and speed 6 After the engine has started the air inlet heater may continue to run in a continuous mode or intermittently The air inlet heater will automatically turn off when the sum of the engine coolant temperature and the air inlet temperature exceeds 127º F 35º C 7 If the engine is ...

Страница 86: ...ty the coolant system must be completely drained flushed and properly refilled with approved coolant before being returned to routine service Any enroute event requiring topping off of the coolant should be reported to service personnel responsible for maintenance of the bus WARNING Exercise extreme care when removing the cap from the engine coolant reservoir Always allow time for the engine to co...

Страница 87: ...ird recommends strictly abiding by the engine manufacturer s testing and maintenance schedules and draining flushing refilling procedures to maintain com pliance with the engine warranty requirements Blue Bird also recommends that you maintain accurate vehicle specific service records of all coolant system maintenance procedures performed The cost of the testing is the owner s responsibility as pa...

Страница 88: ...onal coolant filter The coolant filter should be replaced every 6 months or 6 000 miles whichever occurs first The coolant filter element installed at the Blue Bird fac tory is compatible with all of the above described coolants Blue Bird Number 00064641 Shutters The optional radiator shutters assist in maintaining a constant engine temperature by limiting the air flow through the radiator The shu...

Страница 89: ...o not continue to operate the bus with the loss of either the front or the rear portion of the system Stop the vehicle and obtain profes sional assistance immediately The hydraulic brake system includes an auxiliary electric pump which serves as a backup for the hydraulic pressure supplied by the power steering pump With the engine not running and the key switch in the ON position the electric pum...

Страница 90: ...grasp the parking brake release lever with the left hand and pull until the Park Brake is fully released The parking brake should hold the fully loaded bus on a 20 incline on a dry paved surface If the incline is wet or covered with ice or snow do not park on it The brake will hold but the tires may not CAUTION Always release the parking brake fully Leaving it in a partially released position can ...

Страница 91: ... backflush behavior of the air dryer Parking Brakes With Air Brakes On Blue Bird Vision buses equipped with air brakes the parking brake function is provided not by the air pressure but by coil springs incorporated within the rear wheel brake actuation chambers When the parking brake valve on the dash is pulled outward air pressure is vented from the rear brake actuators allowing the springs to en...

Страница 92: ...wing the park brake to take on the load of holding the bus 6 If parked in any unusual situation such as a severe incline chock the wheels and take any other precautionary measures necessary to ensure the bus doesn t move If this procedure is not followed the bus could move unexpectedly and cause serious injury or death and or property damage CAUTION Do not allow the bus to coast in neutral This pr...

Страница 93: ...y Use D drive for all normal driving conditions The service brake must be applied before the transmission will shift from neutral to drive or reverse If an attempt is made to shift the transmission into drive or reverse without applying the service brake it will remain in neutral an audible alarm will sound and the Range In hibit light on the instrument panel will come on If this occurs apply the ...

Страница 94: ...retard and braking assistance is not available when the transmission is in neutral It may not be possible to get the transmission back into gear while the bus is moving D Drive When D is selected the vehicle will begin to move in first gear and the transmission will upshift automatically through each gear as speed increases As the vehicle slows down the transmission will downshift automatically CA...

Страница 95: ...g range as indicated on the monitor display In DRIVE selection of a specific gear can be accomplished by pressing the UP or DOWN arrow buttons Conditions resulting in the CHECK TRANSMISSION light located in the instrument cluster will disable the pad and no tones will sound see Check Transmission Light The MODE button located on the push button shift selector activates an alter nate shift schedule...

Страница 96: ...rovides the vehicle maximum power and maximum engine braking power The transmission incorporates a hold feature to prohibit upshifting beyond the gear selected during normal driving For downhill operation however the transmis sion may upshift beyond the selected gear when the engine s governed speed is ex ceeded and damage to the engine is possible Range Inhibit Feature The transmission communicat...

Страница 97: ...een 24 F and 20 F 31 C to 7 C the transmission will operate in 1st 2nd or Reverse only If there is no other problem with the transmission the Check Transmission light will not be illuminated For transmission fluid tempera tures above 20 F 7 C the transmission shifts and operates normally Read the cold weather operation instructions in the Allison Transmission Operator s Manual sup plied with the b...

Страница 98: ... will reduce braking and could cause a loss of control Apply the vehicle brakes or other retarding device to prevent exceeding engine governed speed in the lower range selected Electric Retarder If Equipped The electric retarder control switch is mounted on the vertical panel left of the driver It has five positions one off and four retard positions Each high er number increases the amount of reta...

Страница 99: ...e engine coolant temperature gauge stop the vehicle and check the cooling system If the cooling system appears to be functioning properly shift to neutral and accelerate the engine to 1 200 1 500 rpm This will reduce the transmission temperature to operating level within two or three minutes If high temperature persists stop the engine and have the overheating con dition investigated by service pe...

Страница 100: ...l fuel type of engine oil and ambient temperature engine load and other factors Regeneration occurs in three ways Some regeneration occurs naturally whenever operating conditions speed engine load etc result in exhaust system temperatures high enough to oxi dize accumulated soot This unassisted regeneration process can generically be referred to as passive regeneration Regeneration can be caused b...

Страница 101: ...t their early stages as a matter of routine Aftertreatment Terms The following summarizes some of the terms associated with the exhaust systems of Blue Bird buses equipped with 2010 emission standards compliant engines Both the driver and technician should become familiar with the following terms Aftertreatment The process of highly filtering engine exhaust in order to reduce emissions and of purg...

Страница 102: ...e opportunity for the regeneration system to keep the DPF clear soot be gins to accumulate A system of driver alerts keeps the driver informed of when the exhaust system is in need of regeneration and of high exhaust temperature associ ated with regeneration Several levels of regeneration alerts occur in sequence each indicating a more imperative warning High Exhaust Temperature Notification The H...

Страница 103: ...e bus route and return to the bus maintenance shop before the higher level of notification occurs Exactly how much warning time the first appearance of the DPF indicator represents is depen dant upon specific operating conditions However current data from Cummins sug gest that at this level of notification the DPF needs to undergo regeneration within the next two to six hours of bus operation If r...

Страница 104: ... erated without taking the measures indicated by a Level 3 Notification particulate accumulation reaches a critical level Engine power is automatically further de rated by the ECM These indicators are activated The DPF Regeneration alert deactivates The audible alert sounds continuously The engine is further de rated The Check Engine alert deactivates The red Stop Engine alert appears The above in...

Страница 105: ...at all possible the Stationary Regeneration procedure should be conducted at a service facility by trained technicians The Driver s first priority is the safety of the passengers If a Stationary Regen eration must unavoidably be done by the Driver under a qualified technician s direction alternate transportation should be arranged first or passengers should be removed under proper supervision to a...

Страница 106: ...tive Catalytic Reduction SCR system uses diesel exhaust fluid DEF as a chemical reactant The DEF converts to ammonia in the exhaust stream This ammo nia reacts with NOx over a catalyst to form harnless nitrogen gas and water In an SCR system the rate at which DEF is sprayed must be tightly controlled If the rate is too high not all of the ammonia will react with the NOx and some ammo nia will slip...

Страница 107: ...before refilling Refer to Blue Bird and Cummins Service Manuals for detailed description of the aftertreatment system DEF Levels of Priority Notification A system of driver alerts keeps the driver informed of when the DEF is in need of service When fluid is low or contaminated several levels of alerts occur in sequence each indicating a more imperative warning When priority warnings occur they wil...

Страница 108: ...ues to flash from positive to negative DEF FLUIDITYPE The amber icon and an additional amber icon will appear in the lower left warning bank At this point a 25 engine torque derating will occur DEF system service should be attained within 10 hours or subsequent levels of derating will occur DEF Type Level 3 After 10 Hours at level 2 a DEF SPEED LIMIT warning will appear in Quad 1 of the Message Di...

Страница 109: ...d capacity of 80 This automatic stop fill system provides the primary method of preventing overfill of the fuel tanks This rule has been in effect since January 1 1984 As a secondary means of preventing an overfill condition of the fuel tanks and a means of verifying the accuracy of the automatic stop fill device the tanks are equipped with an 80 fixed maximum liquid level outage valve Manual blee...

Страница 110: ... 3 Exit the vehicle and ask all passengers to step outside the vehicle 3 1 Some stations may ask all passengers to stand outside the area where the fill process is taking place 3 2 Some stations could be self service and the driver would perform the filling process however in this case the driver has to be trained and cer tified to obtain an authorized filling station dispenser access card 4 The a...

Страница 111: ...the propane dispenser pump and begin the filling process 7 1 Open the nozzle to begin filling 7 2 Do not fill the tank based on a mechanical float gauge reading or the fuel level gauge on the dashboard 7 3 Pay attention and never walk away from the filling process 7 4 As a primary method of determining when the tanks are full 80 ca pacity an 80 stop fill device will automatically stop the filling ...

Страница 112: ... before removing the nozzle com pletely Some nozzles will be equipped with a small bleeder valve to release this trapped pressure before disconnecting the nozzle 9 Replace the nozzle and fuel transfer hose on the dispenser 10 Verify there are no leaks at the tank filling receptacle and replace the protec tive cap 11 Document the amount of fuel received 12 The fueling process is complete WARNING Du...

Страница 113: ... qualified service tech nicians in the event of any mechanical failure The information in this section is only to provide some information which may be helpful to service technicians rendering assistance Using Triangular Hazard Reflectors In the event that the bus must be parked in an emergency lane or road shoulder deploy the triangular roadside hazard reflectors as follows On a two lane roadway ...

Страница 114: ...ACK jumper cable connect one end to the NEG terminal of the jumper battery 4 Connect the other end of the BLACK jumper cable to a solid chassis ground on the bus such as the engine Do not connect the black jumper cable to the NEG terminal of the bus battery CAUTION Do not crank the engine for more than 30 seconds Allow the cranking motor to cool at least 2 minutes between attempts to start the eng...

Страница 115: ...llowing items may cause an occasional starting problem The Park Brake must be on to start the bus The Transmission must be in Neutral If the bus is equipped withVandal Locks the bus will not start unless the doors or windows equipped with Vandal Locks are closed Low battery charge A malfunctioning starter Problems with the wiring harness or connections Out of fuel ...

Страница 116: ...Following the jack manufacturer s recommendations place the jack securely under the axle at the spring or suspen sion beam nearest the tire wheel to be repaired 4 Jack the bus only to the height necessary to service 5 Support the bus with blocks or jack stands under the frame rails Towing If the bus is towed with the rear wheels on the road the driveshaft must be prevent ed from turning in order t...

Страница 117: ...be mechanically caged before the vehicle can be towed Proceed as follows WARNING Caging the spring brakes disables the parking brake Ensure that the bus is completely secured against rolling by wheel chocks before cag ing the spring brakes 6 1 On each of the rear combination brake chambers a special release stud tool is carried in a storage socket cast into the body of the cham ber Remove the nut ...

Страница 118: ...and secondary front brake res ervoir air tanks are mounted under the bus inboard of the chassis frame rails The supply tank is mounted toward the front of the bus on the left side The supply tankis fitted with a Schrader valve to allow manual pressurization of the system for service or testing purposes by using a common air hose without having to charge the system by running the engine and compres...

Страница 119: ...at the Drivers Handbook will usually reside with the bus The Driver however is the individual most intimately familiar with the normal sounds behaviors and performance of the vehicle The Driver should be alert to any unusual or changing conditions and bring them to the attention of the service staff A few Notes pages are provided at the back of this handbook for that purpose For more comprehensive...

Страница 120: ...44 Hypoid Gear Oil 33 3 pints 15 2 liters SeeRearAxleViscosityChartforappropriateviscosity Axle Oil RS21 145 33 3 pints 15 2 liters Axle Oil RS23 160 39 5 pints 18 7 liters Front Axle Front Axle Grease Chevron Dura Lith Grease EP NLGI 2 2 1 pounds Front Axle Oil Chevron RPM SyntheticTrans mission Fluid SAE 50 4 pints 1 9 liters Brake System Brake Fluid DOT 3 Fluid BB 0067254 DOT3andDOT5mustnotbemi...

Страница 121: ... Hypoid Gear Oil GL 5 S A E 85W 140 10 F 12 2 C 0 76 B Hypoid Gear Oil GL 5 S A E 80W 140 15 F 26 1 C 0 76 D Hypoid Gear Oil GL 5 S A E 80W 90 15 F 26 1 C 0 76 E Hypoid Gear Oil GL 5 S A E 75W 90 40 F 40 C 0 76 J Hypoid Gear Oil GL 5 S A E 75W 40 F 40 C 35 F 1 6 C 0 76 L Hypoid Gear Oil GL 5 S A E 75W 140 40 F 40 C Noupperlimitonthesetemperatures However axlesumptemperaturemustneverexceed 250 F 12...

Страница 122: ...rator s Manual Use only premixed coolant s approved by the engine manufacturer Never mix different types or brands of coolant Engine Replace Oil Filter See Engine operators manual for oil and filter specifications and maintenance interval Adjust Valves See Engine manufacturer s Service Manual for interval As Specified by Transmission Manufacturer Transmission Adjust Transmission Shift Cable See Tr...

Страница 123: ...First 1000 Miles Then Every 6 Months or 6000 Miles Axle Suspension Front Inspect Tighten SofTek Spring Suspension U Bolts Tighten to 285 305 ft lb Axle Suspension Rear Inspect Comfort Air Suspension Ride Height Shock length eye to eye 22 68 0 25 First 1000 Miles Then Every 6 Months or 12 000 Miles Axle Suspension Rear Inspect Tighten Comfort Air Suspension U Bolts Tighten 7 8 U Bolts to 400 450 ft...

Страница 124: ...mergency exits for proper operation including warning buzzer Warning Devices Signs Test Stop Arms Crossing Arms Windows Inspect All Mirrors Clean adjust mirrors Inspect All Windows Clean Windshield door glass driver s window rear vision windows rear door windows Brakes Inspect Air Brakes Air Lines Fittings Inspect for leaks or physical damage Drain Air Brakes Air Tanks Drain daily in cold weather ...

Страница 125: ...nspect Power Steering Fluid Level Replinish to full mark Dexron III Tires Wheels Inspect All Tires Wheels Check air pressure Visually inspect tires tread wear lug nuts including spare Transmission Inspect Transmission Fluid Level Check production order for proper type of fluid to be added Every Week Seats Inspect Tighten Passenger Seats Cusion Screws Inspect for loose cushions clips Inspect Passen...

Страница 126: ...tem Replace Spark Plugs Every Month Exterior Structure Wash Body Wash the vehicle in lukewarm or cold water Do not use hot water or wash in the direct sunlight Only cleaners with an HMIS rating of 1 0 0 0 or less should be used to clean the buses See Exterior Cleaning section of Driver s Handbook for further information ...

Страница 127: ...first Lubricate Outward Opening Door Pivots Lubricate pivot pins with LPS 1 Adjust Outward Opening Door Roller Bracket Adjust for full and secure closure without binding Lubricate Wheelchair Lift Lube Points See model specific literature provided with lift Emergency Exits Lubricate All Emergency Exits Hinges LPS 1 Lubricate Rear Emergency Door Hinges Lubricate at hinge grease fittings Lubricate Re...

Страница 128: ...lides Use silicone lubricant Brakes Inspect Hydraulic Brakes Fluid DOT 3 brake fluid Electrical Inspect Battery Electrolyte Level Replenish with distilled water Every Month or 5000 Miles Warning Devices Signs Adjust Stop Arm Air Air Pressure Adjust for full deployment and retraction Every Month or 12 000 Miles Axle Suspension Rear Inspect Rear Axle Lubricant Level If low refill to bottom of filler...

Страница 129: ...ection tight fasteners and absense of corrosion Fuel System Inspect Fuel Lines Inspect for leaks or signs of abrasion Inspect Fuel Tank Vent Inspect for obstruction Intake System Inspect Air Cleaner Filter Element Inspect for proper seating secure lid Replace if soiled wet or damaged Inspect Intake Tract All Fasteners Inspect for signs of contaminate infiltration loose clamps wear spots holes in p...

Страница 130: ...Cylinder Inspect for signs of leakage or physical damage Every 6 Months Exterior Structure Wax Body Use of a nonabrasive wax is recommended to remove accumulated residue and eliminate any weathered appearance It is essential that units are not waxed in direct sunlight See Exterior Cleaning section of Driver s Handbook for further information and approved waxes Every 6 Months or 5000 Miles Warning ...

Страница 131: ... or damage Tighten mounting bolts to 215 ft lb Inspect Tighten SofTek Spring Suspension Spring Pin Lock Bolts Tighten to 380 420 ft lb Inspect SofTek Spring Suspension Whole Assembly Visually inspect for damage Axle Suspension Rear Inspect Tighten Comfort Air Suspension Shock Absorbers Inspect for signs of leakage wear or damage Tighten upper shock mounts to 50 70 ft lb Tighten lower shock mounts ...

Страница 132: ... System Inspect Exhaust Pipe Joints Inspect for loose clamps leaks damage Fuel System Replace Fuel Filter Filter Element Clean Fuel Filter Inlet Screen Clean Replace if damaged Steering Lubricate Steering Gear Pitman Arm Pivot NLGI 2 EP multipurpose grease rated GC LB or equivalent Use hand operated grease gun Every 6 Months or 10 000 Miles Engine Test Engine Oil Perform oil sample analysis per Ca...

Страница 133: ...Air Suspension Quick Align Bolts Tighten to 525 575 ft lb Brakes Lubricate Air Brakes Cam Shaft Housing NLGI 2 EP multipurpose grease rated GC LB or equivalent Use hand operated grease gun Lubricate Air Brakes Haldex Slack Adjusters See Haldex lubricant specs in Air Brakes chapter Lubricate Air Brakes Meritor Slack Adjusters See Meritor lubricant specs in Air Brakes chapter Engine Inspect Belt Ten...

Страница 134: ... Comfort Air Suspension Shock Absorbers Inspect for leakage or damage Torque upper mount bolts to 50 70 ft lb Torque lower mount bolts to 160 180 ft lb Inspect Tighten Comfort Air Suspension Torque Arm Bolts Torque to 150 205 ft lb Inspect Tighten Comfort Air Suspension U Bolts Torque 7 8 bolts to 400 450 ft lb Torque 3 4 bolts to 260 320 ft lb Inspect Tighten Rear Axle U Bolts Tighten to 300 350 ...

Страница 135: ... Replace Hydraulic Reservoir Fluid Dextron III Replace more frequently in severe operating conditions Clean reservoir filter screen at each change Replace filter if damaged Transmission Inspect Transmission Vent Clear vent hose of debris or obstruction Every 12 Months or 50 000 Miles Axle Suspension Rear Replace Rear Axle Petroleum Based Lubricant Hypoid Gear Oil Viscosity depends upon operating c...

Страница 136: ...d Injectors Rail bracket securely attached Inspect Fuel Tank Check for rust dents or external impact damage Inspect Fuel Tank Leak check all tank fittings and connections Inspect Fuel Tank Retaining devices Check all tank retaining devices Inspect Injector Hose Check for hose integrity Inspect Tighten Injectors Injectors securely attached to rail bracket Inspect Wire Harness Check under hood routi...

Страница 137: ...135 Notes n o t e s ...

Страница 138: ...VISION D R I V E R S H A N D B O O K 136 Notes ...

Страница 139: ......

Страница 140: ...10013333 2011 BBCV D R I V E R S H A N D B O O K 10013333 BBCV BLUE BIRD VISION 2011 ...

Отзывы:

Похожие инструкции для VISION 2011