Operation
19
Solid State Digital Control
1
2
3
4
5
6
7
8
9
10
11
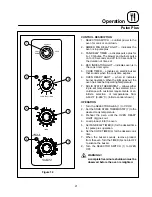
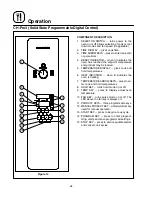
Figure 11
CONTROL DESCRIPTION
1. SELECTOR SWITCH - turns power to the
oven on or off. Allows selection of Cook or
Cool Down Modes.
2. DISPLAY - displays time or temperature and
other information related to oven function.
3. HEAT LAMP - lights when heater is on.
4. PULSE LAMP - lights when Pulsed Fan Mode
is turned on.
5. HOLD LAMP - lights when Hold Mode is
turned on.
6. DIAL - used to enter set points in display
7. START/STOP KEY - starts or stops the timer.
8. TIME KEY - used to show time in the display.
9. TEMP KEY - used to show set temperature in
the display.
NOTE: Actual temperature is shown while the
TEMP key is held down.
10. HOLD KEY - turns Hold Mode on or off.
11. PULSE KEY - turns Pulse Mode on or off.
PROGRAMMING
To set the cook temperature:
1. Press TEMP (9) key.
2. Rotate dial (6) to enter temperature.
To set the cook time:
1. Press TIME (8) key.
2. Rotate the dial (6) to enter time.
NOTE: Time is entered in hours : minutes or
minutes : seconds.
To set the hold time:
1. Press HOLD key (10) to turn hold mode on.
NOTE: HOLD light is on.
2. Rotate dial (6) to enter the hold temperature.
3. Press START/STOP key (7)
To set the pulse time:
1. Press PULSE KEY (11) to turn pulse mode on.
NOTE: Pulse light is on.
2. Rotate DIAL (6) to enter the pulse time. Pulse
time is a portion of the preĆset cook time.

