background image

6

ENGLISH

Radio


mode

Changing


to


radio


mode


or


selecting


a


memory


bank

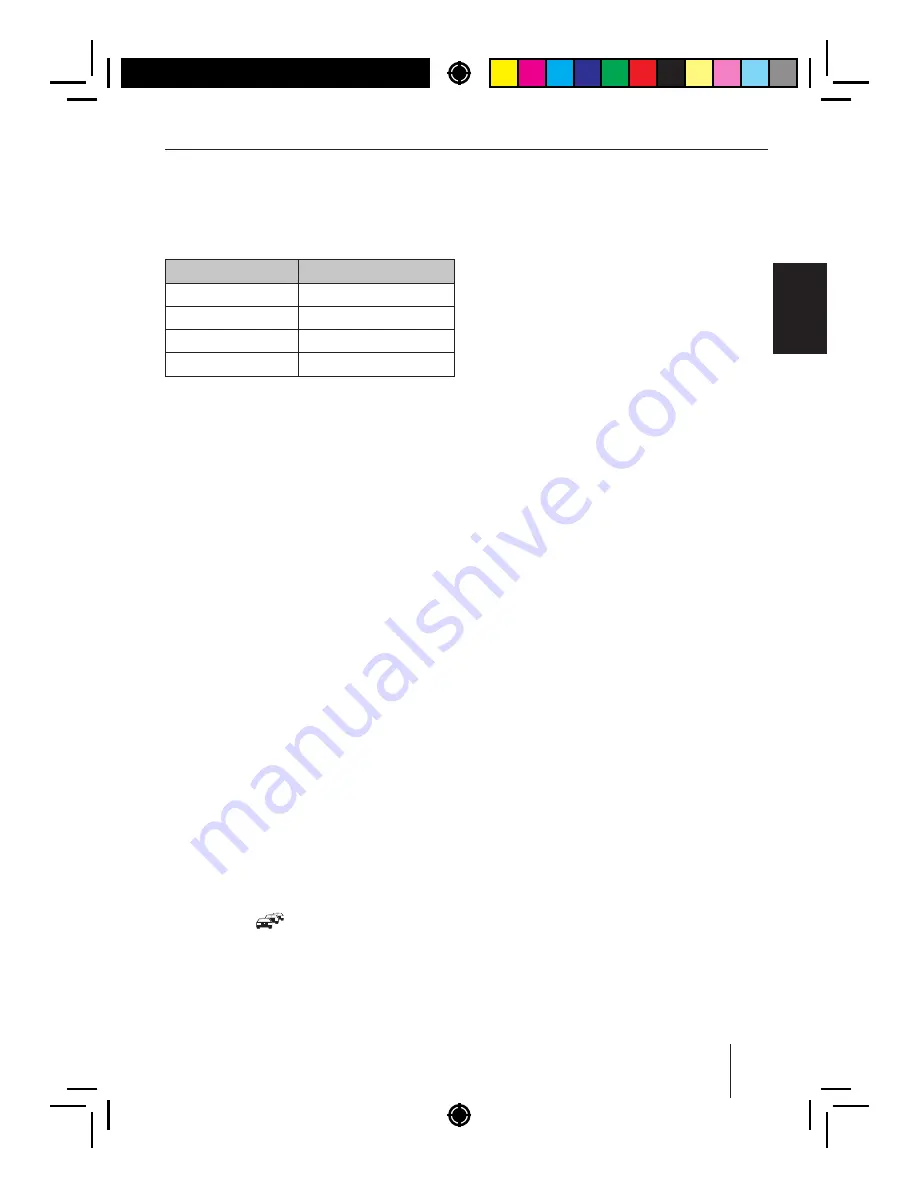
The


following


memory


banks


are


available


in


the


dif erent


reception


areas

:

Region

Memory


banks

EUROPE

FM1

FM2

FMT

MW

LW

USA

FM1

FM2

FMT

AM

AMT

SOUTH


AMERICA

FM1

FM2

FMT

AM

AMT

THAILAND

FM1

FM2

FMT

AM

AMT

  Press


the


SRC

button


16  repeatedly until the 

desired


memory


bank


is


displayed

.

Notes

:

 • Up


to


5


stations


can


be


stored


in


each


memory


bank

.

 • You


can


disable


certain


memory


banks


that


you


do


not


want


to


use

  (

see


chapter


"

User


settings

", 

section

  "

Making


settings


in


the

  "

TUNER

menu

", 

menu


item

  "

BAND


S ELECTION

"). 

Deactivated


memory


banks


are


skipped


during


the


source


selection


with


the


SRC

button 

.

Tuning


into


a


station

There


are


various


ways


of


tuning


into


a


station

:

Notes

:

 • For


the


reception


area

 "

EUROPE

": 

In


the


FM


waveband

only


traf  ic information


stations


are


tuned


into


if


the


priority


for


traf  c infor

-

mation

 (

is


switched


on

 • The


sensitivity


of


seek


tuning


can


be


ad

-

justed

  (

see


the


chapter

  "

User


settings

", 

section

  "

Making


settings


in


the

  "

TUNER

menu

", 

menu


item

 "

SENSITIVITY

").

The


manual


station


tuning


is


automatically


exited


approx

15


seconds


after


the


last


fre

-

quency


change

and


the


station


seek


tuning


is


Storing


stations


or


calling


stored


stations

  Select


the


desired


memory


bank

.

  If


necessary

set


the


desired


station

.

  Press


the


station


button


1

 - 

5


 for approx. 

2


seconds


to


store


the


current


station


under


the


button

.

or

 -

  Brief y


press


the


station


button


1

 - 

5


 to call 

up


the


stored


station

.

Scanning


stations

With


the


scan


function

you


can


scan


either


every


receivable


station


or


every


stored


station


of


the


current


waveband

.

Note

:

You


can


adjust


the


scan


time


for


each


station


(

see


the


chapter

 "

User


settings

", 

section

 "

Mak

-

ing


settings


in


the

  "

VARIOUS

menu

", 

menu


item

 "

SCAN


TIME

").

Scanning


all


receivable


stations


of


the


waveband

  Press


the


MENU

 button 

2

 for approx. 2 sec-

onds


to


start


scanning

.

During


the


scan

the


display


alternately


dis

-

plays

  "

SCAN

and


the


current


frequency


as


well


as


memory


bank


or


station


name

  Brief y


press


the


MENU

  button 

2

  to  con

-

tinue


listening


to


the


station


that


is


currently


being


scanned

.

Starting


station


seek


tuning


  Turn


rotary


control


7

  one  notch  counter-

clockwise


or


clockwise


to


start


station


seek


tuning

.

The


display


briefly  shows

  "

SEARCH


AUTO

". 

The


radio


tunes


into


the


next


receivable


sta

-

tion

.

Tuning


into


stations


manually

  Press


the


rotary


button


7

  once  to  activate 

manual


station


tuning

.

The


display


brief y


shows

 "

SEARCH


MANUAL

".

  Turn


the


rotary


control


7

 to change the fre-

quency


in


increments

.

Note

:

Содержание STOCKHOLM 230 DAB

Страница 1: ...perating instructions Notice d utilisation Istruzioni d uso Bedieningshandleiding Bruksanvisning Instrucciones de manejo Instru es de servi o Betjeningsvejledning K ytt ohje Instrukcja obs ugi Haszn l...

Страница 2: ...iPod mode Track selection fast forward reverse Browse mode in MP3 WMA iPod mode ID3 category iPod only select folder and track 8 button Eject Eject a CD 9 Microphone 10 USB port 11 Front AUX IN socke...

Страница 3: ...icle is standing Always listen at a moderate volumeto pro tect your hearing and to be able to hear acous tic warning signals e g police sirens During mute phases e g when changing the audio source cha...

Страница 4: ...tenna connection adapter Extended scope of delivery 1 Handheld remote control incl battery 1 Connecting cable chamber A 1 Connecting cable chamber B Optional equipment not part of the scope of deliver...

Страница 5: ...eption area in the user menu see the chapter User settings section Making settings in the TUNER menu menu item TUNER AREA Switching on of Switching on of with the On Of button For switch on press the...

Страница 6: ...nu item TRAFFICINFO Notes The volume is increased for the duration of the switched through trafic announce ment You can adjust the minimum volume for traf c announcements see the chapter User settings...

Страница 7: ...station seek tuning is Storing stations or calling stored stations Select the desired memory bank If necessary set the desired station Press the station button 1 5 for approx 2 seconds to store the cu...

Страница 8: ...tain programme type e g for rock or sports broadcasts Note that PTY is not supported by all stations Note The PTY function is only available if it has been activated see the chapter User settings sec...

Страница 9: ...racters without the file exten sion mp3 or wma the use of more characters reduces the number of tracks and folders that the car sound system can recognise No umlauts or special characters CD formats a...

Страница 10: ...drive that may occur as a result of the use of unsuitable CDs Note You must not hinder or assist the drive as it automatically draws in the CD Insert the CD with its printed side up into the CD tray5...

Страница 11: ...Push on the memory card until it disengages Pull the memory card out of the card slot Attach the control panel CD MP3 WMA iPod mode ENGLISH Selecting tracks Turn rotary control 7 one notch counter cl...

Страница 12: ...itched on the icon repeat tracks or repeat folders is shown on the display Conf guring the display Press theDIS button 16 once or several times to toggle between these displays Opera tion Display icon...

Страница 13: ...e option is selected and press the rotary control 7 Turn the rotary control 7 to select a differ ent track Browse mode In Browse mode you can directly search for and select a certain track on the MP3...

Страница 14: ...nected cell phones and control the audio output of other Bluetooth devices and play them back via the loudspeakers of the car sound system Bluetooth streaming Note You can also connect an external mic...

Страница 15: ...nu section Managing paired devices If you should attempt to pair a sixth Blue tooth device PHONE LIST FULL PLEASE DELETE ENTRIES FROM LIST is displayed Pairing and connecting a cell phone Note If a co...

Страница 16: ...may show PAIRED followed by CONNECTED as soon as the car sound sys tem and the streaming device are paired and connected Notes If no connection can be established the display briefy shows CONNECT FAI...

Страница 17: ...been trans ferred the display briefly shows PHONE BOOK NOT AVAILABLE Turn the rotary control7 to select a dif er ent entry Press the rotary control7 or the but ton to call the number CALLING and the d...

Страница 18: ...th menu and the DIAL NEW NUMBER menu item Notes A number previously stored on the memo ry button is replaced If a telephone is unpaired the numbers stored for this telephone are automatically deleted...

Страница 19: ...er Bluetooth streaming mode Starting the Bluetooth streaming mode Press the SRC 16 button repeatedly until BT STREAM appears on the display The playback starts Notes The Bluetooth streaming mode can b...

Страница 20: ...e process frst delete the already transferred phone book see the next section or unpair another cell phone if necessary so that its phone book is also deleted from the car sound system see the chapter...

Страница 21: ...already connected the display brief y shows CONNECT EXIST To disconnect the connection to the displayed device press the button The display briefy shows DISCONNECTED and you are returned to the Bluet...

Страница 22: ...the button 7 to skip the current song Play pause Press the digit 2 to temporarily the www pandora com Thumbs Up Press the button 7 to tell Pandora you like the current track Pandora will play more tr...

Страница 23: ...can time can be adjusted see the chap ter User settings section Making settings in the VARIOUS menu menu item SCAN TIME Browse in android phone You can directly search for and select a certain select...

Страница 24: ...menu menu item SCAN TIME Scanning all receivable stations of the waveband Press theMENU button 2 for approx 2 sec onds to start scanning During the scan the display alternately dis plays SCAN and the...

Страница 25: ...me levels of both audio sources to each other For more details please read the section Making settings in the VARIOUS menu menu items AUX MIX and AUX MIX GAIN in the chapter User settings Sound settin...

Страница 26: ...bution is set Press the rotary control7 to conf rm the setting LOUDNESS Increase of bass at low volume Settings ON OFF Press the rotary control7 to change the setting Turn the rotary control7 to chang...

Страница 27: ...cally exited after the last key has been activated After the setting press the MENU button2 to exit the menu EQUALIZER Switching the equalizer on or of Settings ON OFF Press the rotary control7 to cha...

Страница 28: ...tary control7 to change the setting for the selected menu item Turn the rotary control7 to set the level or frequency Press the rotary control7 to conf rm the setting User settings Calling the user me...

Страница 29: ...o conf rm the setting Deactivated memory banks are skipped during the source selection with theSRC button Notes In the factory default all AM memory banks are deactivated If a memory bank is deactivat...

Страница 30: ...ROPE USA SOUTH AMERICA THAI LAND Press the rotary control7 to open the menu Turn the rotary control7 to change be tween the reception areas Press the rotary control7 to select a recep tion area The di...

Страница 31: ...trol7 to conf rm the setting Upon selecting ON VOLUME Press the rotary control7 to change the setting Turn the rotary contr7 ol to set the volume Press the rotary control7 to conf rm the setting TRAFF...

Страница 32: ...e noon or a PM for the time after noon Making settings in the VARIOUS menu DEMO MODE Switching the demo mode on or of Settings ON OFF Press the rotary control7 to change the setting Turn the rotary co...

Страница 33: ...l7 to toggle between the display of the version number of CPU P and software E NORMSET Restoring the original factory settings of the car sound system Press the rotary control7 The display shows PLEAS...

Страница 34: ...ick up service for your car sound system via the Internet Technical data Voltage supply Operating voltage 10 5 14 4 V Current consumption In operation 10 A 10 sec after switch of 3 5 mA Amplif er Outp...

Страница 35: ...evice may not cause harmful interference and 2 this device must accept any interference received including interference that may cause undesired operation NOTE 1 Any changes or modifications to this u...

Отзывы: