


TIP
When film is laced through the reader’s audio path, DaVinci Resolve will automatically
record audio and add it to your clips. Alternatively, if it is laced through the lower path no audio
will be recorded.
Setting the Reader for Audio Scanning
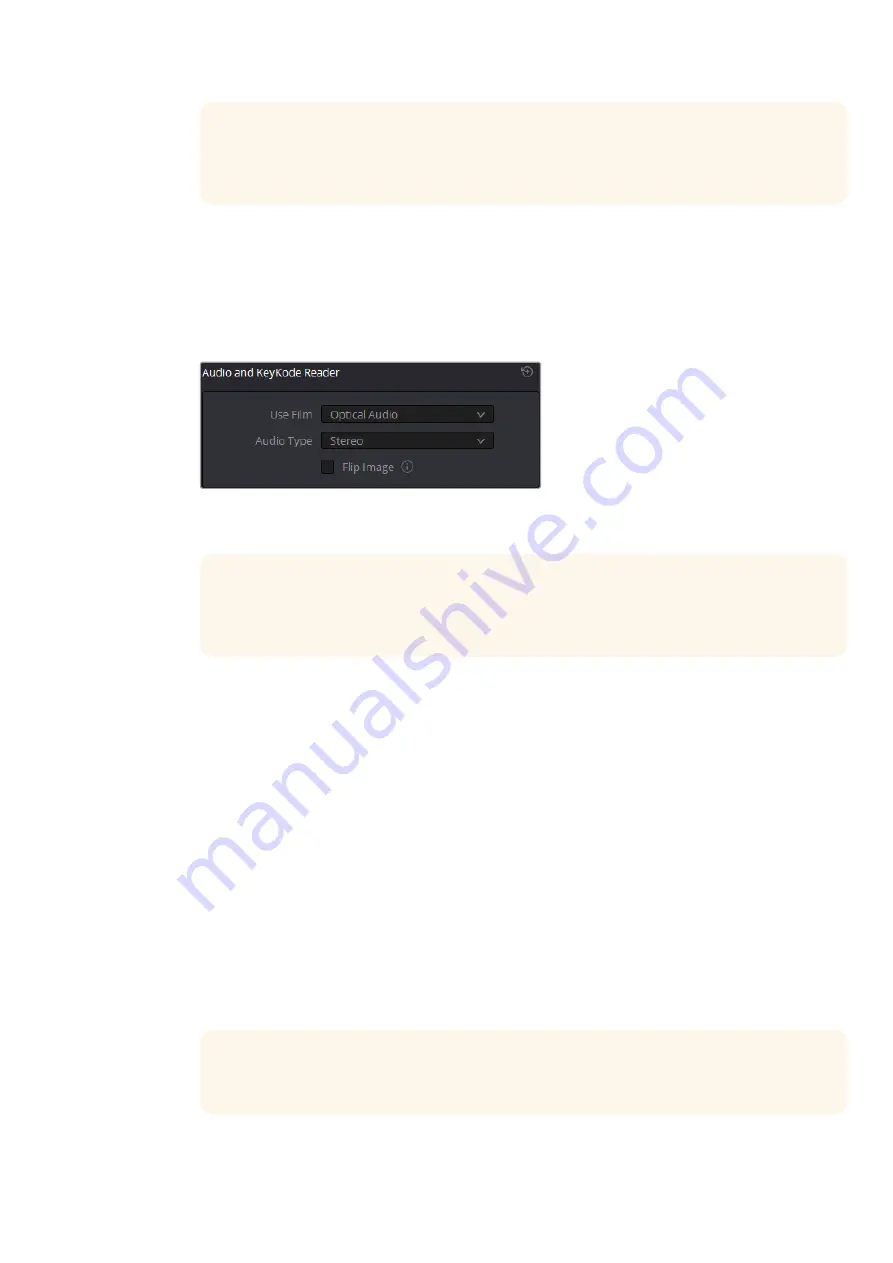
Once your film is laced, go to DaVinci Resolve’s film scanner panel and set the ‘use film’ and ‘audio type’
settings in the reader accessory pane.
These settings let you set which function you want your reader to perform, for example setting the reader to
scan KeyKode information, or to different audio types, for example optical or magnetic audio.
The audio and KeyKode reader pane in DaVinci Resolve’s film scanner panel lets you
change the ‘use film’ option between KeyKode and audio scanning
TIP
The available options will differ depending on the type of film you have loaded. For
example, magnetic audio is available when 16mm is set as the film type in DaVinci Resolve’s
film scanner panel.
Use Film
Use these settings to determine the reader’s KeyKode or audio reading functions. For information on reading
KeyKode data, refer to the ‘Reading KeyKode’ section.
The settings for the audio reader include:
Optical Audio:
Choose this setting when you want to scan audio from an optical audio track.
You can tell if the audio track is optical by inspecting the film. If you’re scanning 35mm or 16mm film and
see a continuous waveform or a long, tightly packed series of stripes down one side, your print has an
optical soundtrack.
Optical Audio Narrow Track:
When scanning optical audio, film shrinkage and the variables inherent
in printing will occasionally mean that your film’s optical soundtrack is smaller than the area scanned
by your Audio and KeyKode Reader. This can result in the audio reader scanning perforations or image
data on either side of the sound track, which causes interference in the audio. In this event, adjusting
the reader’s tracking knob can help improve the audio, but if that is unsuccessful and the audio track is
problematic, then you can select ‘optical audio narrow track’ from the ‘use film’ menu. This will reduce
the area your reader scans by about twenty percent, limiting the unwanted areas around the optical
track and improving the quality of the audio scan.
TIP
For more information about the tracking feature on the audio reader, refer to the ‘tracking’
information later in this section.
49
Optional Audio and KeyKode Reader
Содержание cintel
Страница 99: ...Cintel Scanner インストール オペレーションマニュアル 2020年5月 日本語 ...
Страница 196: ...Manuel d utilisation et d installation Mai 2020 Français Cintel Scanner ...
Страница 293: ...Installations und Bedienungsanleitung Mai 2020 Cintel Scanner Deutsch ...
Страница 395: ...Manual de instalación y funcionamiento Escáner Cintel Mayo 2020 Español ...
Страница 492: ...安装操作手册 2020年5月 中文 Cintel Scanner ...
Страница 589: ...설치 및 사용 설명서 Cintel 스캐너 2020년 5월 한국어 ...
Страница 686: ...Руководство по установке и эксплуатации Русский Май 2020 г Cintel Scanner ...
Страница 783: ...Manuale di istruzioni Cintel Scanner Maggio 2020 Italiano ...
Страница 880: ...Manual de Instalação e Operação Cintel Scanner Maio 2020 Português ...
Страница 977: ...Kurulum ve Kullanım Kılavuzu Cintel Tarayıcı Mayıs 2020 Türkçe ...


