


Focus the Scanner
Just as you need to focus the lens on a camera, you’ll need to focus the projected film image
on your scanner’s sensor. To achieve perfect focus, turn on the Focus Assist checkbox in the
Film Scanner capture settings of DaVinci Resolve. This superimposes a focus peaking overlay
over the Ultra HD image that’s output from the scanner’s HDMI output, and is also displayed in
DaVinci Resolve’s capture window. For the best results, connect an Ultra HD display to your
Cintel scanner so that you can monitor at the maximum available resolution while you focus.
With Focus Assist turned on, focus peaking will detect the film grain of the scanned image
whenever the film plane is in perfect focus. This enables the operator to focus the scanner
even if the film image is out of focus. Simply monitor the Ultra HD output of the scanner while
you turn the Cintel scanner’s focus wheel. Your image will be in focus when the grain running
throughout the image displays peaking outlines.
TIP
You can verify the focal adjustments you’ve made by checking the edges of your
film’s perforations. When these are sharp, your film will be in focus.
Reset the Timecode
To set the timecode for the roll of film you’re about to scan, you need to locate the zero frame
for that roll. It’s standard practice to punch a small physical hole within the frame before the first
frame of necessary film on a roll, to use as a permanent reference for whenever that roll is
scanned. This is referred to as the marker frame, lab roll hole, or head punch. By always setting
the first frame of timecode to match the marker frame, subsequent film scans will have the same
frame count as previous scans, making it possible to rescan and reconform the same material
whenever necessary.
To reset scanned timecode at the marker frame of a new film roll:
1
Use the transport controls under the viewer to locate the marker frame.
2
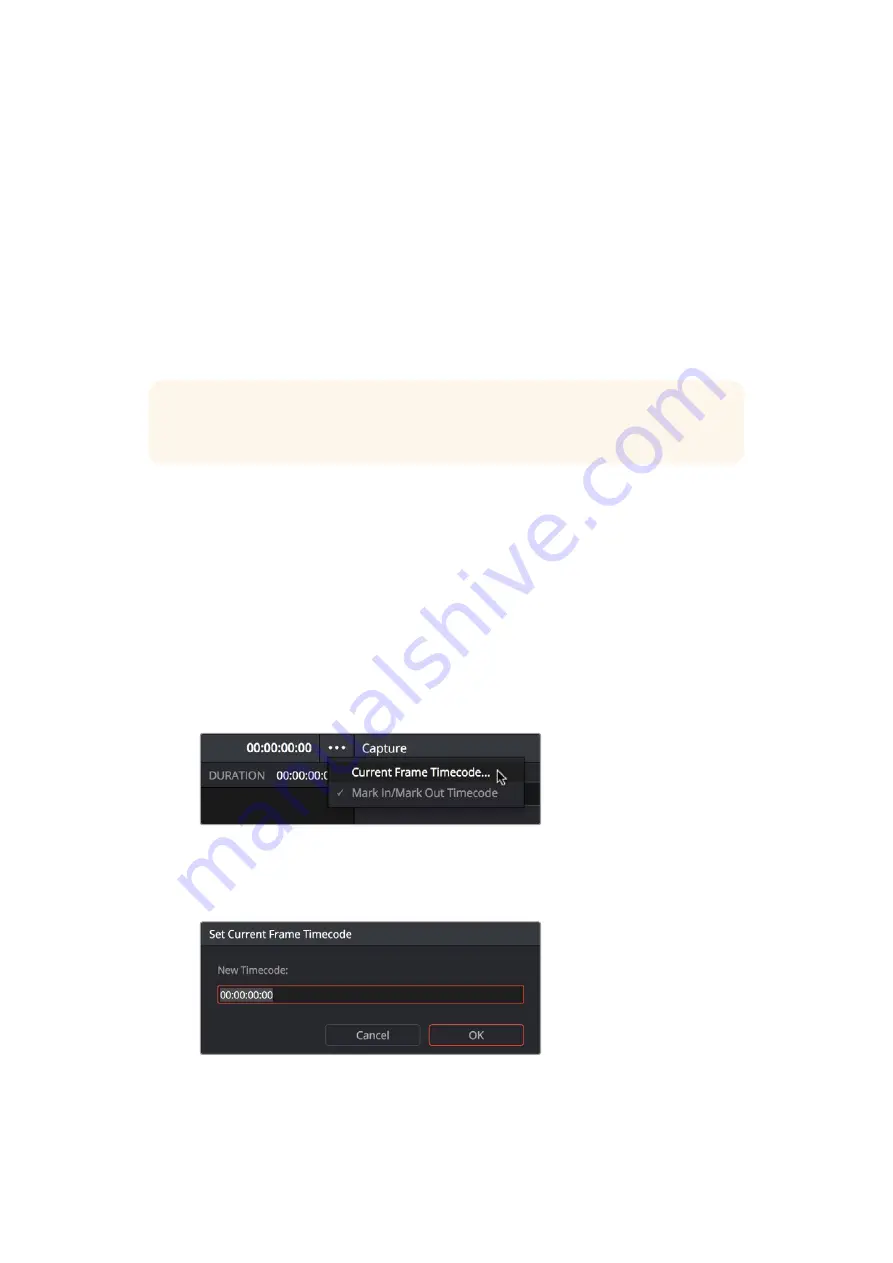
Click the ‘viewer’ option menu and choose ‘current frame timecode.’
Choosing Current Frame Timecode from the Viewer Option menu
3
Enter a timecode value in the dialog box that appears. For example, if you’re scanning
the first roll of a project, you can enter 01:00:00:00.
The Set Current Frame Timecode dialog
4
When you’re done, click OK.
34
Capturing from Cintel using DaVinci Resolve
Содержание cintel
Страница 99: ...Cintel Scanner インストール オペレーションマニュアル 2020年5月 日本語 ...
Страница 196: ...Manuel d utilisation et d installation Mai 2020 Français Cintel Scanner ...
Страница 293: ...Installations und Bedienungsanleitung Mai 2020 Cintel Scanner Deutsch ...
Страница 395: ...Manual de instalación y funcionamiento Escáner Cintel Mayo 2020 Español ...
Страница 492: ...安装操作手册 2020年5月 中文 Cintel Scanner ...
Страница 589: ...설치 및 사용 설명서 Cintel 스캐너 2020년 5월 한국어 ...
Страница 686: ...Руководство по установке и эксплуатации Русский Май 2020 г Cintel Scanner ...
Страница 783: ...Manuale di istruzioni Cintel Scanner Maggio 2020 Italiano ...
Страница 880: ...Manual de Instalação e Operação Cintel Scanner Maio 2020 Português ...
Страница 977: ...Kurulum ve Kullanım Kılavuzu Cintel Tarayıcı Mayıs 2020 Türkçe ...


