


Scan Speed:
With adequate disk performance, you should be able to scan at 30 fps.
However, if you’re scanning to a slow hard drive, you can reduce the scanning speed to
a frame rate that’s suitable for your workstation without dropping frames.
Supply:
Sets the wind direction of the left-hand side feed spool. While auto-detection
will prevent incorrect operation, you should manually configure the reel winding
direction based on how each film roll is wound.
Take up:
Sets the wind direction of the right-hand side take up spool. While
autodetection will prevent incorrect operation, you should manually configure the reel
winding direction based on how each film roll is wound.
Use Film Reel:
Small film reels have a different weight and inertia compared to large
film spools, and this can affect the transport system. Tick this box to switch to settings
that offer improved stability for small film reels.
Focus Assist:
Enables luminance peaking on your scanner’s HDMI monitor output, plus
the viewer inside DaVinci Resolve’s film scanner panel, which makes it easy to obtain
optimum focus adjustments.
Light Source
These controls let you adjust the scanner’s light source to adjust the optimal Dmin, which is the
minimum scanned signal value, plus the color temperature of the scanned material. Use the
built in software scopes in DaVinci Resolve to help set your light source to its optimum level
settings. Scopes can be opened in the Media page by choosing Workspace > Video Scopes >
On. You can adjust these settings to make sure you’re not clipping image data during the
scanning process.
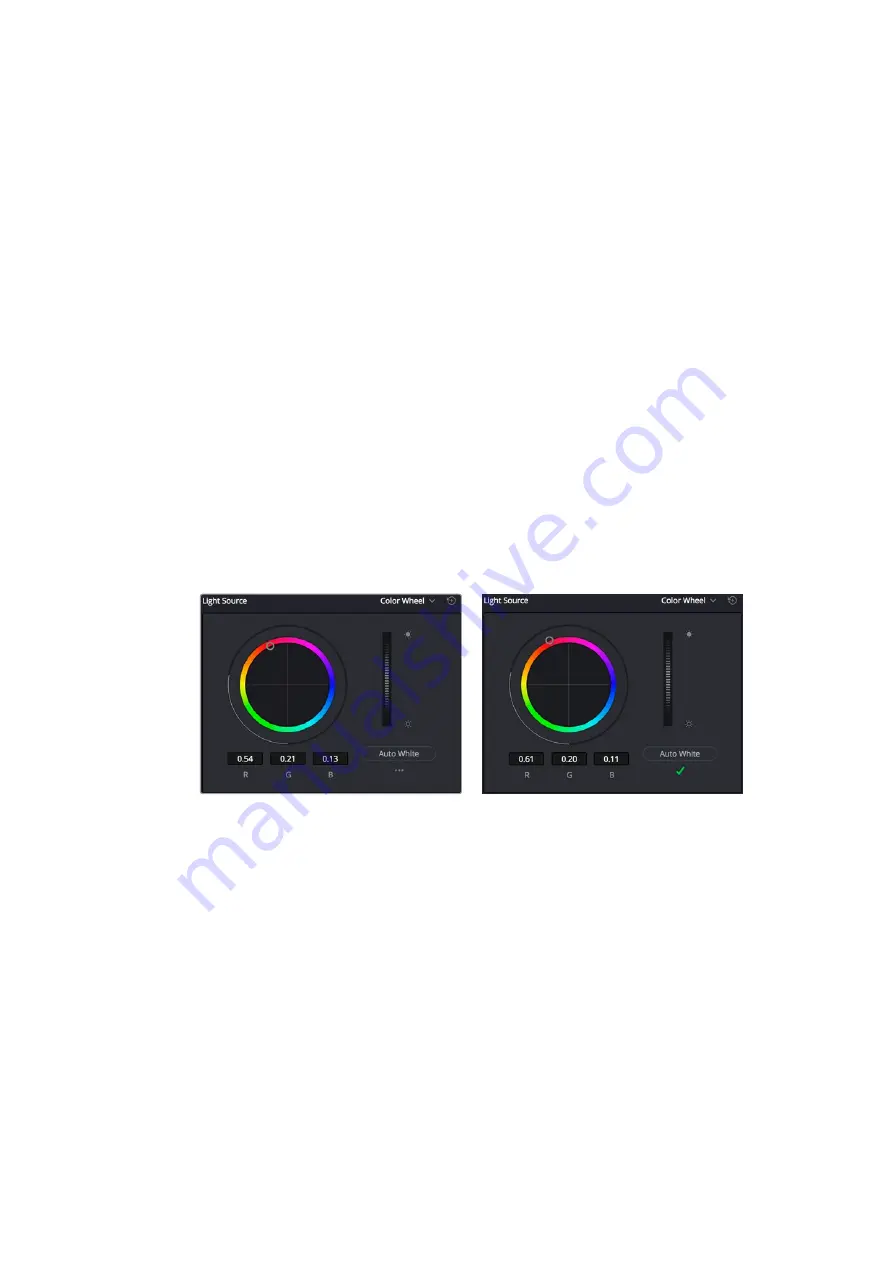
Light Source controls in the Media page showing the default uncalibrated status of
the light source (left), and the status when calibration is successful (right)
Light Source master wheel:
The vertical light source master wheel is located next
to the color wheel and adjusts the intensity of the light source used to illuminate the
film, raising or lowering the RGB channels all at once. For typical negative film, this lets
you adjust the black point of the film image, which is the darkest part of the image. In
negative film, this in fact corresponds to the highlights of the film image. Adjust the light
intensity to sit just above the typical Dmin value of 95, as measured on the histogram
of the video scopes, which guarantees that the highlights won’t be clipped by a
Cineon-style LOG conversion. For positive film, simply adjust the master wheel so that
no part of the signal is being clipped.
Auto Black and Auto White button:
Analyzes the current frame displayed in the viewer
and does an automatic adjustment to set the black point for negative, or for print to set
the white point. For positive film types, the ‘auto black’ button changes to ‘auto white’.
28
Capturing from Cintel using DaVinci Resolve
Содержание cintel
Страница 99: ...Cintel Scanner インストール オペレーションマニュアル 2020年5月 日本語 ...
Страница 196: ...Manuel d utilisation et d installation Mai 2020 Français Cintel Scanner ...
Страница 293: ...Installations und Bedienungsanleitung Mai 2020 Cintel Scanner Deutsch ...
Страница 395: ...Manual de instalación y funcionamiento Escáner Cintel Mayo 2020 Español ...
Страница 492: ...安装操作手册 2020年5月 中文 Cintel Scanner ...
Страница 589: ...설치 및 사용 설명서 Cintel 스캐너 2020년 5월 한국어 ...
Страница 686: ...Руководство по установке и эксплуатации Русский Май 2020 г Cintel Scanner ...
Страница 783: ...Manuale di istruzioni Cintel Scanner Maggio 2020 Italiano ...
Страница 880: ...Manual de Instalação e Operação Cintel Scanner Maio 2020 Português ...
Страница 977: ...Kurulum ve Kullanım Kılavuzu Cintel Tarayıcı Mayıs 2020 Türkçe ...


