background image



























®

8

IN

IN

IN

IN

OUT

OUT

OUT

8

8

8

7

7

7

7

6

6

6

6

5

5

5

5

4

4

4

4

3

3

3

3

2

2

2

2

1

1

1

1

LOC REM OSD UPG LCK PWR

BLACK BOX

CX Uno

BLACK BOX

724-746-5500

®

®

KVM

only

Power control port

The options port of the ServSwitch CX Uno can 
be used to connect to one or more optional 
power control units. This allows you to control 
the mains power being supplied to the 
connected computer(s) so that an authorized 
user can, if necessary, perform a complete 
remote cold reboot on a failed system.
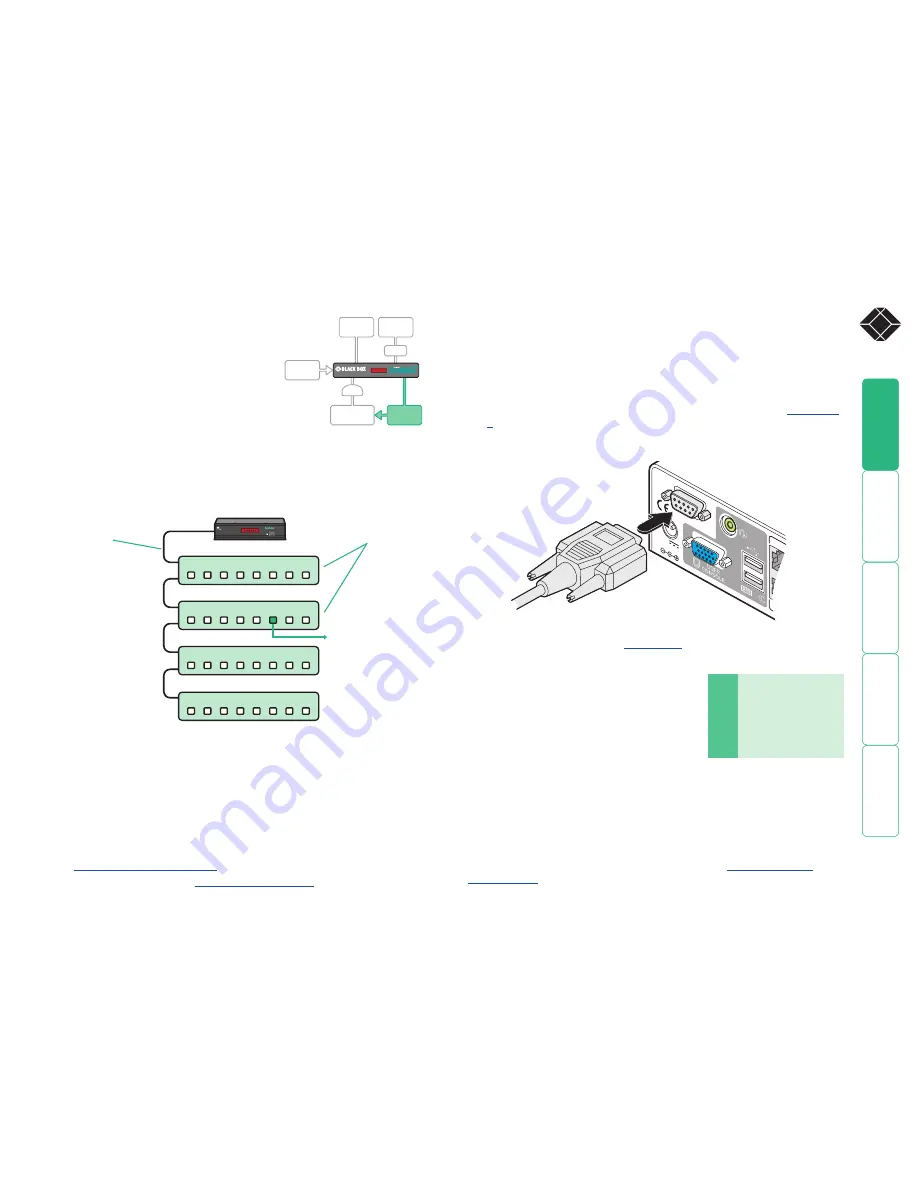
The control connector of the first power switch 
is attached, via serial cable, to the rear panel 
of the ServSwitch CX Uno. Any additional power switches are then attached via 
a ‘daisy-chain’ arrangement to the first power switch. Each power switch box 
is then given a unique address and access to each power port (8 ports on each 
power switch box) is gained using a combination of the switch box address and 
the port number. 

To connect and address the switch boxes

Note: The ServSwitch CX Uno unit can be powered on during this procedure, 
however, the switch boxes should be switched off. Other power switches may 
require different configuration. Please refer to your power switch documentation.

1  Mount up to four switch boxes in positions where they are close to the 

computer systems that they will control and not too distant from the 
ServSwitch CX Uno unit (preferably within 2.5 metres).

2  Use a serial cable with an RJ9 and a 9-pin D-type connector (see 

Appendix 

2

 for specification). Attach the RJ9 plug to the socket marked 

IN

 on the 

first switch box. Attach the other end to the socket marked 

OPTIONS

 on the 

ServSwitch CX Uno.

Power to computer
Box , port  - address: 

Box 

Box 

Box 

Box 

Power 
switch 
boxes

‘Daisy-chain’ 
control 
connections

The power ports are connected to the power inputs of each computer system 
and the power switch box(es) are then connected to a mains power supply.

IMPORTANT: Power switching devices have a maximum current rating. It is 
essential to ensure that the total current drawn by the equipment connected 
to the power switching device does not exceed the current rating of the power 
switching device. You must also ensure that the current drawn from any mains 
socket does not exceed the current rating of the mains socket.

Setting up, configuring and using power switching requires three main steps:

•  Connect and address the switch boxes 

• 

Configure the power strings

•  Operate power switching 

via configuration menu

3  For each of the remaining switch boxes (if used), use a serial cable with RJ9 

connectors at both ends (see 

Appendix 2

 for specification). Attach one 

end to the socket marked 

OUT

 of the previous box and the other end to the 

socket marked 

IN

 of the next box. 

4  Set the addressing switches on each switch 

box using the two micro switches marked ‘Slct’ 
on the front panel. The box connected directly 
to the ServSwitch CX Uno is Box 1 and so on, 
down the daisy-chain line to Box 4 at the end.

5  Attach IEC to IEC power leads between 

each port and the power input socket of 
each computer system that requires power 
switching. Carefully note to which power 
ports, on which boxes, each computer system is connected. If computer 
systems have multiple power inputs, then each input must be connected via 
separate ports, which can be on the same, or different boxes.

6  Connect each box to a suitable mains power input. 

Now proceed to the configuration stage covered in the 

Power switching 

configuration

 section within the Configuration chapter.

5V

2.0A

12

1

16

1

OPTIONS

COMPU

T

ServSwitch CX Uno 

rear panel

Serial cable to first 

power switch box

LOCAL

USER

REMOTE

USER

CX R

POWER

IN

POWER

SWITCH

COMPUTER

SYSTEM

SAM

®

724-746-5500

®


Box

  Switch   Switch 


1


Off 

Off


2


On 

Off


3


Off 

On


4


On 

On

Off = switch upwards
On = switch downwards
Switch  is on the left side

Содержание ServSwitch CX Uno KV0081A

Страница 1: ...l support 24 hours a day 7 days a week Call 724 746 5500 or fax 724 746 0746 Mailing address Black Box Corporation 1000 Park Drive Lawrence PA 15055 1018 Web site www blackbox com E mail info blackbox...

Страница 2: ...ultiple video head connections 16 Remote switching control 17 Configuration Overall initial configuration 18 Configuration menus 19 Configuration menus layout 20 General security and configuration ste...

Страница 3: ...assistance 39 Appendix 1 Configuration menus 40 Functions 41 User Preferences 42 Global Preferences 43 Setup Options 45 Advanced Options 46 Appendix 2 Cable and connector specifications 48 ServSwitch...

Страница 4: ...g In addition to providing the usual keyboard video and mouse signals the ServSwitch CX Uno also provides audio output for full feedback where necessary Many computers ServSwitch CX Uno units can dire...

Страница 5: ...mputers to be saved and restored Local user port Connect a USB keyboard and mouse plus a video monitor and optional speakers to these connectors These allow you to perform the initial configuration of...

Страница 6: ...G LC K PW R KV M onl y BLA CK BOX CX Uno BLACK BOX 72 4 74 6 55 00 Double unit rack brackets Includes twelve screws Part number RMK2004 2 Single unit rack brackets Includes four screws Part number RMK...

Страница 7: ...s four screws extend the size of the ServSwitch CX Uno so that it fills the full width of a 1U rack slot INDOOR USE ONLY 2 1 6 5 ECTIONS 5V 2 0A 16 15 14 13 OPTIONS INDOOR USE ONLY 5V 2 0A 4 12 3 11 2...

Страница 8: ...xtender Local user page 8 Power in page 11 Computer power control switching page 12 Computer system via SAM page 10 Connections do not need to be carried out in the order given within this guide howev...

Страница 9: ...To connect the local user port 1 Position a suitable video monitor keyboard mouse and speakers if required in the vicinity of the ServSwitch CX Uno unit such that their cables will easily reach 2 Att...

Страница 10: ...y a suitable length of category 5 5e or 6 cabling between the CX R CX R USB module and the ServSwitch CX Uno unit Please refer to the section Cable lengths for remote user locations opposite 4 Attach...

Страница 11: ...Uno unit The maximum length of the cable can be up to 10 metres 32 feet however bear in mind that the overall distance between a remote user and any computer must not exceed 300 metres 980 feet 4 Att...

Страница 12: ...supply generate heat when in operation and will become warm to the touch Do not enclose them or place them locations where air cannot circulate to cool the equipment Do not operate the equipment in am...

Страница 13: ...ach computer system and the power switch box es are then connected to a mains power supply IMPORTANT Power switching devices have a maximum current rating It is essential to ensure that the total curr...

Страница 14: ...can be arranged two levels deep forming a tree or cascade arrangement with computer systems situated at either level within that cascade tree The cascade tree The diagram shows how multiple ServSwitch...

Страница 15: ...ch end with an RJ45 connector There must be no crossover connections within the cable The cascade link cables can be up to 50m 160 feet in length However remember that the overall length between the r...

Страница 16: ...gits hence the computer marked in red requires a longer address 1203 as it is situated at cascade level 2 compared to the blue computer at the top level with its two digit port number The first time t...

Страница 17: ...e rear panel An ServSwitch CX Uno will switch its channel if it receives the same command on the serial interface Consequently by linking the serial interfaces a master unit may be made to automatical...

Страница 18: ...e Stop bits 1 No handshaking is implemented however valid command characters will be echoed back to the sending device The value of the byte received via the serial link determines which computer port...

Страница 19: ...ess privileges 2 Create an ADMIN administration password All ServSwitch CX Uno units have a fixed user account that cannot be deleted or renamed called ADMIN This user account is the only one that is...

Страница 20: ...uration Menu Functions User Preferences Global Preferences Setup Options Edit Computer List Edit User List EditAutoscan List Enter Select F1 More menus Esc Quit FirmwareVersion 1 01b06 Default names f...

Страница 21: ...Now create a new password for the ADMIN user account To set an ADMIN password 1 Display the Configuration menu 2 Highlight Edit User List and press 3 Highlight ADMIN and press Press again to accept th...

Страница 22: ...you can determine which of the connected computers can be accessed by the selected user account Only computers that show the marker to the right of the menu box will be accessible to the user account...

Страница 23: ...ursor will move to the computer port column on the right side Change or enter the port address of the computer as required See the Addressing computers in a cascade section for more details 5 When the...

Страница 24: ...AS and CX R USB AS modules see the Remote user skew adjustment section for details To display a suitable high contrast image The best way to clearly view the effect of sharpness and brightness adjust...

Страница 25: ...settings will be stored even when power is removed or if a complete reset is initiated These settings should not require further changes unless the cabling arrangements are altered Remote user skew ad...

Страница 26: ...you more opportunities to view the horizontal position of each color relative to the others 2 On the remote user keyboard connected to an CX R AS or CX R USB AS extender simultaneously press the hotke...

Страница 27: ...t need to be configured to use autoscanning Select the autoscan mode Scan List Active PCs or All PCs Select the autoscan period This is the time that is spent viewing each computer This step also enab...

Страница 28: ...ation settings 1 Run the Data Transfer utility on the computer that is connected to the ServSwitch CX Uno Options serial port The utility has a single window 2 Click the Configuration button and ensur...

Страница 29: ...will always be granted access to all computers regardless of the values entered DATA TRANSFER FILE Users ADMIN SAM ROGER PETE Passwords admin letmein roger1 sue2 Computers Main 00000001 1 1 1 Sales 00...

Страница 30: ...from the ServSwitch CX Uno unit 2 Connect the ServSwitch CX Uno unit to a computer in the same manner as you would to carry out a flash upgrade see Performing flash upgrades 3 Press and hold the rese...

Страница 31: ...shown below Power control sequences Note Other power switches may require different settings to those shown below Please refer to your power switch documentation for details about codes required by ot...

Страница 32: ...the power supply plug from the rear panel of the unit 3 Connect the upgrade computer to the ServSwitch CX Uno Connect the upgrade computer to the OPTIONS port on the rear panel of the ServSwitch CX Un...

Страница 33: ...e results of the unit query will be displayed in the Device Dongle Selection dialog The type and firmware revision of each discovered SAM will be displayed alongside the port number to which it is con...

Страница 34: ...While still holding and press the first numeral of the required port address then If the port address is a single character release all of the keys If the port address is two or more characters relea...

Страница 35: ...round the screen To select a computer using the on screen menu 1 Select the on screen menu in one of two ways By simultaneously pressing and then releasing or By pressing the middle and right buttons...

Страница 36: ...is relinquished after a certain period of inactivity Escape without selecting a port press the right mouse button User arbitration simultaneous local and remote users During operation if both the loca...

Страница 37: ...system that helps to prevent unauthorized access to some or all connected computers If the security option has been selected by your administrator then you will be asked to enter a User Name and Pass...

Страница 38: ...to select 4 Select the required option To disable the banner highlight Reminder Banner and press until DISABLED is shown To change colors highlight Reminder Colour and press until the desired color co...

Страница 39: ...of two ways By simultaneously pressing and then releasing or By pressing the middle and right buttons of a three button mouse If you are not already logged in do so now 2 Switch to the computer port...

Страница 40: ...ification notice for equipment used in Canada Normas Oficiales Mexicanas NOM electrical safety statement Getting assistance If you are still experiencing problems after following the instructions with...

Страница 41: ...en forgotten 2 Press to select More menus 3 Use the following keys and to highlight required options to change option values to quit and save the changes The full set of options are only available to...

Страница 42: ...o This option is especially useful in complex cascade arrangements where many computers are attached See Saving and restoring configuration settings for more details Read Data from RS232 port This opt...

Страница 43: ...ace Toggle Up Down Esc Quit To get here 1 From a local or remote keyboard log on as a standard limited options or admin user 2 Press hotkeys can change 3 Press to select More menus 4 Select User Prefe...

Страница 44: ...named computers press F1 To remove all named computers press F2 3 When all the computers that you wish to scan are affixed with a press RETURN or ENTER to save the selections The selected computers w...

Страница 45: ...can have access at any one time When no keyboard or mouse data has been received from the active user port for the user timeout period the ServSwitch CX Uno will allow the other user to access the co...

Страница 46: ...cascade is power cycled it checks for newly added computers This option allows you to determine whether such new computers are automatically added to the computer list or whether you would prefer to u...

Страница 47: ...CX Uno to read DDC information from the selected source at power up When DISABLED no new DDC data is sought and existing information is used When viewing this menu press F7 to discover DDC information...

Страница 48: ...an Katakana 15 Yugoslavia 34 Korean 16 Turkish F 35 Latin American 17 Reserved 36 255 Netherlands 18 Not supported 00 Norwegian 19 SERVSWITCH CX UNO USB Country Code Country Code AUTO Default Country...

Страница 49: ...32 serial flash upgrade cable 9pin D type female 9pin D type male Multi head synchronization cable MASTER end 9pin D type male SLAVE end 9pin D type male MASTER end 9pin D type male SLAVE1 end 9pin D...

Страница 50: ...apter if the power adapter case becomes damaged cracked or broken or if you suspect that it is not operating properly If you use a power extension cord with the ServSwitch CX Uno make sure the total a...

Страница 51: ...e equipment and the receiver c Connect the equipment to an outlet on a circuit different from that to which the receiver is connected d Consult the supplier or an experienced radio TV technician for h...

Страница 52: ...epairs to certified equipment should be made by an authorized Canadian maintenance facility in this case your supplier Any repairs or alterations made by the user to this equipment or equipment malfun...

Страница 53: ...or los orificios de ventilaci n 10 El equipo el ctrico deber ser situado fuera del alcance de fuentes de calor como radiadores registros de calor estufas u otros aparatos incluyendo amplificadores que...

Страница 54: ...ctxd com Documentation by 2008 Black Box Corporation All trademarks are acknowledged Black Box Corporation 1000 Park Drive Lawrence PA 15055 1018 United States of America Tel 1 724 746 5500 Fax 1 724...

Страница 55: ...Control strings power switching 30 CX R extender 9 CX R USB extender 9 D Daisy chain cable 48 Data Transfer utility 27 DDC options 46 47 E Extender remote user 9 F Firmware upgrade 29 31 Format power...

Страница 56: ...cting cascaded computers 36 computers 33 with hotkeys 33 with mouse buttons 35 with on screen menu 34 Server Access Module connection 10 Setup options 41 45 Skew adjustment 24 Supplied items 5 T Troub...

Страница 57: ...606 747 tech blackbox fr Germany www black box de 49 811 5541 110 49 811 5541 499 techsupp black box de Italy www blackbox it 39 02 27 404 700 39 02 27 400 219 supporto tecnico blackbox it Netherlands...

Отзывы: