background image


안내


설치


안내서는


제품


설치에


필요한


간단한


정보만


기록하고


있습니다

자세한


설치


안내는


첨부된

 CD


사용


설명서를


참고하십시오

. CD


포함되어있는


내용은


아래와


같습니다


1. 

매뉴얼

 : 

사용자

, Windows CE 

모듈


프로그램

코드


페이지

제어


명령어

,  

블루투스

 & 

무선랜


2. 

드라이버

: Windows 

드라이버


3. 

유틸리티

: VMSM(Virtual Memory Switch Manager),  

NV Image Download Manager, Firmware Download Manager 


저희

 (

)

빅솔론은


제품의


기능과


품질


향상을


위하여


지속적인


개선을


하고


있습니다

이로


인하여


제품의


사양과


매뉴얼의


내용은


사전


통보


없이


변경될


있습니다


배터리


안전


주의사항


1. 

제품


구매


처음


사용


이상한


냄새


또는


과열과


같은


이상


증상을


발견하면


즉시


구입


판매점에


문의하십시오

.  

2. 

배터리를


충전할


㈜빅솔론이


지정하는

(

옵션으로


제공

전용


충전기만


사용해서


충전하십시오

잘못된


충전기를


사용할


경우


배터리


과열

연소


/

또는


폭발이


발생할


있습니다

.  

3. 

차량


내부와


같이


고온


또는


강력한


직사광선에


노출되는


장소에서


배터리를


사용하거나


보관하지


마십시오


경우


배터리


과열


/

또는


연소가


일어날


있습니다

또한


배터리


성능


수명이


감소할


있습니다

.  

4. 

배터리에


바닷물


또는


수분이


들어가거나


새어


들어가지


않도록


하십시오

배터리


구동회로


보호장치가


산화되면


배터리가


비정상적인


전류


/

또는


전압으로


인해


과충전


되어


배터리가


과열되거나


배터리에


불이


붙거나


폭발할


있습니다

.  

5. 

배터리를


던지거나


강한


충격이


가해지지


않도록


하십시오

배터리


보호장치가


손상되면


배터리가


과열되고


그에


따라


유해한


화학


반응이


배터리


내에서


생성될


있습니다

.  

배터리


과열

연소


/

또는


폭발이


일어날


가능성이


있습니다

.  

6. 

배터리가


손상되었거나


외부


충격으로


인해


외관이


변형된


경우


또는


부풀어


오른


경우


사용하지


마십시오

.  


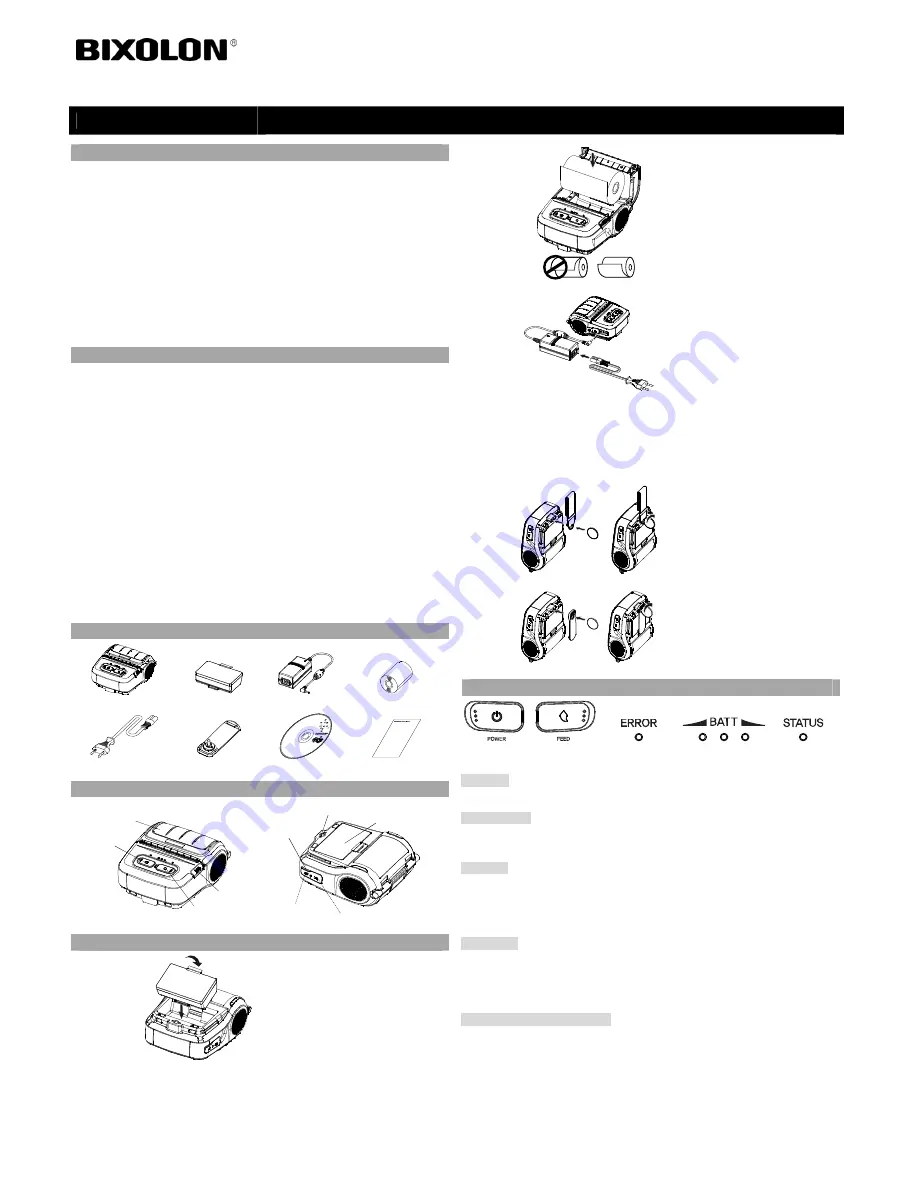
구성품


확인


SPP-R310 


배터리


배터리


충전기


용지


전원


코드


벨트


클립


CD 


설치


안내서


제품의


주요


명칭


Paper Cover

Power Button

Open button

Paper Feed Button

Power Connection

Battery

Hole for mounting belt strap / belt clip

Cable Connection

Interface Cap


설치


충전


배터리


설치


1. 

프린터


밑면에


배터리를


삽입하고


배터리


(hook)


결합하십시오

.

2. 

딸깍하는


소리가


때까지


프린터에


배터리를


밀어


넣으십시오


※참고


배터리는


구입


완전히


충전된


상태가


아니기


때문에


제품


사용


배터리를


충전해야


합니다

. (

배터리


충전기


용지


설치


1. 

열림


버튼을


눌러


용지커버를


여십시오

2. 

그림과


같이


용지를


넣으십시오

(


용지의


지관이


있을


경우


제거하십시오

.) 

3. 

용지


방향에


주의하십시오

4. 

용지를


앞으로


당긴


다음


용지커버를


닫으십시오

5. 

여분의


용지는


프린터


앞면으로


잡아


당겨


찢어내십시오

배터리


충전


1. 

프린터


전원을


주십시오

2. 

전원


코드를


배터리


충전기에


연결한


다음

 AC 

전원에


연결하십시오

3. 

화살표


방향으로


외부


인터페이스

캡을


여십시오

4. 

배터리


충전기를


전원


커넥터에


연결하십시오


참고


㈜빅솔론에서


제공한


배터리


충전기를


사용하지


않을


경우


프린터에


심각한


손상이


발생할


있습니다

㈜빅솔론은


그러한


손상에


대해


어떠한


법적


책임을


지지


않습니다

.(

프린터와


배터리


충전기의


전압


전류


사양이


일치해야


합니다

). 


벨트


스트랩


설치


1. 

벨트


스트랩


고정홀에


벨트


스트랩의


스크류를


삽입하십시오

.

2. 

그림과


같이


동전


등으로


벨트


스트랩


스크류를


체결하십시오

벨트


클립

설치


1. 

벨트


클립


고정홀에


벨트


클립의


스크류를


삽입하십시오

2. 

그림과


같이


동전


등으로


벨트


클립의


스크류를


체결하십시오

(

조립되는


방향에


주의하여


조립하십시오

.) 


조작부


사용법


전원


버튼


용지


이송


버튼


오류

 LED 

배터리

 LED 


상태

 LED 


전원


버튼


버튼은


프린터


전원을


켜거나


사용됩니다

.  


용지


이송


버튼


버튼은


용지를


인위적으로


이송


시키거나


셀프


테스트


 16

진수를


출력할


사용됩니다

.  


오류

 LED   

빨간색

 LED


켜지면


용지


커버가


열린


상태입니다

.   

빨간색

 LED


깜박이면


용지가


없거나


헤드가


가열된


상태입니다

.  

빨간색

 LED


계속


깜박이면


제품에


이상이


발생한


경우일


있으므로


서비스


대리점에


문의하십시오

.  


배터리

 LED  

파란색

LED

 3


켜지면


배터리가


완전


충전


상태입니다

.  

파란색

 LED

2


켜지면


배터리의

 50%


충전


상태입니다

.  

파란색

 LED

 1


켜지면


배터리는


최저


충전


상태입니다

.  

빨간색

 LED


켜지면


배터리


충전


또는


교체가


필요한


상태입니다

.  


상태

LED (

블루투스


또는


무선랜

1) 

블루투스


사용시


녹색

LED


배터리


상태

 LED


켜지면


프린터는


블루투스


무선통신이


가능한


상태입니다

.  

2) 

무선랜


사용시


무선랜의


신호세기를


나타냅니다

신호세기가


양호하면


녹색

 LED


켜지고

신호세기가


약하면


녹색

 LED


깜빡입니다

.  


※참고


파워


세이브


모드는


상태

 LED


켜집니다

.


프린터 설치 안내서


모바일


영수증


프린터

SPP-R310 

Paper Cover 

Power Button 

Paper Feed 

Button 

Open 

Button 

Hole for mounting belt strap / belt clip 

Interface Cap 

Battery

Cable Connection 

Power Connection 

Содержание SPP-R310

Страница 1: ...harge the battery prior to product use Use the battery charger Paper Installation 1 Press the open button to open the paper cover 2 Insert the paper as shown in the image Remove any remaining core of...

Страница 2: ...putted press the power button to perform auto calibration Select the mode Auto Calibration Power Button Self Test Feed Button 4 Three pages of label paper are outputted when performing auto calibratio...

Страница 3: ...ar einrastet Hinweis Da der Akku werkseitig nicht geladen ist muss dieser vor der Inbetriebnahme geladen werden Verwenden Sie hierzu das Ladeger t Papier Installation 1 Dr cken Sie auf die Taste um di...

Страница 4: ...Ausgabe des folgenden Ausdrucks auf die Ein Aus Taste um die automatische Kalibrierung durchzuf hren W hlen Sie folgenden Betriebszustand Automatische Kalibrierung Power Taste Ein Aus Selbsttest Zuf...

Страница 5: ...argez la avant de l utiliser Utilisez le chargeur de batterie Installation du papier 1 Appuyez sur le bouton Ouvrir pour ouvrir le capot du papier 2 Ins rez le rouleau comme illustr Retirez le moyeu d...

Страница 6: ...ante lorsqu elle est en mode Impression d tiquettes 2 Appuyez sur le bouton d alimentation du papier maintenez le vers le bas puis appuyez sur le bouton Alimentation Power 3 Une fois l impression term...

Страница 7: ...el bot n Open Abrir para abrir la cubierta del papel 2 Inserte el papel como se muestra en la imagen Extraiga el centro del rollo de papel que que se haya terminado 3 Sea cuidadoso para alinear el pap...

Страница 8: ...y luego presione el bot n de encendido 3 Una vez hecha la siguiente impresi n presione el bot n de encendido para realizar la calibraci n autom tica Seleccione el modo Calibraci n autom tica Bot n de...

Страница 9: ...ma o bot o abrir para abrir a tampa de papel 2 Insira o papel tal como indicado na imagem Retire qualquer resto de um rolo de papel utilizado 3 Tome cuidado para alinhar o papel correctamente 4 Puxe o...

Страница 10: ...enha o bot o de alimenta o de papel e em seguida pressione o bot o de alimenta o 3 Ap s ser emitida a seguinte impress o pressione o bot o de alimenta o para realizar a calibra o autom tica Seleccione...

Страница 11: ...eedButton PowerConnection Battery Holefor mountingbelt strap belt clip CableConnection InterfaceCap 1 hook 2 1 2 3 4 5 1 2 AC 3 4 1 2 1 2 LED LED LED 16 LED LED LED LED LED LED 3 LED 2 50 LED 1 LED LE...

Страница 12: ...7 8 CE 3 0 Tear Bar Max 50 mm 1 97 Max 49 mm 1 93 79 5 0 5 mm 3 13 0 2 79 5 0 5 mm 3 13 0 2 0 07 0 005 mm 0 08 0 01mm 1 1 2 2 3 4 1 2 Auto calibration Auto calibration Auto calibration 1 2 3 Auto cali...

Страница 13: ...IXOLON 3 4 5 6 SPP R310 Paper Cover PowerButton Openbutton PaperFeedButton Power Connection Battery Holeformountingbelt strap belt clip CableConnection InterfaceCap 1 hook 2 1 2 3 4 1 2 AC 3 4 BIXOLON...

Страница 14: ...13 0 2 0 07 0 005 mm 0 08 0 01mm 1 1 2 2 3 4 1 2 Auto calibration Auto calibration Auto calibration 1 2 3 Auto calibration Select the mode Autocalibration Power button Self test Feed button 4 Auto ca...

Страница 15: ...er BIXOLON 1 2 BIXOLON 3 4 5 6 SPP R310 Paper Cover PowerButton Openbutton PaperFeedButton Power Connection Battery Holeformountingbelt strap belt clip CableConnection InterfaceCap 1 2 1 2 3 4 5 1 2 3...

Страница 16: ...3 13 0 2 0 07 0 005 0 08 0 01 1 2 1 1 2 FEED 2 3 4 1 2 1 2 3 Power Feed 4 1 Bluetooth WLAN 1 Bluetooth 2 Bluetooth 3 WLAN Ad Hoc AP Bluetooth Wireless LAN Bluetooth wireless LAN IP SSID 2 1 2 10 1 2...

Страница 17: ...4 5 6 SPP R310 CD Paper Cover PowerButton Openbutton PaperFeedButton Power Connection Battery Holeformountingbelt strap belt clip CableConnection InterfaceCap 1 hook 2 1 2 3 4 5 1 2 AC 3 4 BIXOLON BIX...

Страница 18: ...1 1 2 2 3 4 1 2 Auto calibration Auto calibration Auto calibration 1 2 3 Auto calibration Select the mode Autocalibration Power button Self test Feed button 4 Auto calibration 1 1 Bluetooth LAN 1 Blu...

Страница 19: ...purchase charge the battery prior to product use Use the battery charger Paper Installation 1 Press the open button to open the paper cover 2 Insert the paper as shown in the image Remove any remainin...

Страница 20: ...putted press the power button to perform auto calibration Select the mode Auto Calibration Power Button Self Test Feed Button 4 Three pages of label paper are outputted when performing auto calibratio...

Отзывы: