EN-3
EN
1. Planning and installation
When selecting the location for and erecting the Biolan Garden Toi-
let, it is essential to provide sufficient space for its use and mainte
-
nance, to route the ventilation pipe without bends through the roof
of the building over the ridge and to locate the seep liquid canister
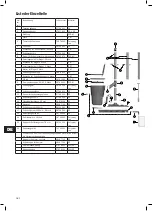
in a suitable place. See the dimension drawing for the toilet unit
(page 2).
Place the toilet unit directly on sufficiently firm ground or concrete
surface. Do not place the unit onto boarded floor.
1.1 Technical specifications
- Top area 53 x 53 cm
- Total height to the upper edge of the seat ring 86 cm
- Total length of the unit 124 cm
- Height of the evaporating pan 9.7 cm
- Volume of the body about 130 l
- Weight about 14 kg
- External diameter of the liquid removal hose 32 mm
- Volume of the seep liquid canister 15 l
- External diameter of the ventilation pipe 75 mm, length 3 x 1.0
m 1 x 0.5 m
2. Before installation
Make sure that the air channel (part 4) inside the body is still in
place after transportation. The channel must rest on the sill on the
inside wall of the tank so that the inlet air grate (part 10) at the side
of the body will allow unobstructed airflow into the air channel. The
air inlet valve cannot be adjusted. Keep the protective cap for the
seep liquid canister (part 15) for emptying of the canister.
3. Installation in the toilet building
The Biolan Garden Toilet is installed through the floor so that the
top cover of the tank (part 2) will serve as the seat ring. Using, for
example, a keyhole saw or a jig saw, cut a suitable hole for the toilet
tank (part 1) and the ventilation channel (part 7) out of the floor
and the wall using the sawing template included in the package as
a guide. Then the sitting height will be about 43 cm. The height re-
quired by the unit from the upper surface of the floor to the ground
is 43 cm. The base must be level across the entire area (113 cm) of
the evaporating pan (part 11). Insert the body into the opening in
the floor. Place the evaporating pan under the body in such a man
-
ner that the body stands firmly in position on top of it. Position the
evaporating pan so that the seep liquid drain hole is at the opposite
end to the body. Install the ventilation channel (part 7) through the
opening made in the wall, as shown in Fig. 1. Attach the channel to
the body using screws (see Fig. 2). Position the top (part 2) on top
of the tank (part 1).
Connect the seep liquid pipe (part 14) to the lead-through rubber
(part 9) at the end of the evaporating pan (part 11). Route the pipe
into the canister (part 15). Bury the canister in the ground, or place
it some other way so that the seep liquid flows by gravitation into
the canister.
Where necessary, the ventilation pipe can be extended using sewa-
ge pipes and fittings (32 mm in diameter). Always use sleeves with
a sealing ring for joining up the pipes. If the seep liquid canister is
difficult to bury, you can replace it with a smaller canister. If you
want, you can lay the seep liquid canister on its side.
Join up the 1m-long ventilation pipes (part 17) that point up from
the ventilation channel (part 7), and support them on the wall by
means of the pipe brackets (part 19). Install the outlet air pipe cap
(part 20) in the end of the topmost ventilation pipe. The ventilation
pipes may be cut off as necessary. Ensure, however, that the venti-
lation pipe reaches above the roof ridge of the toilet building.
Put the evaporating pan cover (part 12) in place. Install the 0.5m-
long ventilation pipe (part 16) between the evaporating pan cover
and the ventilation channel so that the pipe connects with the ven-
tilation channel (part 7). Lock the pipe in position by inserting the
locking stud (part 18) in the hole at the lower end of the pipe.
Fig. 1 Position the ventilation channel (part 7) inside the body.
Example picture of toilet installation and placing the liquid canister.
Fig. 2 Attach the channel to the body by the screws (part 7), inclu-
ded in the delivery.
Содержание GARDEN TOILET
Страница 2: ...2...
Страница 45: ...RU 5 RU www biolan fi 12 12 1 Biolan C Biolan 12 2 17 Biolan Biolan 4 EPDM RST C Biolan 0 2 0 5 12 3 4 11 1 5...
Страница 47: ...06 2013...
Страница 48: ......


