112
Print Server
The Print Server feature allows you to share a printer on your network by connecting a USB cable
from your printer to the USB port on the 8900X R3. This allows you to print from any location on your
network.
Note:
Only USB printers are supported
Setup of the printer is a 3 step process
1. Connect the printer to the 8900X R3’s USB port
2. Enable the print server on the 8900X R3
3. Install the printer drivers on the PC you want to print from
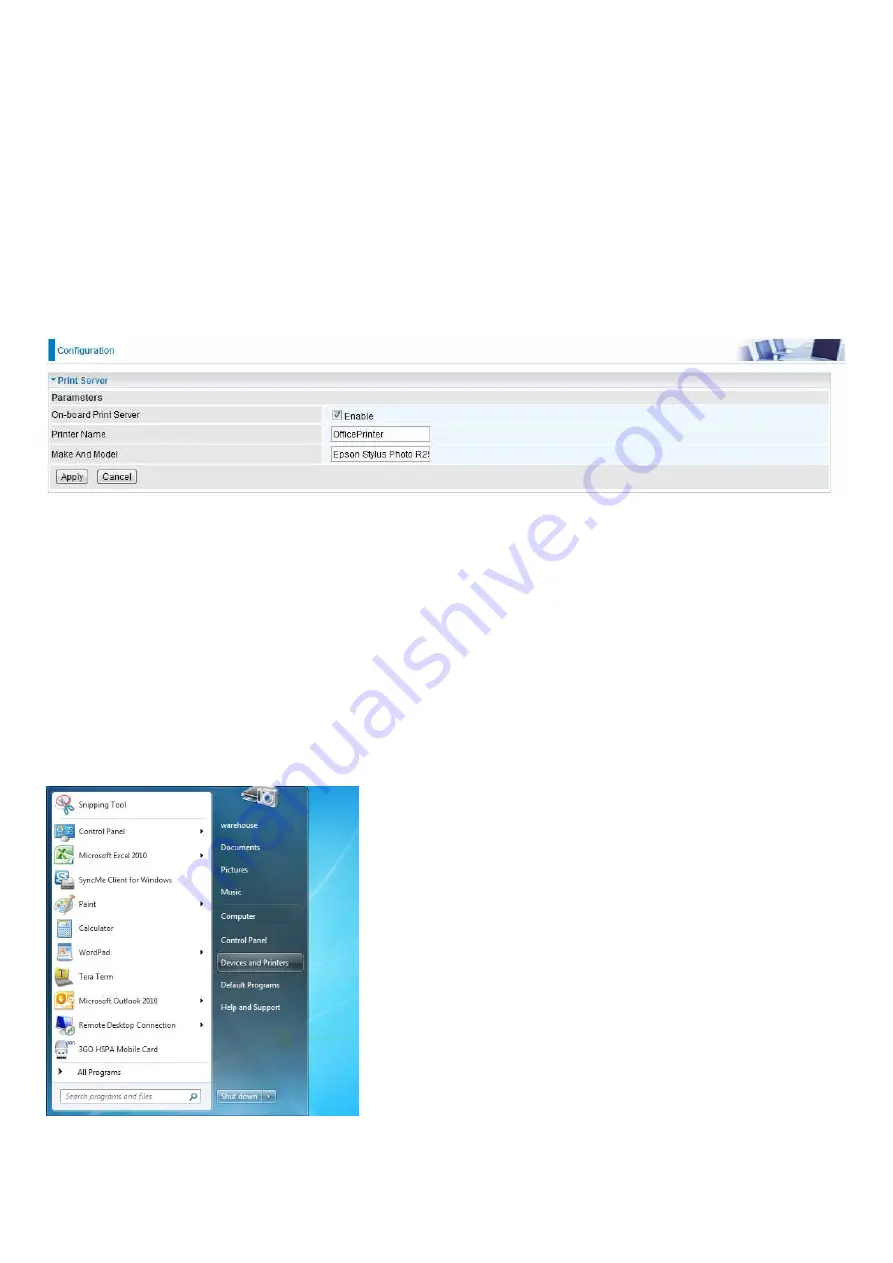
On-board Print Server: Check Enable to activate the print server
Printer Name: Enter the Printer name, for example, OfficePrinter
Make and Model: Enter in the Make and Model information for the printer, for example, Epson
Stylus Photo R290
Note:
The Printer name can be any text string up to 40 characters. It cannot contain spaces.
The Make and Model can be any text string up to 128 characters.
Set up of Printer client (Windows 7)
Step 1: Click Start and select “Devices and Printers”
Содержание BiPAC 8900X R3
Страница 20: ...15 3G LTE Router mode ...
Страница 64: ...59 3 Wait while the device is configured 4 Success ...
Страница 113: ...108 Accessing mechanism of Storage In your computer Click Start Run enter 192 168 1 254 ...
Страница 115: ...110 Access the folder public ...
Страница 118: ...113 Step 2 Click Add a Printer Step 3 Click Add a network wireless or Bluetooth printer ...
Страница 121: ...116 Step 8 Click Next and you are done You will now be able to see your printer on the Devices and Printers Page ...
Страница 123: ...118 Take Windows media player in Windows 7 accessing the DLNA server for example for usage of DLNA ...
Страница 129: ...124 Rule inactive ...
Страница 165: ...160 ...
Страница 168: ...163 ...
Страница 177: ...172 2 Click Connect to a workplace and press Next 3 Select Use my Internet connection VPN and press Next ...
Страница 178: ...173 4 Input Internet address and Destination name for this connection and press Next ...
Страница 179: ...174 5 Input the account user name and password and press Create ...
Страница 180: ...175 6 Connect to the server ...
Страница 182: ...177 ...
Страница 193: ...188 2 Click Connect to a workplace and press Next 3 Select Use my Internet connection VPN and press Next ...
Страница 194: ...189 4 Input Internet address and Destination name for this connection and press Next ...
Страница 195: ...190 5 Input the account user name and password and press Create ...
Страница 198: ...193 9 Go to Network connections enter username and password to connect L2TP_IPSec and check the connection status ...
Страница 207: ...202 3 Set the OpenVPN client s E mail address to receive trusted CA from server to establish a trusted OpenVPN tunnel ...
Страница 225: ...220 2 ipoe_eth0 with DDNS www hometest1 com using username password test test ...
Страница 236: ...231 Click Import Certificate button to import your certificate Enter the certificate name and insert the certificate ...
Страница 237: ...232 Click Apply to confirm your settings ...
Страница 243: ...238 HTTP Port The device equips user to change the embedded web server accessing port Default is 80 ...
Страница 245: ...240 Mobile Networks User can press Scan to discover available 3G 4G LTE mobile network ...
Страница 251: ...246 Example Ping www google com ...
Страница 252: ...247 Example trace www google com ...


