


127
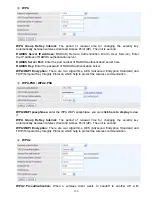
IGMP
Default Version:
enter the supported IGMP version, 1-3, default is IGMP v3.
Query
Interval:
enter the periodic query interval time (sec) the multicast router sending the query
message to hosts to understand the group membership information.
Query
Response
Interval:
enter the response interval time (sec).
Last Member Query Interval:
enter the interval time (sec) the multicast router query the specified
group after it has received leave message.
Robustness Value:
enter the router robustness parameter, 2-7, the greater the robustness value,
the more robust the Querier is.
Maximum Multicast Groups:
enter the Maximum Multicast Groups.
Maximum Multicast Data Sources( for IGMP v3):
enter the Maximum Multicast Data Sources,1-24.
Maximum Multicast Group Members:
enter the Maximum Multicast Group Members.
Fast leave:
check to determine whether to support fast leave. If this value is enabled, IGMP proxy
removes the membership of a group member immediately without sending an IGMP membership
query on downstream. This is very helpful if user wants fast channel (group change) changing in
cases like IPTV environment.
LAN to LAN (Intra LAN) Multicast:
check to determine whether to support LAN to LAN (Intra LAN)
Multicast. If user want to have a multicast data source on LAN side and he want to get IGMP
snooping enabled, then this LAN-to-LAN multicast feature should be enabled.
MLD
Default Version:
enter the supported MLD version, 1-2, default is MLDv2.
Query
Interval:
enter the periodic query interval time (sec) the multicast router sending the query
message to hosts to understand the group membership information.
Query
Response
Interval:
enter the response interval time (sec).
Last Member Query Interval:
enter the interval time (sec) the multicast router query the specified
group after it has received leave message.
Robustness Value:
enter the router robustness parameter, default is 2, the greater the robustness
value, the more robust the Querier is.
Maximum Multicast Groups:
enter the Maximum Multicast Groups.
Maximum Multicast Data Sources( for MLDv2):
enter the Maximum Multicast Data Sources,1-24.
Maximum Multicast Group Members:
enter the Maximum Multicast Group Members.
Fast leave:
check to determine whether to support fast leave. If this value is enabled, MLD proxy
removes the membership of a group member immediately without sending an MLD membership
query on downstream. This is very helpful if user wants fast channel (group change) changing in
cases like IPTV environment.
LAN to LAN (Intra LAN) Multicast:
check to determine whether to support LAN to LAN (Intra LAN)
Multicast. If user want to have a multicast data source on LAN side and he want to get MLD
snooping enabled, then this LAN-to-LAN multicast feature should be enabled.
Содержание BiPAC 7800NL
Страница 6: ...3 Firmware Upgradeable Device can be upgraded to the latest firmware through the WEB based GUI ...
Страница 12: ...9 Important note for using this router ...
Страница 17: ...14 Connecting Your Router Users can connect the ADSL2 router as the following ...
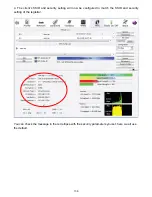
Страница 57: ...54 The device summary information ...
Страница 64: ...61 Click Next to check the settings If you confirm click Apply to submit the settings ...
Страница 67: ...64 Click Next to go on to check the settings Click Apply to apply your settings ...
Страница 69: ...66 IPv6 disabled Click Apply to apply your settings ...
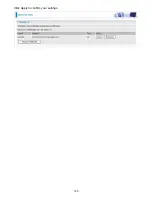
Страница 109: ...106 In listing table you can remove the one you don t want by checking the checking box and press Remove button ...
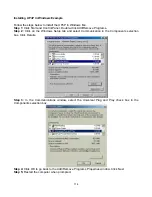
Страница 121: ...118 in the system tray Step 6 Double click on the icon to display your current Internet connection status ...
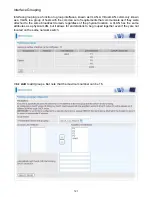
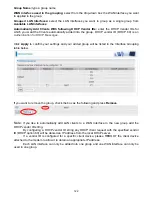
Страница 127: ...124 Click Import Certificate button to import your certificate Enter the certificate name and insert the certificate ...
Страница 128: ...125 Click Apply to confirm your settings ...
Страница 142: ...139 Add Enrollee with PBC Method 1 Select radio button Push Button and Click Or Press the physical button on router ...
Страница 145: ...142 Configure AP as Enrollee Add Registrar with PIN Method 1 Set AP to Unconfigured Mode and Click Config AP button ...