background image

Aftercare

Aftercare

In the event that your product has a problem some maintenance may be 
 required.

Temperature control issue

If the temperature control does not regulate the temperature once the
product is installed this could be due to incorrect pressures.
Or
This could be due to debris in the thermostat, as the system was not
flushed prior to connection of the water supply.
Or
This could be due to limescale build up on the thermostat

If the pressures are not balanced, this must be fixed by either 
increasing the lower pressure or reducing the higher pressure 
(but the minimum pressure requirement must still be achieved)

Alternatively check the thermostat and clean away any debris
or limescale.

TURN OFF WATER SUPPLY

Turn the diverter handle to an open position to allow water to drain.
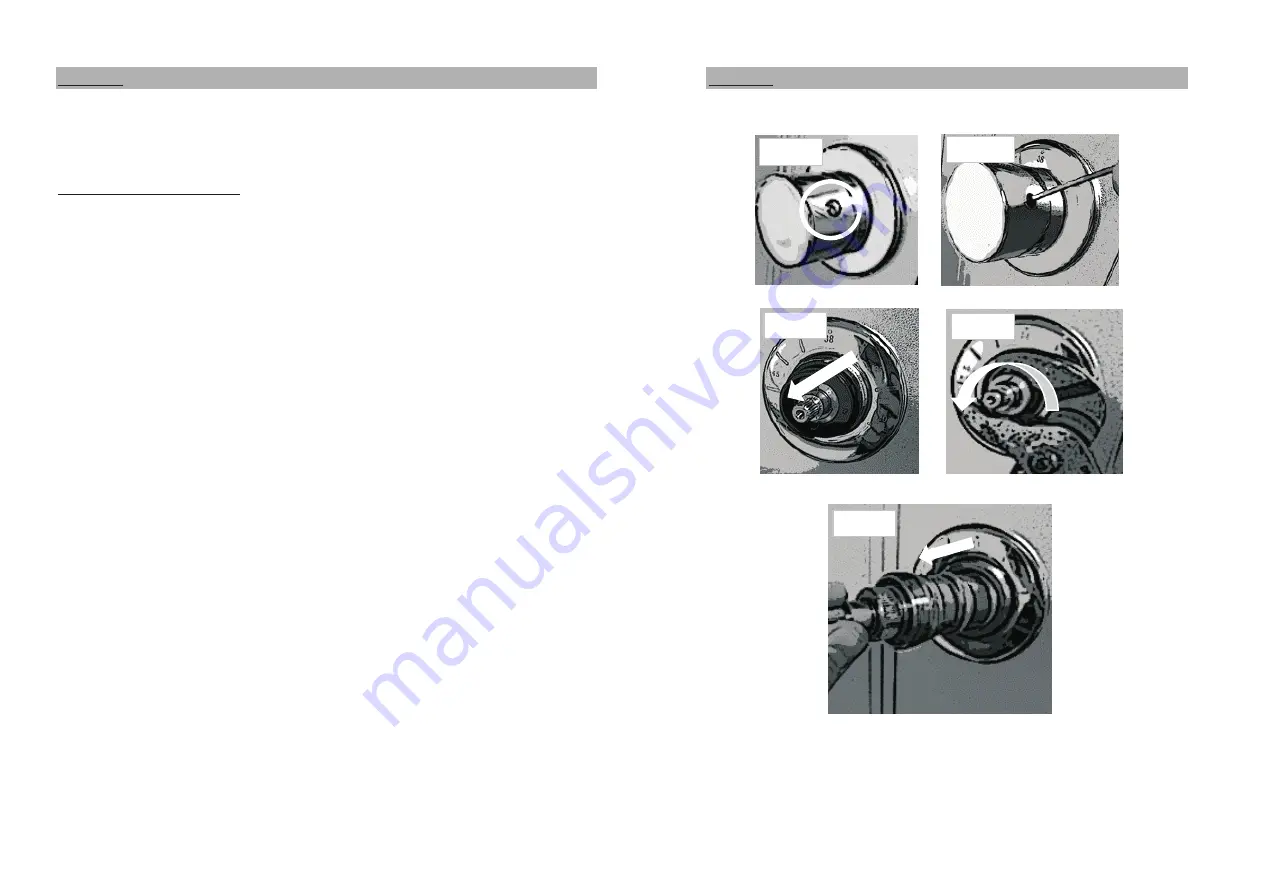
Turn temp handle to the 38c stop position and remove the handle cap (Fig 1).
Using a hex key, loosen the grub screw inside the handle (Fig 2).
Pull the handle and take note of the stop ring position for replacing (Fig 3).
Using grips, turn the brass thermostat anti-clockwise to remove (Fig 4).
Once removed clear any debris inside the mixer.
Run the thermostat under warm  water and scrub using a soft
bristle brush to remove debris/limescale.
Re-fit thermostat and re-fit black stop ring in noted position.
Replace handle with button in the 38c position.
Tighten screw and re-fit cap.

If you should have any issues with your product, please contact us via

Turn on water supply and test.

       our Help Centre on line at WWW.betterbathrooms.com

Fig 1

Fig 2

Fig 3

Fig 4

Fig 5

SEPT  18 - V6BB

Содержание 900 Quadrant Steam

Страница 1: ...the installation is allowed to be within bathroom Zones 0 or 1 Installation is permitted within Zone 2 and outside of the bathroom zones as long as it is not in a position where it is likely to be sp...

Страница 2: ...e and remain hot for a period after use therefore contact with either can cause injury do not touch until fully cooled After use always turn off the unit at the switch Any maintenance should only be c...

Страница 3: ...e tray is level If levelling is required adjust the legs on the tray Check the tray using a spirit level Once the tray is level tighten the securing nuts on the legs After levelling connect the pre fi...

Страница 4: ...l 2 2 Hold the rail 1 to the front face of the chrome profile 2 5 Ensure the fin on the seal faces inside the enclosure 3 From inside the profile connect the screws A and tighten into rail 6 Fit the g...

Страница 5: ...e end of the touching surfaces Do not seal on the inside central panel 5 10 Push the back panels 4A and 4B to the central panel 5 after being sealed and align correctly 11 Secure together using the nu...

Страница 6: ...ate V onto the back corner of the tray Drill should not be on hammer setting 14 Align the steam generator to the steel plate once steam generator Hold this frame and secure into position using the fix...

Страница 7: ...frame using a 3mm drill bit back panels and to the tray Remove the assembly Failure to seal in this way may allow water to escape through the touching surfaces and to the outside of the enclosure Ali...

Страница 8: ...21 Secure the steam generator frame to the steel plate V using fixings provided nuts and bolts G 20 Connect flexi tube from mixer to shower head connection 22 Insert steam generator hose through centr...

Страница 9: ...the back and side edges where the frame must be connected to the left inlet failure to do this will meets the tray ensuring not block the drainage slots cause issues with the thermostat function 25 W...

Страница 10: ...ose facing down 37 Hook the door onto the top rail push the door towards the 33 Attach fixings for shelf to right hand back panel and secure bottom rail then press down on the bottom roller to hook th...

Страница 11: ...f the cabin roof as shown below Cable Connections 45 The radio aerial strip should be un wound and attached to the 41 All connections need to be made before moving the enclosure roof of the cabin or w...

Страница 12: ...d symbols Control Panel Function Please note Telephone function requires connection to your landline cable connector CD function requires connection to a CD player with the CD player outside the enclo...

Страница 13: ...this model CD Function Press the FM CD button until the CD symbol is displayed on Fan the screen Press the fan button to activate the extraction fan flashing You will need to connect an external CD pl...

Страница 14: ...cks Check water supply is reaching the steam tank Check cable connections When the set steam time has been reached the steam will Check if inlet valve filter on the steam tank is blocked turn off Solu...

Страница 15: ...position to allow water to drain On the handle unscrew the handle peg Fig 1 Using a hex key loosen the grub screw inside the handle Fig 2 Pull off the handle Using a spanner remove the brass retainer...

Страница 16: ...y debris or limescale TURN OFF WATER SUPPLY Turn the diverter handle to an open position to allow water to drain Turn temp handle to the 38c stop position and remove the handle cap Fig 1 Using a hex k...

Страница 17: ...wer Hose Flow control diverter Door runners Seals Failure to seal correctly will invalidate your guarantee Reported damage after installation will not be covered by your guarantee Maintenance For some...

Страница 18: ...separated and disposed of in an environmentally friendly manner Contact your local disposal site to confirm SEPT 18 V6BB Product Specification Working Pressure 1 5 to 4 bar Pressure MUST be balanced D...

Отзывы:

Похожие инструкции для 900 Quadrant Steam