

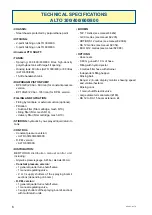


18
82493 - ALTO
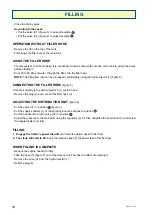
SPRAYING
POWER TAKE-OFF SPEED
- With the power take-off connected (following filling), increase its speed to 540 rpm by bringing the needle of
the rev counter opposite the mark (R)
(see manual
No. 82.471
).
ADjUSTING THE VOLUME/HECTARE
In order to program your volume/hectare
- You need to know, for the gear chosen, the forward speed in km/h, at 540 rpm at the power take-off
(see
manual
No. 82.471
).
- Bearing in mind the required volume/hectare, refer to the rate chart of the selected nozzle(s)
(see nozzle
manual
No. 82.467
).
▪ In the column corresponding to the forward speed in km/h, find: the nozzle and pressure which will enable
the required volume/hectare to be obtained.
Example:
- Speed in km/hour:
6 km/h
- Volume/hectare:
260 litres/ha
- Selected nozzles:
ALUMINE AFX (0.50 m spaced).
Possible choice:
- ALUMINE AFX BLUE
........................3.5 bar, 256 litres/ha
TO ObTAIN REQUIRED VOLUME/HECTARE
- Fit the chosen nozzles.
- Put the handle of the main valve (V2) in position (figure 7).
- Increase the power take-off speed to 540 rpm.
- Display on the pressure gauge (1) the pressure previously read from the flow rate table, using the screwed
rod (4) on the regulator (2) and lock with the knurled nut (3) (figure 7).
- From now on, you can work.
SPRAYING CONTROL
- Put the valve (V1) in position (figure 3, page 17).
- Put the supply shutters (1) (figure 8) of the spraying boom's sections at position .
- Put the handle of the main valve (V2) in position .
TO STOP THE SPRAYING
Closure of one or more sections:
- Close the shutter or shutters by putting them in position (figure 8).
Total closure:
- Leave the supply shutters in "opened" position and adjust the main valve (V2), putting its handle in
position (figure 8).
Содержание ALTO 300
Страница 2: ...2 82493 ALTO...
Страница 4: ...4 82493 ALTO...
Страница 14: ...14 82493 ALTO...
Страница 17: ...17 82493 ALTO 5 6 4 3 V4 V1 1 1 2 3 4 2 3 V2...
Страница 19: ...19 82493 ALTO 7 8 1 1 2 3 4 V2 V2...
Страница 21: ...21 82493 ALTO 9 10 1 V1 V2...
Страница 22: ...22 82493 ALTO...
Страница 25: ...25 82493 ALTO 11 12 13 1 3 2 V 1 1 3 2 V2 4...
Страница 27: ...27 82493 ALTO 16 17 19 18 14 V4 V1 15 1 2 3 1 V2 V3 V2...
Страница 29: ...29 82493 ALTO ON OFF 20 21 24 23 D P Elec 2 4 1 1 1 V V 22 V2 V2 1 2 3...
Страница 31: ...31 82493 ALTO 27 D P Elec 1 ON OFF 28 2 4 1 1 V 26 25 V4 V1 1 2 V2 V V2 3...
Страница 32: ...32 82493 ALTO...
Страница 33: ...33 82493 ALTO OTHER SPRAYER FUNCTIONS...
Страница 35: ...35 82493 ALTO a b a a b b 31 30 32 1 2 3 4 5 6 2 3 29 1 33 1 2 V2 V V2...
Страница 37: ...37 82493 ALTO 35 36 34 V4 Alto 300 400 Alto 300 400 Alto 600 800 Alto 600 800 1 1 3 2 2 2 3 2...
Страница 39: ...39 82493 ALTO 37 41 40 38 39 1 42 1 S 1 2 E...
Страница 40: ...40 82493 ALTO...
Страница 41: ...41 82493 ALTO MAINTENANCE OF THE SPRAYER See Safety checks maintenance of the Sprayers manual No 82 471...
Страница 46: ...46 82493 ALTO...
Страница 47: ...47 82493 ALTO MAINTENANCE DIAGRAM SPRAYING CIRCUIT...
Страница 49: ...49 82493 ALTO 1 2 3 7 4 9 6 5 8 10 17 12 13 14 16 15 ON OFF 11...


