


16
82493 - ALTO
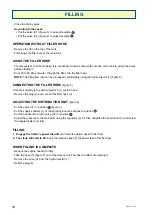
FILLING
- Close the drain valves.
According to the cases:
▪ Put the valve (V1) (figure 3) to opened position .
▪ Put the valve (V4) (figure 4) to closed position .
OPERATION WITHOUT FILLER HOSE
- Remove the lid on the top of the tank.
- Fill through the filler hole of the main tank
USING THE FILLER HOSE
- For this system to work properly, it is necessary to have some water into the main tank to prime the pump
before starting it.
- Pour 30 to 50 litres of water, through the filter, into the filler hole.
NOTE:
The filling flow rate can be increased considerably using the hydro-injector (1) (figure 5).
CONNECTING THE FILLER HOSE
(figure 5)
Connect it directly to the hydro-injector’s (1) suction hose:
- Remove the plug (2) and connect the filler hose (3).
ADjUSTING THE DISTRIbUTION UNIT
(figure 6)
- Put the valve (V1) in position (figure 3).
- Put the supply shutters (1) of the spraying boom's sections at position .
- Put the handle of the main valve (V2) in position .
- Adjust the pressure to the maximum using the regulator (2), for that, untighten the knurled nut (3) and screw
the regulator stem (4) fully.
FILLING
1. Engage the tractor’s power take-off
and raise its rotation speed to 540 rpm.
2. Your tank will start to fill.
Keep the rotation speed of the power take-off at 540 rpm.
WHEN FILLING IS COMPLETE
- Reduce the engine speed (to idle).
- Take the hose (3) (figure 5) out of the water point. This has the effect of emptying it.
- Remove the hose (3) from the hydro-injector (1).
- Refit the plug (2).
Содержание ALTO 300
Страница 2: ...2 82493 ALTO...
Страница 4: ...4 82493 ALTO...
Страница 14: ...14 82493 ALTO...
Страница 17: ...17 82493 ALTO 5 6 4 3 V4 V1 1 1 2 3 4 2 3 V2...
Страница 19: ...19 82493 ALTO 7 8 1 1 2 3 4 V2 V2...
Страница 21: ...21 82493 ALTO 9 10 1 V1 V2...
Страница 22: ...22 82493 ALTO...
Страница 25: ...25 82493 ALTO 11 12 13 1 3 2 V 1 1 3 2 V2 4...
Страница 27: ...27 82493 ALTO 16 17 19 18 14 V4 V1 15 1 2 3 1 V2 V3 V2...
Страница 29: ...29 82493 ALTO ON OFF 20 21 24 23 D P Elec 2 4 1 1 1 V V 22 V2 V2 1 2 3...
Страница 31: ...31 82493 ALTO 27 D P Elec 1 ON OFF 28 2 4 1 1 V 26 25 V4 V1 1 2 V2 V V2 3...
Страница 32: ...32 82493 ALTO...
Страница 33: ...33 82493 ALTO OTHER SPRAYER FUNCTIONS...
Страница 35: ...35 82493 ALTO a b a a b b 31 30 32 1 2 3 4 5 6 2 3 29 1 33 1 2 V2 V V2...
Страница 37: ...37 82493 ALTO 35 36 34 V4 Alto 300 400 Alto 300 400 Alto 600 800 Alto 600 800 1 1 3 2 2 2 3 2...
Страница 39: ...39 82493 ALTO 37 41 40 38 39 1 42 1 S 1 2 E...
Страница 40: ...40 82493 ALTO...
Страница 41: ...41 82493 ALTO MAINTENANCE OF THE SPRAYER See Safety checks maintenance of the Sprayers manual No 82 471...
Страница 46: ...46 82493 ALTO...
Страница 47: ...47 82493 ALTO MAINTENANCE DIAGRAM SPRAYING CIRCUIT...
Страница 49: ...49 82493 ALTO 1 2 3 7 4 9 6 5 8 10 17 12 13 14 16 15 ON OFF 11...


