Technical Handbook
EasyKit
Berg Hortimotive Burg. Crezeelaan 42a 2678 KZ De Lier The Netherlands Tel:
+31 (0) 174- 517 700
Fax:
+31 (0) 174- 516 958
E- mail:
[email protected]
Internet:
www.berghortimotive.com
Страница 1: ...echnical Handbook EasyKit Berg Hortimotive Burg Crezeelaan 42a 2678 KZ De Lier The Netherlands Tel 31 0 174 517 700 Fax 31 0 174 516 958 E mail info berghortimotive nl Internet www berghortimotive com...
Страница 2: ...2 of 45 Version 8 October 2018 The machine is manufactured by Berg Hortimotive Burg Crezeelaan 42a 2678 KZ De Lier The Netherlands Tel 31 0 174 517 700 Fax 31 0 174 516 958 Email info berghortimotive...
Страница 3: ...r otherwise for consequential damage caused by defects to the EasyKit e g interruption of business delays etc 1 3 Guarantee For a period of 6 months after delivery Berg Hortimotive gives the client a...
Страница 4: ...ing them It is important that this handbook is carefully read in order to learn how the EasyKit should be operated and maintained By reading this handbook and then using the EasyKit you or anyone else...
Страница 5: ...YKIT 24 7 3 CHARGING THE BATTERIES ON THE EASYKIT 24 7 4 EFFICIENT USE OF THE PIPE RAIL WAGON AND THE BATTERIES 25 7 5 MOVING THE EASYKIT ON THE MAIN PATH 25 7 6 USING THE EMERGENCY STOP 25 7 7 RESTAR...
Страница 6: ...ill result in serious injury or even death 3 2 Review of the safety pictograms used The EasyKit is provided with safety pictograms in order to bring possible dangers or dangerous situations to the att...
Страница 7: ...ble load 5 Maximum tilted position pipe rail system 2 6 Maximum support spacing 1250 mm 7 Only to be used indoors in greenhouse 3 3 Machine type plate The EasyKit is fitted with a machine type plate w...
Страница 8: ...irs or inspections Always switch off the EasyKit using the earth switch Always take up the slack in the operating cable by gathering it up using the Velcro strips provided This reduces the chances of...
Страница 9: ...rder to avoid the danger of becoming trapped or jammed the greatest of care must be given to the moving parts on the EasyKit When starting up again after maintenance or repairs please check whether an...
Страница 10: ...ance and appendix 4 It is necessary when working with the EasyKit to wear shoes or boots with steel toecaps S1 Activities not described in this handbook should only be carried by or in consultation wi...
Страница 11: ...rail system The platform may not be entered while the machine is on the concrete path Always walk alongside the machine therefore not on the chassis when transporting it over the main path Customer sp...
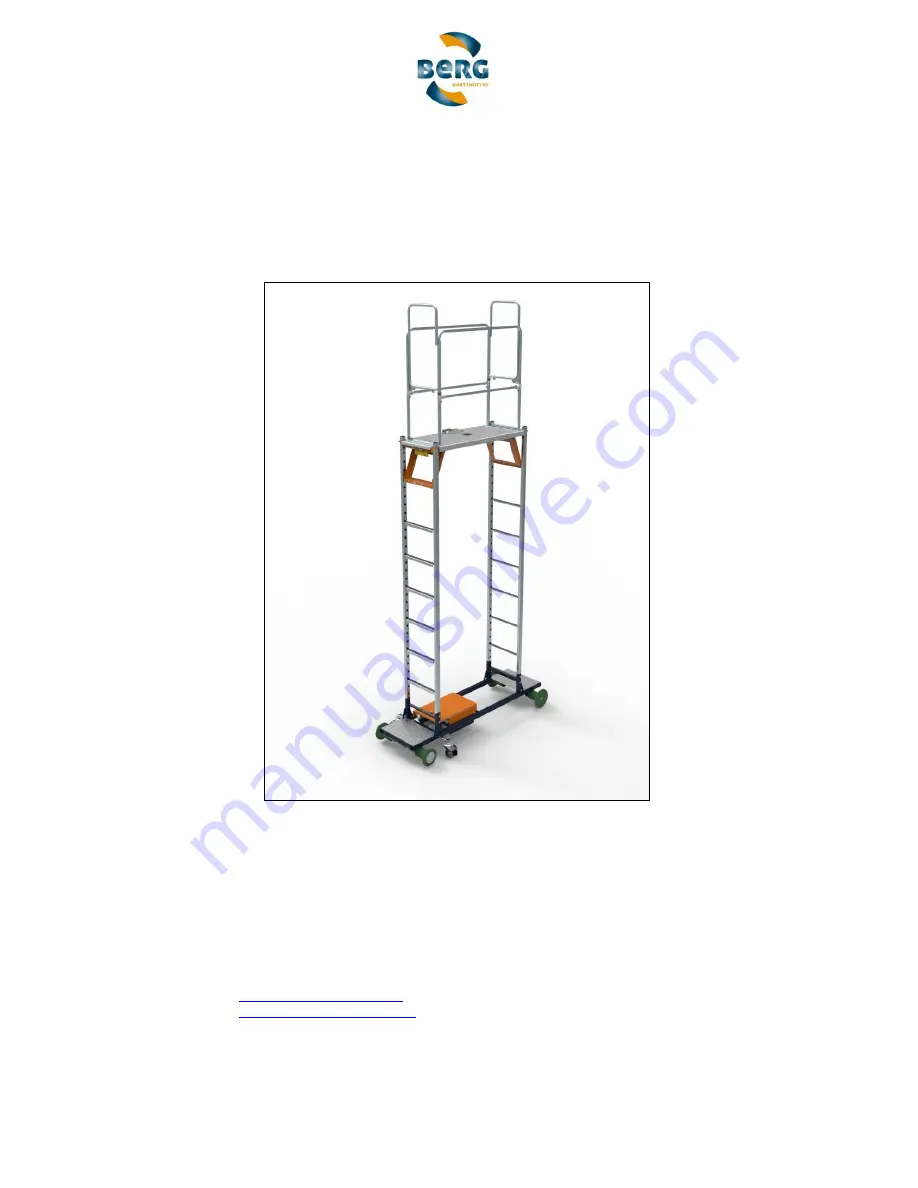
Страница 12: ...main components of the EasyKit are illustrated at figure 1 Figure 1 Main components of EasyKit A Door B Rail safety railing C Control panel D Platform E Height adjustment F Step G Stands H Trailing re...
Страница 13: ...e 2 EasyKit controls A Speed regulator button B Direction selector switch defect warning lamp C Emergency stop D Foot pedal Figure 3 EasyKit Chassis Figure 4 Earth switch A Battery B Charge supply plu...
Страница 14: ...ting on pipe rail systems that comply with the horticulture sector guidelines the health and safety catalog in force in the Netherlands for pipe rail systems The EasyKit should only be used on the cor...
Страница 15: ...d fixings have been correctly applied The EasyKit has been specially designed to run on a pipe rail system When leaving the Berg Hortimotive factory the EasyKit is checked for proper functioning and s...
Страница 16: ...ans that there are rails on the paths between the plants which consists of two pipes of the same diameter having a fixed width between them centre to centre measurement The pipes are often used as hea...
Страница 17: ...0 4 Mpa 62 psa The use of rail systems not covered by the policy regulations is permitted on the condition that a stabilisation test is carried out in accordance with the policy regulations from which...
Страница 18: ...Kit must be immediately halted and the operator should walk alongside the machine back to the path Thereafter the pipe rail system should be adjusted before any activities can be restarted First of al...
Страница 19: ...ce required for installing the machine De stack the EasyKits removing the casings remove the packaging and slacken the bolts Release the control box use a bench or similar Put the platform onto the be...
Страница 20: ...e the bench Ensure that the locks are properly in place both bolts should be in the green part Remove the bolts from the foot switch position the control box and screw it down Fix the cable clamp atta...
Страница 21: ...ars of the rail secure the rail with the bolts Fit the safety rail spring put the supply plug into the connector The EasyKit is now ready for use 6 6 Dismantling the EasyKit Dismantling the EasyKit is...
Страница 22: ...knob should be set at zero Only authorised properly trained personnel of at least 18 years of age should be allowed to operate the EasyKit Personnel should be fully aware of the directions and instruc...
Страница 23: ...of becoming trapped or jammed the greatest of care must be given to the moving parts on the EasyKit Keep a safe distance from fixed and or moving parts within the greenhouse as well as cables and rop...
Страница 24: ...position and push the EasyKit on the concrete path For entering the next path see point 4 7 2 Switching OFF the EasyKit 1 The EasyKit stops as soon as the foot pedal is released 2 The electrical circ...
Страница 25: ...po potentiometer If the speed is set optimally fewer stops and starts are required which has a very positive effect on the wear of the pipe rail wagon By following the above recommendations the produc...
Страница 26: ...l and the brakes are applied to the swivel wheels If after a long period the EasyKit longer than 2 weeks is put back into operation it should first be inspected as described at chapter 6 1 Inspection...
Страница 27: ...unattended when the electrical supply plug is still in place Always keep the EasyKit in good working condition by carrying out regular safety inspections Dangerous situations should be always be rect...
Страница 28: ...ance carbon brushes on the motor and replace if less than 1 cm see 8 4 Visual Air pressure X Check the height adjuster locks visual X Test the springs in the locks visual X Figure 4 Maintenance schedu...
Страница 29: ...cm high check at the change of each season whether the stops are still functioning properly The ground under the pipe rail system should be dry flat and hard Soft or damp spots should be repaired and...
Страница 30: ...stance is within calling distance when people have to work near batteries Avoid short circuits sparks and ensure that there is no electrical connection between the battery poles The battery cover shou...
Страница 31: ...ossible to clean the EasyKit using compressed air provided that it is dry Never pour water over the EasyKit or clean it using a steam or high pressure water cleaner which could lead to serious damage...
Страница 32: ...Chain broken Motor gearwheel is loose Drive roller is jammed Controls do not react Direction of travel switch defective Reset using potentiometer Foot switch defective Potentiometer defective Status L...
Страница 33: ...table for operating in explosive atmospheres Type Dimensions mm standard Centre to centre 420 800 Length 1740 Width c to c 220 Chassis step up height from concrete path 210 Step up height on platform...
Страница 34: ...gn principles EN ISO 14122 2 Safety of Machines Permanent access facilities to machines Part 2 Working platforms footpaths EN ISO 14122 3 Safety of Machines Permanent access facilities to machines Par...
Страница 35: ...nd operation of control elements NEN 5509 User handbook Content structure formulation and presentation in accordance with the definitions in the directives 2006 42 EG Machinery Directive 2004 108 EG D...
Страница 36: ...Translated user manual EasyKit page 36 of 45 12 Technical appendices...
Страница 37: ...Translated user manual EasyKit page 37 of 45 Appendix 1 Maintenance logbook Date Description of repair maintenance Type no Serial no Company name engineer...
Страница 38: ...Translated user manual EasyKit page 38 of 45 Appendix 2 Technical drawings...
Страница 39: ...Translated user manual EasyKit page 39 of 45 Appendix 3 Electrical diagrams Version EasyKit MRT 2011 without tilt warning Version EasyKit MRT 2011 with tilt warning Appendix 4 Battery safety sheet...
Страница 40: ...eed regulator as well as the battery charger Efficient usage Endeavour to set the level of speed as closely as possible to the work tempo potentiometer By following the above recommendations the produ...
Страница 41: ...ct the positive terminal red to the positive pole and the negative terminal black to the negative pole on the battery Battery fluid is corrosive avoid contact with clothing skin and eyes Wash battery...
Страница 42: ...s along the ground and may enter sewers and basements 3 Personal protection Chemical protection suit Respiratory mask equipped with ABEKP1 filter 4 Intervention actions 4 1 General Keep upwind Put on...
Страница 43: ...h resuscitation should be avoided Use alternative methods preferably with oxygen or compressed air driven apparatus 6 Essential precautions for product recovery Use acid resistant equipment Recover sp...
Страница 44: ...Translated user manual EasyKit page 44 of 45...
Страница 45: ...r contamination on the top layer periodically after detection How to clean Remove dirt or contamination on the top layer using a soft brush or cloth or a compressed air line 6 bar Chemical contaminati...