Operation
26
Eng
lish
Using the menus
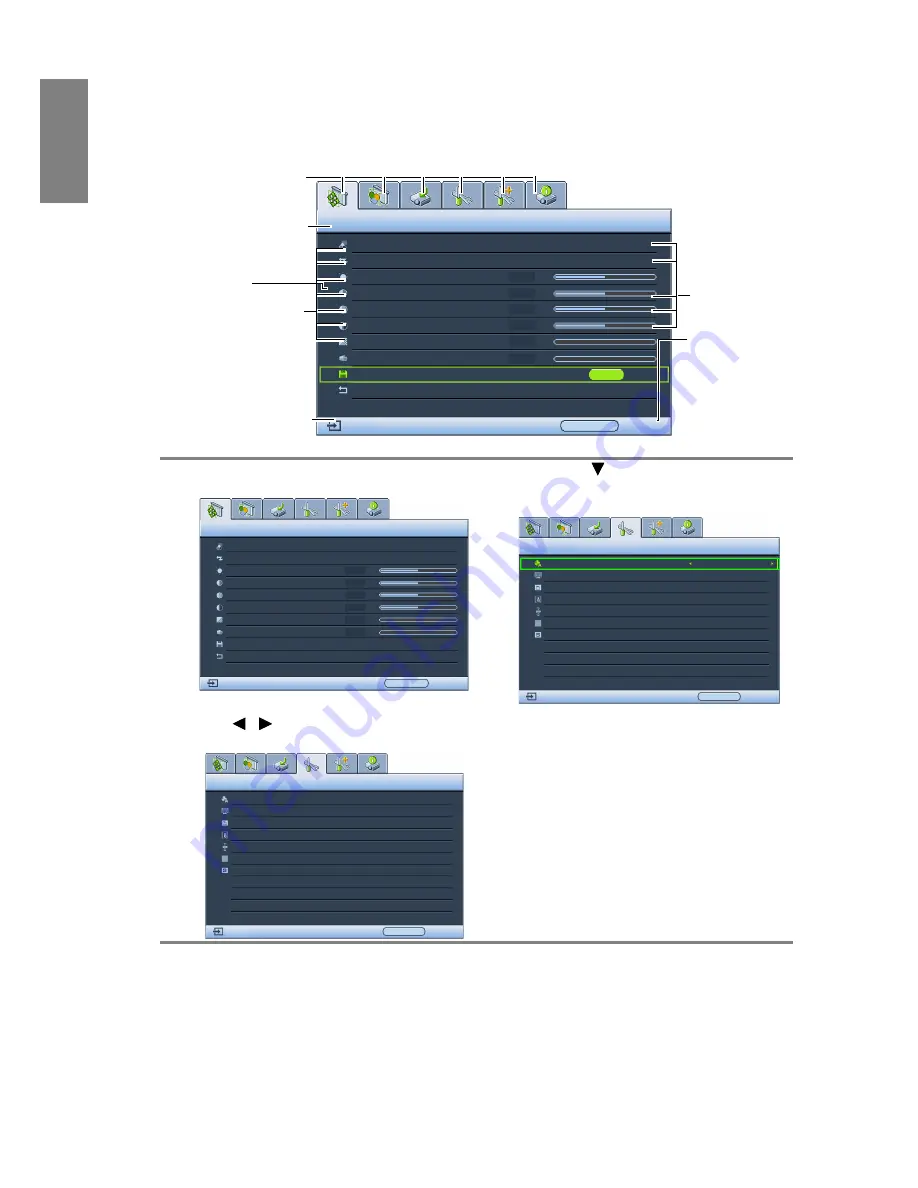
The projector is equipped with On-Screen Display (OSD) menus for making various
adjustments and settings.
Below is the overview of the OSD menu.
To use the OSD menus, please set them to your familiar language first.
Securing the projector
Using a security cable lock
The projector has to be installed in a safe place to prevent theft. Otherwise, purchase a lock,
such as a Kensington lock, to secure the projector. You can locate a Kensington lock slot on
the left side of the projector. See
"Rear adjuster foot" on page 9
for details.
A Kensington security cable lock is usually a combination of key(s) and a lock. Refer to the
lock’s documentation for finding out how to use it.
1.
Press MODE/ENTER on the projector or
remote control to turn the OSD menu on.
3.
Press
to
highlight
Language and
press MODE/ENTER to select a
preferred language.
2.
Use
/
to highlight the SYSTEM SETUP:
Basic menu.
4.
Press MENU/EXIT twice* on the
projector or remote control to leave
and save the settings.
*The first press leads you back to
the main menu and the second
press closes the OSD menu.
Current input signal
Main menu icon
Main menu
Sub-menu
Highlight
Press MENU/
EXIT to the
previous
page or to
exit.
Status
Picture Mode
Reference Mode
Brightness
Save Settings
Contrast
Color
Reset Picture Settings
User 1
50
ENTER
Menu/Back
Exit
PC
Tint
Sharpness
Flesh Tone
0
0
PICTURE : Basic
0
0
0
Living Room
PTCTURE : Basic
Picture Mode
Reference Mode
Brightness
Save Settings
Contrast
Color
Reset Picture Settings
Tint
Sharpness
Flesh Tone
50
0
0
0
0
0
User 1
Living Room
Menu/Back
Exit
PC
SYSTEM SETUP: Basic
Language
Front Table
Projector Position
Menu Settings
Operation Settings
Remote Receiver
Background Color
Splash Screen
PC
Front+Top
Blue
Menu/Back
Exit
English
BenQ
SYSTEM SETUP: Basic
Language
Front Table
Projector Position
Menu Settings
Operating Settings
Remote Receiver
Background Color
Splash Screen
PC
Front+Top
Blue
Menu/Back
Exit
English
BenQ


