


GUIDE TO INSTALLATION AND OPERATION
XVP-3901-DPI |
5
3. Position the new panel and secure it in place with the captive screw(s) at the bottom.
2.2 Card Installation
Once a matching rear connector panel has been installed, install the XVP-3901-DPI card as follows:
1. Open the front panel of the frame.
2. Slide the XVP-3901-DPI card into the slot and push gently on the handle to seat the connectors.
The card should be inserted into the right-most slot (as seen from the front of the frame) associated with the
double-slot rear panel. Inserting the card into the wrong slot will not damage the card, and will be flagged by the
on-card status LED flashing red to indicate that there is no connection to the rear panel.
3. Close the front panel of the frame.
2.3 Installation of the Optical Interface (option)
Refer to Annex 3 on page 80.
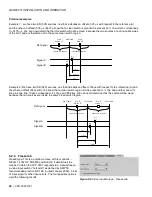
2.4 ABUS Connection to Companion
Audio Cards
When the XVP-3901-DPI is used in conjunction with
one or two companion audio cards (Grass Valley’s
AAP, DAP or UAP series), the ABUS flat cable must be
installed between the ABUS connector of the XVP-
3901-DPI and the connectors on the audio cards. The
ABUS flat cable is supplied with the audio card.
Note that audio cards from the Densité 2RU series will
require 3RU extenders for both the card and the
associated rear panel in order to fit into the Densité
3RU frame with the XVP-3901-DPI.
Note:
If only one audio card is used, you must use the
two end connectors on the ABUS cable, and leave the
center connector unplugged
Figure 2.2 ABUS flat cable installation
X
V
P
-3
9
0
1
U
A
P
-X
X
X
X
D
A
P
-X
X
X
X
Extenders
Содержание Grass Valley XVP-3901-DPI
Страница 4: ...GUIDE TO INSTALLATION AND OPERATION XVP 3901 DPI ...
Страница 78: ...GUIDE TO INSTALLATION AND OPERATION 72 XVP 3901 DPI ANNEX 1 XVP 3901 Local User Interface ...
Страница 79: ...GUIDE TO INSTALLATION AND OPERATION XVP 3901 DPI 73 ...
Страница 80: ...GUIDE TO INSTALLATION AND OPERATION 74 XVP 3901 DPI ...
Страница 81: ...GUIDE TO INSTALLATION AND OPERATION XVP 3901 DPI 75 ...