18
PRO MIXER DJX900USB/DJX750
Quick Start Guide
19
PRO MIXER DJX
900
USB/DJX7
50
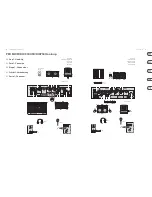
Getting started
(EN)
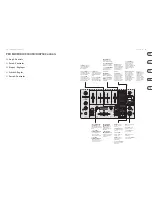
Make
a
ll
the
appropriate
power,
audio,
speaker
and
USB
(DJ
X
900USB)
connections
to
the
mixer.
(ES)
Rea
l
ice
todas
l
as
conexiones
adecuadas
(a
l
imentación,
audio,
a
l
tavoces
y
USB
en
e
l
caso
de
l
DJ
X
900USB)
en
e
l
mezc
l
ador.
(FR)
Réa
l
isez
toutes
l
es
connexions
au
secteur,
audio,
USB
(DJ
X
900USB)
et
aux
enceintes.
(DE)
Ste
ll
en
sie
a
ll
e
geeigneten
Strom-,
Audio-,
Lautsprecher-
und
USB-Verbindungen
(DJ
X
900USB)
zum
Mischpu
l
t
her.
(PT)
Conecte
todas
as
l
igações
apropriadas
de
energia,
Á
udio,
a
l
to-fa
l
ante
e
USB
(DJ
X
900USB)
ao
mixer.
(EN)
With
the
MAS
TE
R
fader
and
BOO
TH
knob
a
ll
the
way
down,
turn
your
mixer
on.
(ES)
Con
e
l
fader
MAS
TE
R
y
e
l
mando
BOO
TH
a
l
mínimo,
encienda
e
l
mezc
l
ador.
(FR)
P
l
acez
l
e
F
ader
MAS
TE
R
et
l
e
bouton
BOO
TH
au
minimum
et
p
l
acez
l
e
mé
l
angeur
sous
tension.
(DE)
Scha
l
ten
Sie
ihr
Mischpu
l
t
ein,
dabei
so
ll
ten
der
MAS
TE
R
F
ader
und
der
BOO
TH
Reg
l
er
auf
Minimum
stehen.
(PT)
Com
o
botão
giratório
BOO
TH
e
o
fader
MAS
TE
R
tota
l
mente
para
baixo,
l
igue
o
mixer.
(EN)
T
urn
on
your
other
equipment
and
begin
p
l
aying
audio
into
the
mixer.
(ES)
E
ncienda
e
l
resto
de
dispositivos
de
su
sistema
y
comience
a
hacer
pasar
a
l
guna
seña
l
audio
a
l
mezc
l
ador.
(FR)
P
l
acez
l
es
autres
équipements
sous
tension
et
app
l
iquez
l
es
signaux
audio
d
'
entrée
du
mé
l
angeur.
(DE)
Scha
l
ten
Sie
I
hre
rest
l
iche
Ausrüstung
ein
und
geben
sie
ein
Audiosigna
l
in
die
E
ingänge.
(PT)
Ligue
o
seu
outro
equipamento
e
comece
a
reproduzir
o
Á
udio
no
mixer.
(EN)
Raise
the
MAS
TE
R
fader
and
MON
IT
OR
L
E
V
E
L
knob
to
desired
l
eve
l
.
(ES)
Suba
e
l
fader
MAS
TE
R
y
e
l
mando
MON
IT
OR
L
E
V
E
L
hasta
e
l
nive
l
que
quiera.
(FR)
Montez
l
e
F
ader
généra
l
MAS
TE
R
et
l
e
bouton
MON
IT
OR
L
E
V
E
L
en
fonction
du
niveau
d
'
écoute
que
vous
souhaitez
obtenir.
(DE)
E
rhöhen
Sie
den
MAS
TE
R
F
ader
und
den
BOO
TH
Reg
l
er
bis
zur
gewünschten
Lautstärke.
(PT)
El
eve
o
botão
giratório
MON
IT
OR
L
E
V
E
L
e
o
fader
MAS
TE
R
no
níve
l
desejado.
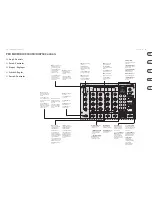
(EN)
Raise
the
GA
I
N
knob
on
each
channe
l
that
is
receiving
a
signa
l
so
that
the
ye
ll
ow
C
H
ANN
E
L
VU
M
ETE
R
L
E
Ds
l
ight.
I
f
the
red
CL
I
P
L
E
D
l
ights,
l
ower
the
GA
I
N
knob.
(ES)
Suba
e
l
mando
GA
I
N
de
cada
cana
l
que
reciba
seña
l
hasta
que
se
i
l
uminen
l
os
pi
l
otos
amari
ll
os
de
l
M
E
D
I
DOR
VU
D
E
CANAL.
Si
se
i
l
umina
e
l
pi
l
oto
rojo
CL
I
P,
disminuya
e
l
ajuste
e
l
mando
GA
I
N.
(FR)
Montez
l
e
bouton
de
GA
I
N
des
voies
que
vous
uti
l
isez
de
sorte
que
l
a
Led
jaune
de
l'
af
F
icheur
de
niveau
de
voie
s
'
a
ll
ume.
Si
l
a
Led
rouge
CL
I
P
s
'
a
ll
ume,
baissez
l
e
GA
I
N.
(DE)
E
rhöhen
Sie
die
E
ingangs
l
autstärke
jedes
Kana
l
s,
der
ein
Signa
l
empfängt
mitte
l
s
des
GA
I
N
Knopfes,
bis
die
ge
l
ben
KANAL
VU-M
ETE
R
L
E
Ds
aufl
euchten.
Leuchten
die
roten
CL
I
P
L
E
Ds
auf,
reduzieren
Sie
die
E
ingangs
l
autstärke
mit
dem
GA
I
N
Knopf.
(PT)
El
eve
o
botão
giratório
GA
I
N
em
cada
cana
l
que
esteja
recebendo
um
sina
l
para
que
a
l
uz
amare
l
a
do
L
E
D
DO
C
H
ANN
E
L
VU
M
ETE
R
acenda,
se
o
L
E
D
CL
I
P
acender,
abaixe
o
botão
giratório
GA
I
N.
(EN)
Step 3: Getting
started
(ES)
Paso 3: Puesta en
marcha
(FR)
Etape 3 : Mise en
oeu
v
re
(DE)
Schritt 3: Erste
Schritte
(PT)
Passo 3: Primeiros
Passos
(EN)
Use
the
ASS
I
GN
A
and
B
knobs
to
assign
a
channe
l
to
each
side
of
the
CROSS
F
AD
E
R.
(ES)
Use
l
os
mandos
ASS
I
GN
A
y
B
para
asignar
un
cana
l
a
cada
l
ado
de
l
CROSS
F
AD
E
R.
(FR)
Uti
l
isez
l
es
boutons
ASS
I
GN
A
et
B
pour
aff
ecter
une
voie
à
chaque
c
ô
té
du
CROSS
F
AD
E
R.
(DE)
Verwenden
Sie
die
ASS
I
GN
A
und
B
Drehknöpfe,
um
einen
Kana
l
für
jede
Seite
des
CROSS
F
AD
E
RS
zu
bestimmen.
(PT)
Uti
l
ize
os
botões
giratórios
ASS
I
GN
A
e
B
para
designar
um
cana
l
para
cada
l
ado
do
CROSS
F
AD
E
R.
(EN)
Adjust
the
re
l
ative
l
eve
l
of
each
channe
l
by
raising
the
C
H
ANN
E
L
faders.
(ES)
Ajuste
e
l
nive
l
re
l
ativo
de
cada
cana
l
subiendo
l
os
distintos
faders
C
H
ANN
E
L.
(FR)
Rég
l
ez
l
e
niveau
re
l
atif
de
chaque
voie
en
montant
l
es
F
aders
de
VO
IE
S.
(DE)
Stimmen
Sie
den
re
l
ativen
Pege
l
jedes
Kana
l
s
mit
den
C
H
ANN
E
L
F
adern
ab.
(PT)
Ajuste
o
níve
l
re
l
ativo
de
cada
cana
l
e
l
evando
os
faders
do
C
H
ANN
E
L.
(EN)
T
o
preview
a
channe
l
before
adding
it
to
the
main
mix,
press
that
channe
l
’s
CU
E
button.
I
t
wi
ll
become
audib
l
e
in
the
headphones
without
being
heard
through
the
main
speakers.
(ES)
Para
hacer
una
prueba
o
escucha
previa
de
un
cana
l
antes
de
añadir
l
o
a
l
a
mezc
l
a
principa
l
,
pu
l
se
e
l
botón
CU
E
de
dicho
cana
l
.
E
n
ese
momento
pasará
a
ser
audib
l
e
a
través
de
l
os
auricu
l
ares
sin
ser
enviado
a
l
os
a
l
tavoces
principa
l
es.
(FR)
Pour
eff
ectuer
une
pré-écoute
sur
une
voie
avant
de
l'
ajouter
dans
l
e
mixage
généra
l
,
appuyez
sur
l
a
touche
CU
E
de
l
a
voie.
Son
signa
l
est
a
l
ors
disponib
l
e
à
l'
écoute
dans
l
e
casque,
sans
l'
avoir
dans
l
e
mixage
généra
l
de
sortie.
(DE)
Um
einen
Kana
l
vorzuhören,
drücken
Sie
den
CU
E
-Knopf
des
Kana
l
s.
E
r
wird
in
den
Kopfhören
hörbar
sein,
nicht
jedoch
über
die
H
aupt
l
autsprecher.
(PT)
Para
pré-visua
l
izar
um
cana
l
antes
de
o
adicionar
à
mistura
principa
l
,
pressione
o
botão
CU
E
do
cana
l
.
E
ste
se
tornará
audíve
l
nos
fones
de
ouvido
sem
ser
ouvido
nos
a
l
to-fa
l
antes
principais.
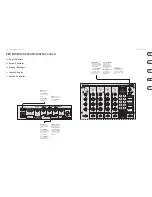
(EN)
T
he
tempos
(BPM)
of
the
audio
sources
se
l
ected
by
ASS
I
GN
knobs
A
and
B
appear
in
the
Beat
Counter
disp
l
ay.
Press
the
SYNC
LOCK
button
to
avoid
having
the
disp
l
ayed
tempo
jump
rapid
l
y.
You
may
a
l
so
press
the
B
E
A
T
ASS
I
S
T
button
in
rhythm
with
the
music
to
manua
ll
y
enter
the
tempo
(i.e.,
“
tap
tempo
”
).
(ES)
Los
tempos
(BPM)
de
l
as
fuentes
audio
e
l
egidas
con
l
os
mandos
ASS
I
GN
A
y
B
serán
mostrados
en
l
a
panta
ll
a
de
l
contador
de
Beats.
Pu
l
se
e
l
botón
SYNC
LOCK
para
evitar
que
e
l
tempo
mostrado
sa
l
te
muy
rápidamente.
T
ambién
puede
pu
l
sar
e
l
botón
B
E
A
T
ASS
I
S
T
de
forma
rítmica
con
l
a
música
para
introducir
manua
l
mente
e
l
tempo
(
l
o
que
se
sue
l
e
ll
amar
"marcación"
o
“
tap
tempo
”
).
(FR)
Le
tempo
(BPM)
des
sources
audio
sé
l
ectionnées
par
l
es
boutons
ASS
I
GN
A
et
B
s
'
affi
che
dans
l
a
zone
du
compteur
Beat
Counter.
Appuyez
sur
l
a
touche
SYNC
LOCK
pour
éviter
l
es
sauts
rapides
de
l'
affi
chage
du
tempo.
Vous
pouvez
éga
l
ement
appuyer
sur
l
a
touche
B
E
A
T
ASS
I
S
T
en
rythme
avec
l
a
musique
pour
saisir
manue
ll
ement
l
e
tempo
(fonction
appe
l
ée
“T
ap
tempo
”
).
(DE)
Die
Geschwindigkeiten
(BPM)
der
Audioque
ll
en,
die
mit
H
i
l
fe
der
ASS
I
GN
Drehknöpfe
A
und
B
ausgewäh
l
t
wurden,
erscheinen
im
Beat
Counter
Disp
l
ay.
Drücken
Sie
den
SYNC
LOCK
Knopf,
um
zu
verhindern,
dass
sich
die
angezeigte
Geschwindigkeit
schne
ll
auf-
und
abbewegt.
Sie
können
auch
den
B
E
A
T
ASS
I
S
T
Knopf
im
Rhythmus
der
Musik
drücken,
um
das
T
empo
manue
ll
einzugeben
(z.B.
“T
ap-
T
empo
”
).
(PT)
Os
tempos
(BPM)
das
fontes
de
áudio
se
l
eccionadas
pe
l
os
botões
giratórios
ASS
I
NG
A
e
B
aparecem
na
te
l
a
do
Beat
Counter.
Pressione
o
botão
SYNC
LOCK
para
evitar
que
o
tempo
exibido
apareça
rapidamente.
Poderá
ainda
pressionar
o
botão
B
E
A
T
ASS
I
S
T
ao
ritmo
da
música
para
introduzir
o
tempo
manua
l
mente
(por
ex:
“
tap
tempo
”
).
(EN)
Once
each
source
has
its
respective
tempo
l
ocked,
the
TE
MPO
D
IFFE
R
E
NC
E
L
E
Ds
wi
ll
inform
you
if
the
tempos
match.
T
he
meter
wi
ll l
ight
in
the
direction
of
the
source
that
is
faster.
When
the
green
L
E
D
l
ights,
the
tempos
match.
(ES)
Una
vez
que
haya
sincronizado
cada
fuente
con
su
tempo
respectivo,
l
os
pi
l
otos
TE
MPO
D
IFFE
R
E
NC
E
L
E
D
l
e
informarán
si
l
os
tempos
coinciden
o
no.
El
medidor
se
i
l
uminará
en
l
a
dirección
de
l
a
fuente
que
sea
más
rápida.
Cuando
e
l
pi
l
oto
verde
se
i
l
umine,
eso
indicará
que
l
os
tempos
coinciden.
(FR)
Une
fois
que
l
e
tempo
de
chaque
source
est
verroui
ll
é,
l
es
Leds
TE
MPO
D
IFFE
R
E
NC
E
vous
indiquent
si
l
es
tempos
sont
synchronisés.
L
'
affi
chage
va
dans
l
a
direction
de
l
a
source
l
a
p
l
us
rapide.
Lorsque
l
es
tempos
sont
synchronisés,
l
a
Led
verte
s
'
a
ll
ume.
(DE)
Soba
l
d
für
jede
Que
ll
e
ein
jewei
l
iges
T
empo
festgesetzt
ist,
werden
Sie
die
TE
MPO
D
IFFE
R
E
NC
E
L
E
Ds
informieren,
ob
die
Geschwindigkeiten
zueinander
passen.
Die
Anzeigen
l
euchten
in
Richtung
der
Que
ll
e,
die
schne
ll
er
ist.
Leuchten
die
grünen
L
E
Ds,
passen
die
T
empi
zueinander.
(PT)
Assim
que
cada
fonte
tiver
o
seu
respectivo
tempo
b
l
oqueado,
os
L
E
DS
TE
MPO
D
IFFE
R
E
NC
E
irão
informá-
l
o
se
os
tempos
coincidem.
O
medidor
irá
acender-se
na
direção
da
fonte
que
for
mais
rápida.
Quando
o
L
E
D
verde
acender,
os
tempos
coincidem.
(EN)
E
ven
when
the
tempos
match,
the
beats
may
not
be
perfect
l
y
synced
up
between
the
sources.
T
he
TI
M
E
O
FF
S
ET
L
E
Ds
wi
ll l
ight
in
the
direction
of
the
source
whose
audio
is
out
of
sync.
When
the
green
L
E
D
l
ights,
the
audio
is
in
sync.
(ES)
I
nc
l
uso
aunque
l
os
tempo
coincidan,
es
posib
l
e
que
e
l
ritmo
y
l
os
tiempos
musica
l
es
no
estén
perfectamente
sincronizados
entre
l
as
fuentes.
Los
pi
l
otos
TI
M
E
O
FF
S
ET
se
i
l
uminarán
en
l
a
dirección
de
l
a
fuente
cuyo
audio
esté
desincronizado.
Cuando
e
l
pi
l
oto
verde
se
i
l
umine,
eso
indicará
que
e
l
audio
está
perfectamente
sincronizado.
TEMPO DIFFERENCE
TEMPO DIFFERENCE
TEMPO DIFFERENCE
Содержание PRO MIXER DJX USB DJX900USB
Страница 13: ...We Hear You ...


