18
STEP 7:
Install the log tray assemblies. See FIGURE 10.
1. Lower the beam to horizontal position. Please refer to “Beam Operating Positions” section in Page 23.
2. Position the log tray frames onto the beam as shown below and secures with the M10 hardware loosely.
3. Tighten the M10 hardware using an 16mm wrench on the bolts, and a 17mm wrench on the lock nuts.
Page 15
STEP 7:
Install the log tray assemblies. See FIGURE 10.
1.
Lower the beam to horizontal position. Please refer to “Beam Operating Positions” section in
Page 23.
2.
Position the log tray frames onto the beam as shown below and secures with the M10 hardware loosely.
3.
Tighten
the M10 hardware using an 16mm wrench on the bolts, and a 17mm wrench on the lock nuts
REF. NO.
DECSRIPTION
QTY.
12
Log tray assembly
2
13
Hardware Kit # 6-1, including:
1
13-1
Hex head bolt / M10 x 45
4
13-2
Flat washer / M10
8
13-3
Lock nut / M10
4
(FIGURE 10)
Page 18
Содержание Agri Ease BE-25TLE65GX
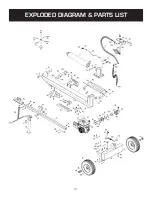
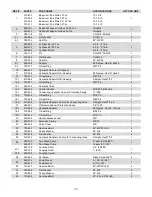
Страница 34: ...31 EXPLODED DIAGRAM PARTS LIST Page 28 EXPLODED DIAGRAM PARTS LIST Page 31...
Страница 39: ......


