background image

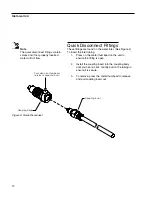
Coupling Insert

Push down on thumbpad
to release coupling insert

Coupling Body

Figure 4: Quick Disconnect

12

Quick Disconnect Fittings

These fittings are found on the water inlet. (See Figure 4)
To insert the inlet tubing:

1.

Press on the metal thumbpad on the unit to
ensure the fitting is open.  

2.

Install the coupling insert into the coupling body
until you hear a click.  Gently pull on the tubing to
ensure it is secure.

3.

To remove, press the metal thumbpad to release
and pull coupling insert out.

I

NSTALLATION

Note

The quick disconnect fittings contain
valves and if not properly inserted
water will not flow.

Содержание EASYpure II UV 1302 Series

Страница 1: ...EASYpure II UV OPERATION MANUAL AND PARTS LIST Series 1302 Model D7401 100 240 Volts LT1302X1 8 22 05 ...

Страница 2: ...uick Disconnect Fittings 12 Component Installation 13 UV Lamp Installation 13 Initial Cartridge Installation 14 Locating and Mounting Unit 15 Bench Mounting 15 Wall Mounting 15 Remote Dispenser 16 Tube Connections 16 Remote Dispenser Wall Bracket Mounting 17 Water Service Connections 17 Feed Water 17 Power Connections 18 Air Purge 18 Controls and Normal Operation 20 Power Switch 20 Control Panel 2...

Страница 3: ...r Process Flow Diagram 38 Wiring Diagram 39 One Year Limited Warranty 40 Figures Figure 1 Tubing Installation 10 Figure 2 Tubing Removal 10 Figure 3 Typical Polypropylene Tubing Adapter Installation 11 Figure 4 Quick Disconnect 12 Figure 5 UV Lamp Installation 13 Figure 6 Cartridge Installation 14 Figure 7 Tube Connections 16 Figure 8 Remote Wall Bracket Mounting 17 Figure 9 External Unit Connecti...

Страница 4: ...stead prod ucts The specific safety notes pertinent to this Barnstead product are listed below Warnings To avoid electrical shock always 1 Use a properly grounded electrical outlet of correct voltage and current handling capacity 2 Do not locate the EASYpure II UV directly over equipment that requires electrical service Routine maintenance of this unit may involve water spillage and subsequent ele...

Страница 5: ...e to comply with the above could result in explosion and personal injury 4 Avoid splashing disinfecting solutions on cloth ing or skin 5 Ensure all piping connections are tight to avoid chemical leakage 6 Ensure adequate ventilation 7 Carefully follow manufacturer s safety instruc tions on labels of chemical containers and material safety data sheets 8 Depressurize system prior to opening cartridg...

Страница 6: ...ent grade water that exceeds ASTM Type I CAP and NCCLS Type I standards It uses a three stage deioniza tion process combined with UV oxidation and a 0 2 micron final filter to polish pretreated water distilled deionized or reverse osmosis Water resistivity is continuously sensed by a resistivity cell and displayed on a digital display EASYpure II UV ...

Страница 7: ... requires water pretreated by either distillation deionization or reverse osmosis meeting the following criteria TOC Less than 1 0 ppm Turbidity 1 0 N T U maximum Temperature 40 F 104 F 4 4 C 40 C TDS RO Less than 50 ppm as CaCO3 DI Less than 10 ppm as CaCO3 Distilled Less than 2 ppm as CaCO3 Pressure Range Gravity feed to 100 psig 7 kg cm2 maximum Flow Rate Greater than 0 26 gpm 1 0 lpm at positi...

Страница 8: ... Limits for Harmonic Current Emissions EN61000 3 3 Limits for Voltage Fluctuations and Flicker EN 61326 1 Electrical Equipment for Measurement Control and Laboratory Use Part I General Requirements Safety EN 61010 1 Safety Requirements for Electrical Equipment for Measurement Control and Laboratory Use Part I General Requirements per the provisions of the Low Voltage Directive 73 23 EEC as amended...

Страница 9: ...fitting on other end TU1119X7 e Sanitization syringe CMX25 f North American power cord with attached 1 6 amp fuse bag CRX72 g European power cord with attached 0 63 amp fuse bag CRX70 h Operation Manual LT1302X1 Unpacking Note Cartridges and the 0 2 micron final filter are not provided with the EASYpure II UV and must be ordered separately EASYpure Kit Ultra low Organics Deionized Feed No Final Fi...

Страница 10: ...nsertion length of 11 16 3 Wet the tube end with water and insert the tube straight into the fitting until it bottoms out on the interior shoulder and the insertion mark is no longer visible Push to Connect Fitting Tubing Removal Refer to Fig 1 2 1 Using the tool provided AYX23 push the collet toward the body while pulling on the tubing to release the tube Installation COLLET TUBING TYPICAL FITTIN...

Страница 11: ... 3 Thread the nut onto the adapter DO NOT use the o ring at this time 4 Push the tubing through the nut until it bottoms out in the adapter 5 Remove the adapter nut and tubing Place the o ring over the tubing Be careful not to push the backup ring or grab ring further back on the tubing when installing the o ring 6 Install the hex nut on the adapter and hand tighten INSTALLATION Figure 3 Typical P...

Страница 12: ...the inlet tubing 1 Press on the metal thumbpad on the unit to ensure the fitting is open 2 Install the coupling insert into the coupling body until you hear a click Gently pull on the tubing to ensure it is secure 3 To remove press the metal thumbpad to release and pull coupling insert out INSTALLATION Note The quick disconnect fittings contain valves and if not properly inserted water will not fl...

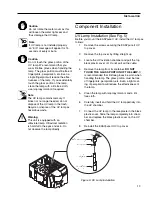
Страница 13: ...traight up 3 Locate the UV oxidation chamber and pull the top black plastic cover off Do not pull on the cable 4 Remove the lamp from its container DO NOT TOUCH THE GLASS PORTION OF THE LAMP It is recommended that lint free gloves be worn when handling the lamp The glass portion must be free of fingerprints perspiration etc Even a light coat ing of perspiration will reduce the effectiveness of the...

Страница 14: ...r socket until it is firmly seat ed 6 Repeat steps 2 5 with the EASYpure ULTRApure Catalog No D50233 cartridge placing it in position 2 Next install the High Purity Low TOC Catalog No D50229 car tridge placing it in position 3 7 Close and latch cartridge access door This serves to verify the cartridges have been prop erly seated INSTALLATION Note The EASYpure II UV s cartridges must be installed i...

Страница 15: ...y to be attached to the EASYpure II UV INSTALLATION Caution Wall composition condition and con struction as well as fastener type must be considered when mounting this unit The mounting surface and fasteners selected must be capable of supporting a minimum of 150 lbs Inadequate support and or fasteners may result in damage to mounting sur face and or equipment If you are un sure of mounting surfac...

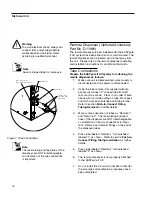
Страница 16: ... tubes as Remote 1 and Remote 2 The recirculating and feed lines of the dispenser are NOT interchangeable so orientation of the two connections is impor tant Remove and discard fittings on the end of the dispenser tubes 4 Press tube labeled Remote 1 into bulkhead labeled 1 as shown Refer to section Push to Connect Fitting Tubing Installation for further details 5 Press tube labeled Remote 2 into b...

Страница 17: ...8 O D X 1 4 NPT tubing adapter on the other 2 Install the tubing adapter into your incoming water line We recommend a customer supplied shut off valve be installed in your feed water line Do not connect the feedwater to your EASYpure II UV until you are told to do so See Air Purge section INSTALLATION Fuse Holder Power Entry Module Cord Socket Optional Remote Dispenser Connections Feedwater Inlet ...

Страница 18: ...nnected to the EASYpure II UV place the draw off trigger into the locked position by depressing the button on the right side of the dispenser at the same time as the trigger is depressed OR If there is no remote dispenser being utilized ensure that the hose barb is attached to the draw off valve fitting and depress the draw off valve lever to open the draw off valve 2 Place a suitable container un...

Страница 19: ...ng from the opened valve rinse approximately 5 liters of water through the valve to drain 7 Close the draw off valve 8 Refer to the Sanitization section and sanitize the EASYpure II UV 19 INSTALLATION Note See the Controls and Normal Operation section to familiarize your self with the controls of the unit ...

Страница 20: ...n the unit is in either the start run or Standby SbY mode will put the unit into a Stop IdL Mode Display In addition to displaying the temperature compensated 25 C resistivity in megohms cm the display also indi cates operational modes and error indicators The follow ing is what can appear on the display SbY Er1 rEC Er2 IdL Er3 Er4 Er5 Controls and Normal Operation Figure 10 Control Panel STOP STA...

Страница 21: ...being placed in the Run Mode and prolong the life of the UV lamp It is recommended that the EASYpure II UV be placed in the Standby Mode during non work hours At the end of the work day press the STANDBY switch to place the unit in Standby mode SbY will appear on the display Idle Mode IdL IdL indicates the unit is powered and waiting to be placed in Run or Standby Mode Note On initial start up the...

Страница 22: ...ove the remote dispenser from the wall bracket 3 The dispenser will deliver a steady stream when you depress the draw off trigger For unattend ed operation depress the button on the right side of the dispenser at the same time as the trigger is depressed To unlock the draw off trig ger and stop dispensing water press the draw off trigger 4 When draw off is complete release the draw off trigger and...

Страница 23: ...p on the sanitization block located on the inside left of the cartridge area 7 Remove the syringe cap and attach syringe to the luer fitting on the sanitization block 8 Slowly inject the solution into the system Some water will be displaced from the remote dispenser or unit draw off valve Avoid injecting air into the system 9 Remove the syringe and replace the luer cap on the sanitization block 10...

Страница 24: ...rb for future use 18 Remove a new 0 2 micron final filter and bell assembly from its bag and insert it into the fitting in the draw off valve and remote dispenser if available Gently turn it clockwise until it is fully seated 19 Remove the protective cap from the filter bell Open the draw off valve or remote dispenser and flush 10 15 liters of water through the 0 2 micron final filter 20 The sanit...

Страница 25: ...e power cord 2 Disconnect incoming water line at quick dis connect Depressurize the system by opening the optional remote dispenser or unit draw off valve allowing water to drain until no more flows from the valve s 3 Remove the screws securing the EASYpure II UV top cover MAINTENANCE AND SERVICING Warning Depressurize system prior to opening cartridge access door Note Ensure you have an o ring pa...

Страница 26: ...the cell in deionized or dis tilled water following the detergent and acid cleaning 11 After cleaning reinstall with the replacement o ring on cell part GSX29 12 Reinstall the cell and hand tighten see Fig 13 Reroute the cable up through the housing and reconnect 13 Reinstall membrane switch lead While lifting draw off valve handle replace the front cover and secure with screws Reinstall the 0 2 m...

Страница 27: ...Catalog No D50230 or D50231 from its plastic bag 5 Wet the o rings on both ends 6 Press the upper end cap into the pretreatment position until it bottoms out Refer to Fig 6 if needed 7 Lower the cartridge and insert the lower end cap into the lower socket until it is firmly seated 8 Repeat steps 3 7 with the EASYpure ULTRApure Catalog No D50233 cartridge 27 MAINTENANCE AND SERVICING Warning Discon...

Страница 28: ...mber of times the EASYpure II UV unit is turned on and off If the EASYpure II UV is cycled between Run Standby and Idle Modes frequently during the work day this will result in a shorter lamp life Therefore it is recommended that the EASYpure II UV be left in the Run Mode during normal working hours and in Standby Mode at night and on weekends To replace the ultraviolet lamp 1 Turn off the EASYpur...

Страница 29: ...orn when handling the lamp The glass portion must be free of finger prints perspiration etc Even a light coating of perspiration will reduce the effectiveness of the lamp 8 Clean the lamp with isopropyl alcohol and a lint free cloth 9 Carefully insert and hold the UV lamp partially into the UV chamber 10 Connect the UV lamp to the receptacle in the black plastic cover of the UV chamber Replace the...

Страница 30: ...e Fig 9 1 Turn off the EASYpure II UV and disconnect it from the power supply Remove the power cord 2 Pull out the fuse drawer located in the power entry module 3 Remove old fuses and replace with fuses of the same type and rating See Replacement Parts section 4 Replace fuse drawer on left side of unit 5 Reattach the power cord and reconnect the unit to the power supply 6 Operate normally Unit Shu...

Страница 31: ...showing Loose wire connection to pump Ensure pump is properly connected purity information to display control board PC1286X3 Display control board is defective Replace board Call Barnstead International Technical Service Pump worn out or defective Replace pump Call Technical Service Recirculated water will not rinse Exhausted cartridge Replace the cartridge as up to desired purity level indicated ...

Страница 32: ... Replacement section Short cartridge life Cartridges being used are beyond Check the expiration date expiration date Cartridges begin to lose capacity after being stored two years from the date of manufacture Replace the cartridges with unexpired ones Change in feedwater characteristics Call Technical Service for possible feedwater testing Increased product water usage Verify usage Water leakage i...

Страница 33: ...ch out of Replace pressure switch Call tolerance Technical Service Display reads Er3 UV lamp cable not plugged into J6 of Plug UV lamp cable into J6 of UV lamp error PC1302X1 PC1302X1 daughter board See Fig 12 UV lamp burnt out or nearing the end Replace UV lamp LMX13 of its useful life Chamber seal is compromised and Replace quartz sleeve and o rings UV lamp is getting wet Call Technical Service ...

Страница 34: ...cation trouble Cycle power Meter board data error Meter board not connected Check connection from meter to display control board board PCX70 10 pin connector to display control board J2 Meter board PCX70 out of Replace meter board PCX70 tolerance Call Technical Service TROUBLESHOOTING ...

Страница 35: ...ead International representative for additional information on the expendables kit Replacement Parts Note Shelf life will be inaccurate if products are taken out of their original packaging Description Catalog No Recommended Max Shelf Quantity Life EASYpure Kit Ultra low Organics Deionized Feed D502124 1 2 years1 EASYpure Kit Ultra low Organics Distilled or RO Feed D502125 1 2 years1 EASYpure High...

Страница 36: ...stock of those parts listed in the GENERAL MAINTENANCE PARTS and SAFETY STOCK sections Description Catalog No Recommended Quantity Check Valve 02214 1 Pressure Regulating Valve PMX252 1 Quick Disconnect Body CUX12 1 Quick Disconnect Insert CUX9 1 Hose Barb Fitting 05930 1 Description Catalog No Recommended Quantity Replacement Display Control Board PC1286X2 1 Resistivity Meter Board PCX70 1 Pump A...

Страница 37: ...sed this unit or can be obtained promptly from the factory When service or replacement parts are needed we ask that you check first with your dealer If the dealer cannot handle your request contact our Customer Service Department at 563 556 2241 or 800 553 0039 Prior to returning any materials to Barnstead International Corp please contact our Customer Service Department for a Return Goods Authori...

Страница 38: ...38 Technical Information Water Process Flow Diagram ...

Страница 39: ...N D8611 UV C1 POWER ENTRY MODULE CEX183 E1 RESISTIVITY CELL E703X1A L1 UV LAMP LMX13 PC1 CONTROL DISPLAY BOARD PC1286X3 PC2 DAUGHTER BOARD NON R O D I PC1302X1 PC3 METER BOARD PCX70 PC4 BALLAST SC1191X1 PU1 PUMP PU1286X1 PS1 POWER SUPPLY TNX116 S1 MEMBRANE SWITCH SWX200 S2 PRESSURE SWITCH SWX202 WH1 AC POWER HARNESS WH1190X3 WH3 PUMP AND FLOAT SWITCH EXTENSION HARNESS WH1305X1 WH4 PRESSURE SWITCH ...

Страница 40: ...ding use inconsistent with written operating instructions for the product mishandling con tamination overheating modification or alteration of the product by any customer or third party or iii use of replacement parts that are obtained from a party who is not an authorized dealer of BARNSTEAD Heating elements because of their susceptibility to overheating and contamination must be returned to the ...

Отзывы: