


R9001440/9
GRAPHICS
Uniformity Adjustments
Date:10/02/2000
6300
15
Uniformity Correction Adjustments
The manual interface in the projector software
Another manual interface is incorporated in the projector software (Go to: SERVICE
/ UNIFORMITY / ADJUST), with the possibility to adjust groups of grid points
together and to visually locate the area on the screen where the adjustment is
necessary.
Select with or
then <ENTER>
<EXIT> to return.
ADJUSTMENT MODE
Select a path from below :
RANDOM ACCESS
INSTALLATION
SERVICE
SERVICE
IDENTIFICATION
CHANGE PASSWORD
CHANGE LANGUAGE
CHANGE PROJ. ADDRESS
CHANGE BAUDRATE PC
RESET LAMP RUNTIME
LAMP RUNTIME HISTORY
DIMMING
MORE...
Select with or
then <ENTER>
<EXIT> to return.
Select with or
then <ENTER>
<EXIT> to return.
SERVICE
BARCO LOGO
PANEL ADJUSTMENTS
UNIFORMITY
P
RESET INPUT BALANCE
I2C DIAGNOSIS
MORE
selected color
adjusting size square
square movable
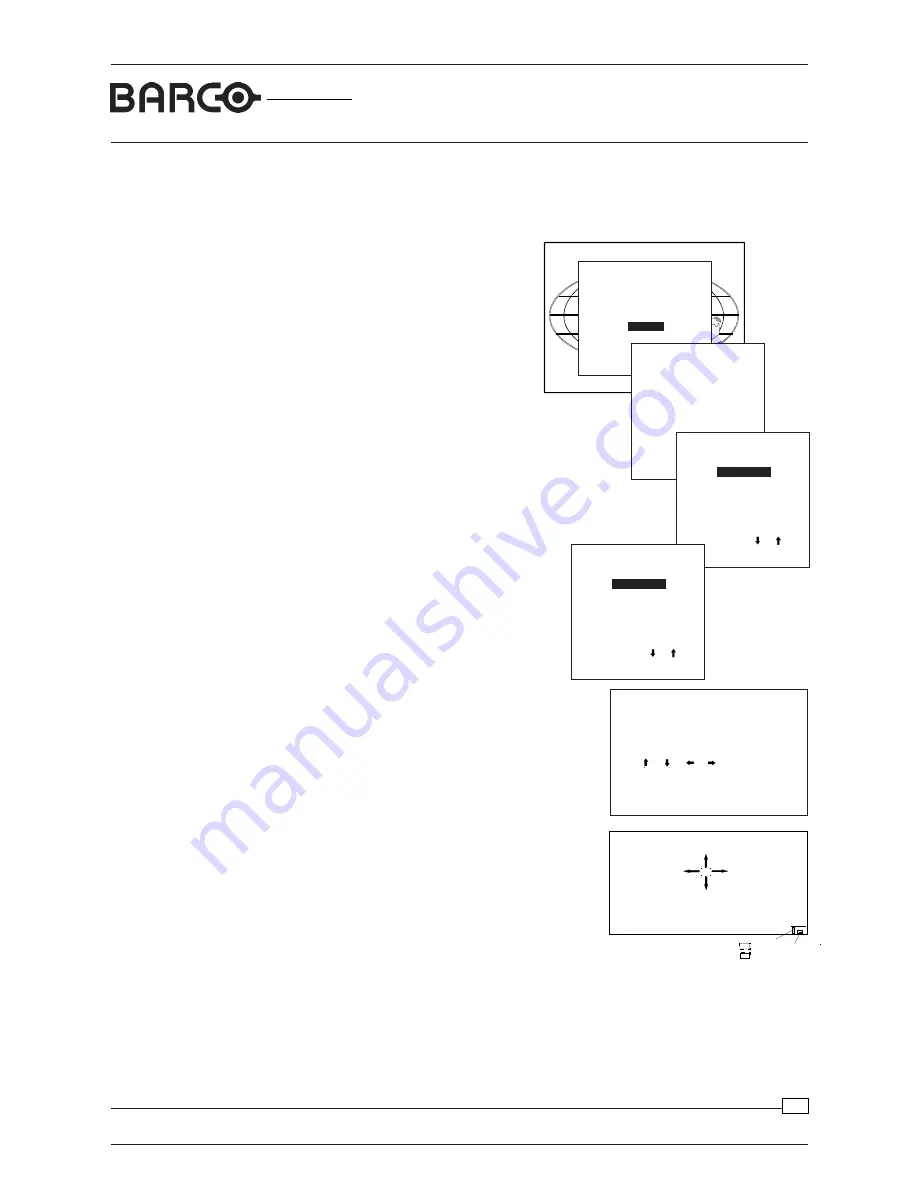
Entering the Uniformity adjustment
mode:
Start up the Service Mode
Push the
cursor key
é
or
ê
to highlight
'Service' and then press ENTER.
Some items in the Service mode are
password protected (when the password
function is active). Enter the password to
continue. All other password protected
items are now available if you stay in the
adjustment mode.
The service menu is built-up in two parts
which are connected together with the
'more' item.
If the desired item is not in the list of the
displayed menu, select 'more' with the
cursor key and push ENTER to display
the other items in the service menu.
Push the
cursor key
é
or
ê
to highlight
'Uniformity' and then press ENTER.
In the Uniformity menu, select ‘Adjust’
and press ENTER.
The display shows the different function keys to be
used for adjustment.
Press
ENTER
to proceed to the uniformity
corrections. A small square area is selected on the
screen. The cursors on the remote or keypad can
be used either to MOVE this box around, or to
INCREASE or DECREASE its size.
This projector adjustment can be done
while the UNI program is running, and
you can update the values on your
screen afterwards by typing R (Read
projector uniformity).
Select with or
<ENTER> toggle/Select
<EXIT> to return.
UNIFORMITY
ADJUST
PURITY
DEFAULT
UNIFORMITY
<Brightness>
adjust level
<Color>
Color to be adjusted
<Enter>
Toggle between
SIZE and MOVE selected area
< >,< >,< >,< >,
Change SIZE or MOVE selected
area.
<ENTER> to continue
<EXIT> to return
Toggle between these modes by pressing <enter> on the remote or on the projector
keypad. Use this box to surround the colored area on the screen that needs to be
corrected. Use the <color> button on the remote or keypad to select a color and
<brightness> to increase or decrease its value.


