Barazza 1CESV Скачать руководство пользователя страница 12

12

BEFORE STARTING

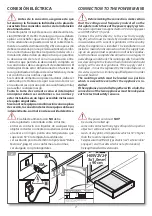
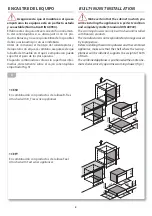
 UNDERSTANDING THE APPLIANCE

1

Thermostat knob

2

Switch

3

Main operation indicator light

4

Extractable drawer

5

Data plate

ANTES DE COMENZAR

 CONOCER EL EQUIPO

1

Rueda termostato

2

Interruptor

3

Piloto de funcionamiento general

4

Cajón extraíble

5

Placa de características

6

4

3

2

1

5

Mod.
Art.

...V ...Hz

...Kw

Questo apparecchio deve essere installato conformemente
alle norme in vigore. Consultare il libretto istruzioni prima
di installare e usare l’apparecchio

F.lli Barazza S.r.l

        MADE IN ITALY

 CONVIENE SABER QUE

El  primer  encendido  debe  realizarse  con  el 
calientaplatos vacío, a la máxima temperatu-
ra durante unos 120 minutos.

Durante este tiempo el calientaplatos podría emitir 
humo y olores desagradables: esto se debe a la com-
bustión de las grasas utilizadas para su fabricación. 
Ventile el local.
Deje que se enfríe completamente la cámara con la 
puerta cerrada y limpie en profundidad el frontal, los 
accesorios  y  el  interior  de  la  cámara,  de  la  manera 
indicada en el capítulo correspondiente.

 USEFUL INFORMATION

The 

warming  drawer

must  be  empty  when 

turned on for the first time, and it should be set 
at maximum temperature for about 120 min-

utes.  During  this  time  the  warming  drawer  may  emit 
smoke or unpleasant odours (due to the burning of the 
grease used in the factory processing of the oven), so the 
room should be aired well during its operation.
Allow the oven cavity to cool completely with the door 
closed and thoroughly clean the front panel, accessories 
and interior of the cavity following the procedures indi-
cated in the respective chapter.

Содержание 1CESV

Страница 1: ...1 CESV 1 CEFY taste of design Caj n calientaplatos Warming drawer Manual de instalaci n y uso Installation and use manual...

Страница 2: ...Los dibujos los esquemas de instalaci n y las tablas contenidas en el manual deben considerarse indicativos y nicamente a t tulo informativo Las instalaciones de acometida del edificio deben cumplir l...

Страница 3: ...iento ordinario 15 Limpieza 15 Periodos de inactividad 15 Eliminaci n al final de la vida til 16 Asistencia postventa 16 NDICE INDEX DESCRIPTION PAGE TECHNICAL DATA 4 INSTALLATION 5 Safety warnings 5...

Страница 4: ...sorbida Total power absorbed kW 0 4 Resistencia Heating element W 400 Tangencial Tangential W 30 Tipo de cable Cable type H05V2V2 F 3x1 mm2 Longitud del cable Cable length cm 90 Medidas del calientapl...

Страница 5: ...g from the socket INSTALACI N INSTALLATION ADVERTENCIAS DE SEGURIDAD Lea detenidamente este manual de instrucciones antes de la instalaci n y o el uso del equipo y cons rvelo en un lugar accesible a t...

Страница 6: ...ene outer packaging film instructions bag expanded polystyrene impact protections REVISI N Y DESPLAZAMIENTO Tras desembalar el equipo quitando todos los mate riales de embalaje y las pel culas de prot...

Страница 7: ...aracter sticas coincidan con las de la instalaci n de alimentaci n Elcalientaplatosincluyedeserieuncabledealimenta ci n H05V2V2 F de 90 cm de largo al que se deber aplicar un enchufe capaz de soportar...

Страница 8: ...ctcondition and completely stable Standard DIN 68930 Thewarmingdrawercanonlybeattachedandinstalled with Barazza products Themanufacturerisnotresponsiblefordamagecaused by improper use Beforeinstalling...

Страница 9: ...o de estos fig 4 Complete la instalaci n fijando el equipo al mueble de lado fig 5 It is recommended that you install the appliance far fromrefrigeratorsandfreezerssothattheheatproduced does not compr...

Страница 10: ...Porlotanto sisedispara el termostato para volver a utilizarlo solo hay que esperar hasta que se enfr e el equipo En cambio si el disparo se debe a un defecto de los componentes es necesaria la interve...

Страница 11: ...durante el funcionamiento Mantenga vigilado el aparato durante todo su funcionamiento No revista el hueco del calientaplatos con papel de aluminio o similares Do not lean or sit on the warming drawer...

Страница 12: ...atos podr a emitir humo y olores desagradables esto se debe a la com busti n de las grasas utilizadas para su fabricaci n Ventile el local Deje que se enfr e completamente la c mara con la puerta cerr...

Страница 13: ...e permanecer encendida durante todo el funcionamiento fig 7 Para apagar el aparato ponga en la posici n 0 off la rueda 1 y pulse el bot n 2 la luz roja se apagar 2 1 7 USING THE APPLIANCE USE DESCRIPT...

Страница 14: ...es valores VAJILLAS TIEMPO MIN Vajillas para 6 personas 30 35 La experiencia en el uso le ayudar a determinar los ajustes ideales para sus necesidades HEATING TIME Different factors influence the time...

Страница 15: ...m s de 2 3 semanas limpie en profundidad el equipo siguiendo las indicaciones del cap tulo correspondiente desconecte el enchufe de alimentaci n el ctrica SAFETY WARNINGS Always switch off the main e...

Страница 16: ...uso de componentes distintos de los suministrados por el Fabricante anula la Garant a y puede ocasionar da os a las personas y al propio equipo END OF LIFE DISPOSAL At the end of its service life the...

Страница 17: ...Notas...

Страница 18: ...18 Note...

Страница 19: ......

Страница 20: ...o grafico Artlinea cod CESV6 rev 03 03 2015 Barazza srl 31025 Sarano di S Lucia di Piave TV ITALIA Via Risorgimento 14 Tel 39 0438 62888 Fax 39 0438 64901 info barazzasrl it www barazzasrl it taste of...

Отзывы: