manualshive.com logo in svg
background image

ST

OP


PLA

BA

CK


Living Room

N.MUSIC 

N.RADIO 

PC

V.MEM 

DTV 

A.MEM


TV


DVD 

CD

TV 

LIGHT 

RADIO 

DTV 

DVD 

CD 

V MEM 

RECORD 

A MEM 

TEXT 

MENU 

LIST 

EXIT 

STOP 

GO 

GO

STOP

 9

LIST

PLAY

STOP

N.RADIO

N.RADIO

GO

+

N.RADIO

N.MUSIC

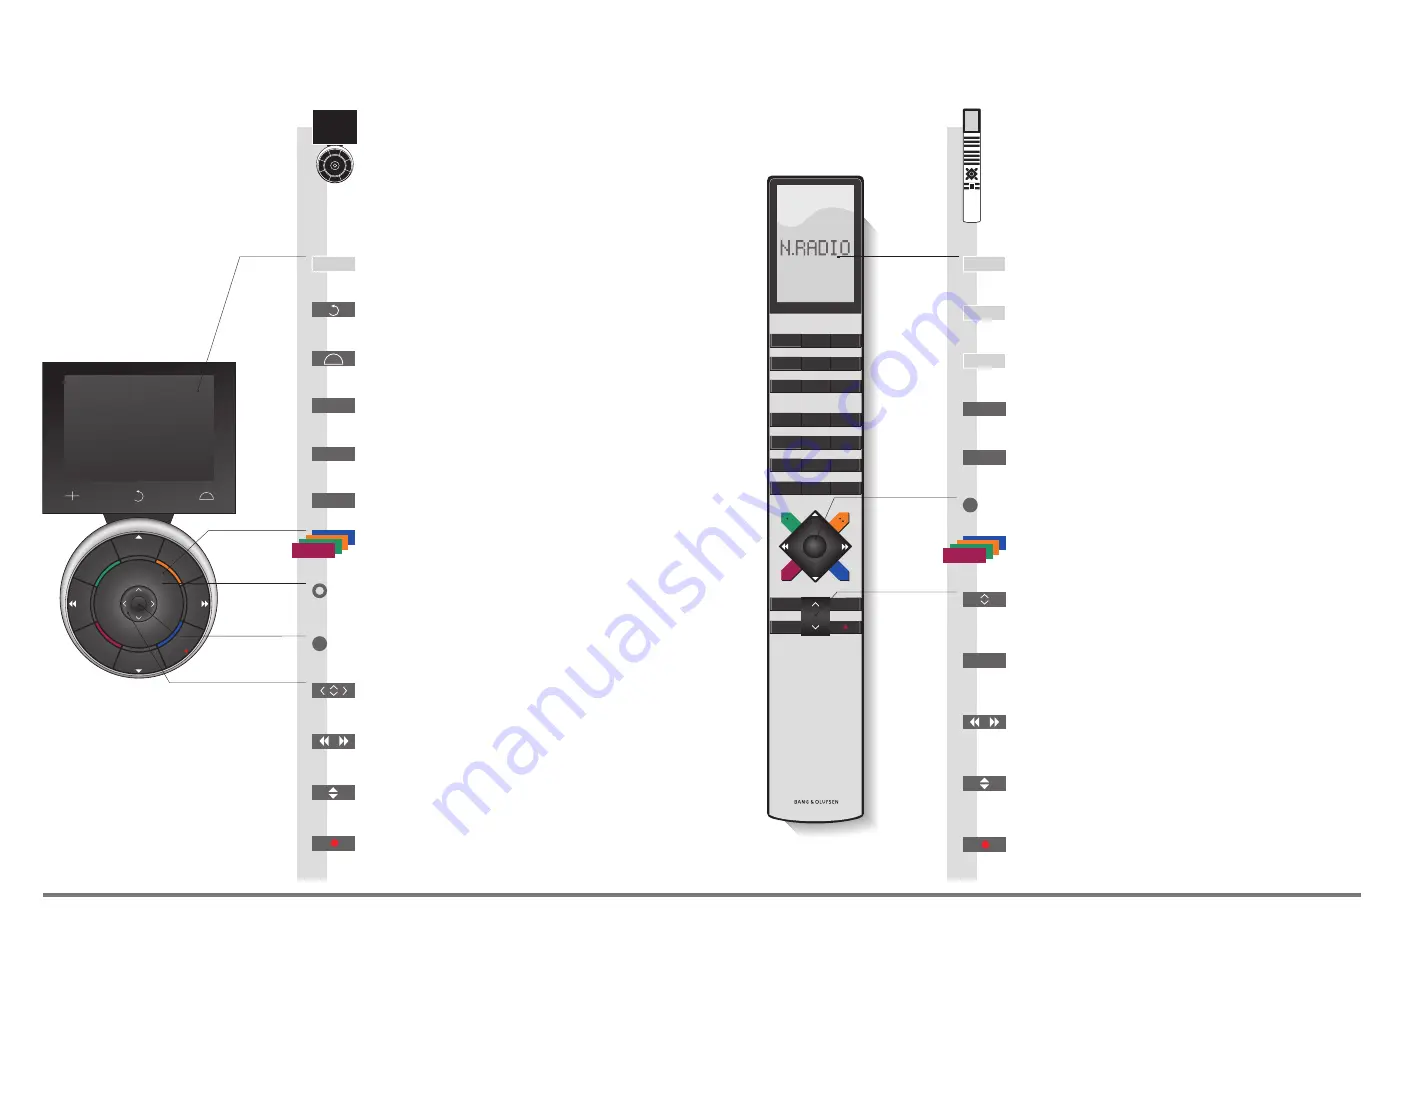
How to use your remote control 

You can also operate your music 

system with Beo5 and Beo4. 

Useful hints 

*

1

 About soft buttons 

*

2

 Coloured buttons 

*

3

 Item

*

4

 Playback

Light grey buttons indicate that you have to press a text in the display.  
Dark grey buttons indicate that you have to press a hard button. 
Press the wheel next to the colour to activate a coloured button. 
Only applies to N.MUSIC 

When you play a track from your collection, you automatically add it as a MOTS seed (see page 4). 

Start playback 

Step through tracks or stations 

Previous or next track in play queue

Previous or next item in a list 

Standby 

Previous or next track in play queue 

Previous or next item in a list*

3


Press once to pause playback 

Soft button 

Touch screen to select*

Press centre button to accept and store 

settings, resume replay 

Turn to adjust volume 

To mute, turn quickly counter-clockwise 

Bring up scene buttons 

Press again to return 

Select coloured music or radio list*

2


Press volume wheel next to the colour 

Bring up digits to select track or station 

Press again to return 

Back up through Beo5 displays 

Select coloured music or radio list 

Follow up with a digit to play a certain track or station 

Adjust volume 

To mute, press the middle of the button 

The Beo4 display shows you the activated source or function 

Accept and store settings, resume replay 

Previous or next track or station in play queue 

Previous or next item in a list 

Press once to pause playback 

Standby 

Select track or station to play*

4


Step through tracks or stations 

Display extra ‘buttons’ on Beo4 

Press repeatedly to change ‘buttons’ 

Switch on N.MUSIC 

Switch on N.RADIO 

Содержание BeoSound 5

Страница 1: ...BeoSound 5 Guide...

Страница 2: ...se harmful interference to radio or tele vision reception which can be determined by turning the equip ment off and on the user is encouraged to try to correct the interference by one or more of the f...

Страница 3: ...9785 3911 fax Dear Customer 3509874 0807 Technical specifications features and the use thereof are subject to change without notice How to use your BeoSound 5 The music system is designed for close u...

Страница 4: ...a list Standby Previous or next track in play queue Previous or next item in a list 3 Press once to pause playback Soft button Touch screen to select 1 Press centre button to accept and store setting...

Страница 5: ...N RADIO Contents 4 Listen to N MUSIC 6 Listen to N RADIO 10 Play queues and lists 11 Sound settings 12 System information and system settings 13 Clean up 16 Set up your music system 18 Overview of set...

Страница 6: ...eed MOTS Play queue Play specific track Start N MUSIC Switch off Activate N MUSIC to use these functions Use a track as seed to auto generate an endless sequence of similar tracks Play the next or pre...

Страница 7: ...o5 Operation Hold for 3 seconds Play similar tracks instantly in player mode Hold for 3 seconds Play similar tracks instantly Select track or item Confirm Previous or next track in player mode Move to...

Страница 8: ...see page 10 and 12 BeoSound 5 Operation The music system starts automatically on the last played station Switch off Start N RADIO Activate N RADIO to use these functions Find station by view Select st...

Страница 9: ...top or bottom for player mode Confirm Press Select MODE Confirm Press Press Favourites Press a digit on Beo5 to play a station immediately To play a specific station in a coloured list press the colo...

Страница 10: ...8...

Страница 11: ...10 Play queues and lists 11 Sound settings 12 System information and settings 13 Clean up Contents Play queues and lists Sound settings System information and settings Clean up Advanced use 9...

Страница 12: ...g radio stations and are shortcuts to the tracks you use as seeds for MOTS Play queues and lists Use play queues and lists to personalise your daily music experience Place your favourite music and rad...

Страница 13: ...Volume Preset a volume level 0 90 for your music system Adjust and confirm volume Select VOLUME in the SOUND menu Select SETTINGS in the MODE menu Balance Adjust the balance 9 9 between your speakers...

Страница 14: ...remaining capacity of the BeoMaster and set menu language and time zone View available storage View available storage Storage capacity Select AVAILABLE STORAGE in the SYSTEM INFO menu Select SETTINGS...

Страница 15: ...L REMOVE CLEAR QUEUE CANCEL REMOVE CLEAR LIST No action Delete album artist or track permanently No action Remove album artist or track from the queue Clear the queue No action Remove track or station...

Страница 16: ...14...

Страница 17: ...18 Set up your music system 20 Overview of settings 20 Cleaning Contents Set up your music system Overview of settings Cleaning Installation Setup 15...

Страница 18: ...to place the music system on a wall using the standard wall bracket Place the wall bracket Fasten the wall bracket Use the correct size and type of screws and wall plugs taking into account the const...

Страница 19: ...to the corresponding sockets in the base of the music system Note Place a cable binder behind the USB plug A 2 Run the USB cable through the cable holder 3 Run the POWER cable under the USB cable and...

Страница 20: ...leaning NOTE Regular maintenance such as cleaning is the responsibility of the user Select SOUND SYSTEM INFO SYSTEM SETTINGS MAINTENANCE Select VOLUME 0 90 p 11 BALANCE 9 9 p 11 BASS 6 6 p 11 TREBLE 6...

Страница 21: ......

Страница 22: ......

Страница 23: ...and electronic equipment and parts must not be disposed of with ordinary household refuse all electrical and electronic equipment and parts must be collected and disposed of separately Products and eq...

Страница 24: ......

Отзывы: