background image

www.balluff.com

7

english

4.1 

Installing the transducer

NOTICE!

Improper installation

Improper installation can compromise the function of the 
transducer and result in damage.


f

For this reason, ensure that no strong electrical or 
magnetic fields are present in the immediate vicinity 
of the transducer.


f

The recommended spacing for the installation must 
be strictly observed.

The following must be observed when installing the 

magnet:


– To ensure the accuracy of the position measuring 

system, the magnet is attached to the moving member 

of the machine using non-magnetizable screws 

(stainless steel, brass, aluminum).


– The moving member must guide the magnet on a track 

parallel to the transducer.


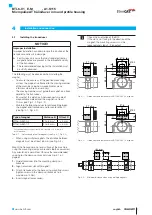
– Ensure that the distance A between parts made of 

magnetizable material and the magnet is at least 

10 mm (see Fig. 4-1, Fig. 4-2).


– Maintain the following values for distance B between 

the magnet and transducer and for center offset C  

(see Fig. 4-1, Fig. 4-2):

Type of magnet

Distance B

Offset C

BTL6-A-3800-2

4 to 8 mm

1)

± 5 mm

BTL6-A-3801-2

4 to 8 mm

1)

± 5 mm

1)

 For optimum measurement results, a distance B of 6 to 8 mm is 

recommended.

Tab. 4-1:  Distance and offset for magnets (see Fig. 4-1, Fig. 4-2)


– When using multiple magnets, the distance between 

magnets must be at least 65 mm (see Fig. 4-3).

Mount the transducer on a level surface of the machine 

using the mounting clamps or brackets (both accessories). 

Any orientation is permitted. Observe the recommended 

spacing for the clamps or brackets (see Fig. 3-1 on 

page 6).

1. 

Guide transducer into the mounting clamps or 

brackets.

2. 

Align transducer slot with magnet!

3. 

Attach transducer to the base using mounting screws 

(tighten screws in the clamps or brackets to a 

maximum of 4 Nm).

4. 

Insert magnet (accessories).

Check the orientation of the BTL.

If the slot is not facing in the direction of the 

magnet, the mounting screws must be 

loosened and steps 2-3 repeated.

Fig. 4-1: 


C

55-4

10.8

21 A

28
16

37.6

Ø 4.2

B

5

28.2

Dimensions and distances with BTL6-A-3800-2 magnet

Fig. 4-2: 


C

55-4

5

21 A

B1

8

28
16

37.6

Ø 4.2

Dimensions and distances with BTL6-A-3801-2 magnet

Fig. 4-3:  Minimum distance when using multiple magnets

≥ 

65 mm

Installation and connection

BTL6-V1 _ E-M _ _ _ _ -A1-S115

Micropulse AT transducer in round profile housing

Содержание BTL6-V1 E-M Series

Страница 1: ...BTL6 V11E M0500 A1 S115 BTL1035 BTL6 V1 _ E M _ _ _ _ A1 S115 Betriebsanleitung deutsch...

Страница 2: ...www balluff com...

Страница 3: ...3 2 Funktion 6 4 Einbau und Anschluss 7 4 1 Wegaufnehmer einbauen 7 4 2 Elektrischer Anschluss 8 4 3 Schirmung und Kabelverlegung 8 5 Inbetriebnahme 9 5 1 System in Betrieb nehmen 9 5 2 Hinweise zum...

Страница 4: ...ngetragene und lizenzierte Marke der Beckhoff Automation GmbH Es ist eine Software SPS die unter Windows auf einem PC l uft Mit dem CE Zeichen best tigen wir dass unsere Produkte den Anforderungen der...

Страница 5: ...effen kann Der Betreiber hat die Verantwortung dass die rtlich geltenden Sicherheitsvorschriften eingehalten werden Insbesondere muss der Betreiber Ma nahmen treffen dass bei einem Defekt des Wegmesss...

Страница 6: ...zt durch ein Aluminiumgeh use Entlang des Wellenleiters wird ein Positionsgeber bewegt Dieser Positionsgeber ist mit dem Anlagenbauteil verbunden dessen Position bestimmt werden soll Der Positionsgebe...

Страница 7: ...male Messergebnisse wird ein Abstand B von 6 8 mm empfohlen Tab 4 1 Abstand und Versatz f r Positionsgeber siehe Bild 4 1 Bild 4 2 Bei Verwendung mehrerer Positionsgeber ist zwischen diesen ein Mindes...

Страница 8: ...mer und Schaltschrank m ssen auf dem gleichen Erdungspotenzial liegen Schirmung Zur Gew hrleistung der elektromagnetischen Vertr glich keit EMV sind folgende Hinweise zu beachten Wegaufnehmer und Steu...

Страница 9: ...ebnahme nur durch geschultes Fachpersonal f f Sicherheitshinweise des Anlagen oder Systemher stellers beachten 1 Anschl sse auf festen Sitz und richtige Polung pr fen Besch digte Anschl sse tauschen 2...

Страница 10: ...ositionsgeber gr er ist als die Anzahl der Positions geber die im Config Register eingetragen ist 6 Ger teprofil Hinweis Tipp Die Ger tebeschreibungsdatei im XML Format k nnen Sie unter www balluff de...

Страница 11: ...eprofil Fortsetzung 6 3 Ein Modul manuell anf gen Vor dem Anschlie en von Modulen an das EtherCAT Netz muss sich das EtherCAT System in einem sicheren stromlosen Zustand befinden Die Betriebsspannung...

Страница 12: ...betauend Schockbelastung nach EN 60068 2 271 50 g 6 ms Dauerschock nach EN 60068 2 291 50 g 2 ms Vibration nach EN 60068 2 61 12 g 10 bis 2000 Hz Schutzart nach IEC 60529 in verschraubtem Zustand IP 6...

Страница 13: ...L6 A 3801 2 Gewicht ca 25 g Geh use Kunststoff Betriebstemperatur 40 C bis 85 C 8 2 Befestigungsklammern schelle BTL6 A MF01 A 43 15 3 7 30 18 7 5 3 57 42 7 35 32 3 0 Bild 8 3 Befestigungsklammer BTL6...

Страница 14: ...g Bild 8 6 Steckverbinder BCC M488 0000 1A 000 43x834 000 BCC M478 0000 1A 000 43x834 000 Steckverbinder gerade frei konfektionierbar M12 8 polig Bild 8 7 Steckverbinder BCC M478 0000 1A 000 43x834 00...

Страница 15: ...ionsgeber 1 1 Positionsgeber 2 2 Positionsgeber Ethernet Schnittstellentyp E EhterCAT Nennl nge 4 stellig M0500 metrische Angabe in mm Nennl nge 500 mm Bauform A1 Profilgeh use Durchmesser 30 mm Elekt...

Страница 16: ...10 0 393700787 Tab 10 1 Umrechnungstabelle mm inch 1 inch 25 4 mm inch mm 1 25 4 2 50 8 3 76 2 4 101 6 5 127 6 152 4 7 177 8 8 203 2 9 228 6 10 254 Tab 10 2 Umrechnungstabelle inch mm 10 Anhang 10 2...

Страница 17: ...rvice Center Germany Balluff GmbH Schurwaldstrasse 9 73765 Neuhausen a d F Phone 49 7158 173 370 Fax 49 7158 173 691 service balluff de US Service Center USA Balluff Inc 8125 Holton Drive Florence KY...

Страница 18: ...BTL6 V11E M0500 A1 S115 BTL1035 BTL6 V1_E M_ _ _ _ A1 S115 User s Guide english...

Страница 19: ...www balluff com...

Страница 20: ...2 Function 6 4 Installation and connection 7 4 1 Installing the transducer 7 4 2 Electrical connection 8 4 3 Shielding and cable routing 8 5 Startup 9 5 1 Starting up the system 9 5 2 Operating notes...

Страница 21: ...Automation GmbH It is a software PLC that runs on a Windows PC The CE Mark verifies that our products meet the requirements of EU Directive 2004 108 EC EMC Directive The transducer meets the requireme...

Страница 22: ...s pertaining to the work to be done The operator is responsible for ensuring that local safety regulations are observed In particular the operator must take steps to ensure that a defect in the positi...

Страница 23: ...veguide which is protected by an aluminum housing A magnet is moved along the waveguide This magnet is connected to the system part whose position is to be determined The magnet defines the position t...

Страница 24: ...1 2 4 to 8 mm1 5 mm 1 For optimum measurement results a distance B of 6 to 8 mm is recommended Tab 4 1 Distance and offset for magnets see Fig 4 1 Fig 4 2 When using multiple magnets the distance betw...

Страница 25: ...ined ground The transducer and the control cabinet must be at the same ground potential Shielding To ensure electromagnetic compatibility EMC observe the following Connect transducer and controller us...

Страница 26: ...ined technical personnel f f Observe the safety instructions of the equipment or system manufacturer 1 Check connections for tightness and correct polarity Replace damaged connections 2 Turn on the sy...

Страница 27: ...agnets is greater than the number of magnets entered in the Config register 6 Device profile Note tip The device description XML file can be downloaded from www balluff de The file must be installed b...

Страница 28: ...Scan boxes 6 Device profile continued 6 3 Appending a module manually The EtherCAT system must be in a safe deenergized state before modules are connected to the EtherCAT network Switch on the operati...

Страница 29: ...ing Shock rating per EN 60068 2 271 50 g 6 ms Continuous shock per EN 60068 2 291 50 g 2 ms Vibration per EN 60068 2 61 12 g 10 to 2000 Hz Degree of protection per IEC 60529 when attached IP67 7 3 Sup...

Страница 30: ...nsions of BTL6 A 3801 2 magnet Weight Approx 25 g Housing Plastic Operating temperature 40 C to 85 C 8 2 Mounting clamps bracket BTL6 A MF01 A 43 15 3 7 30 18 7 5 3 57 42 7 35 32 3 0 Fig 8 3 BTL6 A MF...

Страница 31: ...8 pin Fig 8 6 Connector BCC M488 0000 1A 000 43x834 000 BCC M478 0000 1A 000 43x834 000 Straight connector freely configurable M12 8 pin Fig 8 7 Connector BCC M478 0000 1A 000 43x834 000 8 Accessories...

Страница 32: ...nets 1 1 magnet 2 2 magnets Ethernet interface type E EtherCAT Nominal length 4 digit M0500 Metric specification in mm nominal length 500 mm Construction A1 Profile housing diameter 30 mm Electrical c...

Страница 33: ...0 393700787 Tab 10 1 Conversion table mm to inches 1 inch 25 4 mm inches mm 1 25 4 2 50 8 3 76 2 4 101 6 5 127 6 152 4 7 177 8 8 203 2 9 228 6 10 254 Tab 10 2 Conversion table inches to mm 10 Appendi...

Страница 34: ...ne 49 7158 173 0 Fax 49 7158 5010 balluff balluff de Global Service Center Germany Balluff GmbH Schurwaldstrasse 9 73765 Neuhausen a d F Phone 49 7158 173 370 Fax 49 7158 173 691 service balluff de US...

Страница 35: ...BTL6 V11E M0500 A1 S115 BTL1035 BTL6 V1_E M_ _ _ _ A1 S115 Manual de instrucciones espa ol...

Страница 36: ...www balluff com...

Страница 37: ...Funcionamiento 6 4 Montaje y conexi n 7 4 1 Montaje del transductor de desplazamiento 7 4 2 Conexi n el ctrica 8 4 3 Blindaje y tendido de cables 8 5 Puesta en marcha 9 5 1 Puesta en servicio del sis...

Страница 38: ...ware que se ejecuta en un PC con Windows Con el marcado CE confirmamos que nuestros productos cumplen con los requerimientos de la directiva de la UE 2004 108 CE directiva CEM El transductor de despla...

Страница 39: ...das El explotador es responsable de respetar las normas de seguridad locales vigentes En particular el explotador debe adoptar medidas destinadas a evitar peligros para las personas y da os materiales...

Страница 40: ...nto BTL6 se encuentra el gu aondas protegido mediante una carcasa de aluminio A lo largo del gu aondas se mueve un sensor de posici n Este sensor de posici n est unido con el componente de la instalac...

Страница 41: ...recomienda una distancia B de 6 8 mm Tab 4 1 Distancia y desplazamiento de los sensores de posici n v ase la figura 4 1 y la figura 4 2 Si se utilizan varios sensores de posici n se debe respetar una...

Страница 42: ...co potencial de puesta a tierra Blindaje Para garantizar la compatibilidad electromagn tica CEM se deben tener en cuenta las siguientes indicaciones Conecte el transductor de desplazamiento y el contr...

Страница 43: ...icaciones de seguridad del fabricante de la instalaci n o sistema 1 Compruebe que las conexiones est n asentadas firmemente y tengan la polaridad correcta Sustituya las conexiones da adas 2 Conecte el...

Страница 44: ...ro detectado de sensores de posici n es superior al n mero de sensores de posici n introducido en el registro Config 6 Perfil del aparato Nota consejo Puede descargar el archivo de descripci n del apa...

Страница 45: ...ntinuaci n 6 3 Adici n manual de un m dulo Antes de conectar m dulos a la red EtherCAT el sistema EtherCAT debe encontrarse en un estado seguro y sin corriente Conecte la tensi n de servicio y ejecute...

Страница 46: ...permanente seg n EN 60068 2 291 50 g 2 ms Vibraci n seg n EN 60068 2 61 12 g de 10 a 2000 Hz Clase de protecci n seg n IEC 60529 en estado atornillado IP67 7 3 Alimentaci n de tensi n Tensi n estabil...

Страница 47: ...osici n BTL6 A 3801 2 Peso Aprox 25 g Carcasa Material sint tico Temperatura de servicio De 40 C a 85 C 8 2 Pinzas abrazadera de fijaci n BTL6 A MF01 A 43 15 3 7 30 18 7 5 3 57 42 7 35 32 3 0 Fig 8 3...

Страница 48: ...8 6 Conector BCC M488 0000 1A 000 43x834 000 BCC M478 0000 1A 000 43x834 000 Conector recto libremente confeccionable M12 8 polos Fig 8 7 Conector BCC M478 0000 1A 000 43x834 000 8 Accesorios continu...

Страница 49: ...1 sensor de posici n 2 2 sensores de posici n Tipo de interfaz Ethernet E EtherCAT Longitud nominal 4 cifras M0500 indicaci n m trica en mm longitud nominal 500 mm Forma constructiva A1 carcasa perfi...

Страница 50: ...de conversi n mm pulgadas 1 pulgada 25 4 mm pulga das mm 1 25 4 2 50 8 3 76 2 4 101 6 5 127 6 152 4 7 177 8 8 203 2 9 228 6 10 254 Tab 10 2 Tabla de conversi n pulgadas mm 10 Anexo 10 2 Placa de cara...

Страница 51: ...d F Phone 49 7158 173 0 Fax 49 7158 5010 balluff balluff de Global Service Center Germany Balluff GmbH Schurwaldstrasse 9 73765 Neuhausen a d F Phone 49 7158 173 370 Fax 49 7158 173 691 service balluf...

Страница 52: ...BTL6 V11E M0500 A1 S115 BTL1035 BTL6 V1_E M_ _ _ _ A1 S115 Notice d utilisation fran ais...

Страница 53: ...www balluff com...

Страница 54: ...n 6 4 Montage et raccordement 7 4 1 Montage du capteur de d placement 7 4 2 Raccordement lectrique 8 4 3 Blindage et pose des c bles 8 5 Mise en service 9 5 1 Mise en service du syst me 9 5 2 Conseils...

Страница 55: ...GmbH Il s agit d un logiciel API fonctionnant sur PC Windows Avec le symbole CE nous certifions que nos produits r pondent aux exigences de la directive europ enne 2004 108 UE directive CEM Le capteu...

Страница 56: ...s directives correspondantes Il est de la responsabilit de l exploitant de veiller ce que les dispositions locales concernant la s curit soient respect es L exploitant doit en particulier prendre les...

Страница 57: ...TL6 abrite le guide d ondes prot g par un bo tier en aluminium Un capteur de position se d place le long du guide d ondes Le capteur de position est reli l l ment de l installation dont la position do...

Страница 58: ...e B de 6 8 mm Tab 4 1 Distance et d port pour capteur de position voir figures 4 1 et 4 2 Lors de l utilisation de plusieurs capteurs de position il faut respecter une distance minimum de 65 mm entre...

Страница 59: ...tre reli s au m me potentiel de mise la terre Blindage Pour garantir la compatibilit lectromagn tique CEM les consignes suivantes doivent tre respect es Relier le capteur de d placement et la commande...

Страница 60: ...e effectu e que par un personnel qualifi f f Les consignes de s curit de l installation ou du fabricant doivent tre respect es 1 V rifier la fixation et la polarit des raccordements Remplacer les racc...

Страница 61: ...ns de capteurs de position est sup rieur au nombre de capteurs de position figurant dans le registre Config 6 Profil de l appareil Conseils d utilisation Le fichier de description de l appareil au for...

Страница 62: ...l appareil suite 6 3 Ajout manuel d un module Avant de raccorder les modules au r seau EtherCAT le syst me EtherCAT doit tre hors tension et dans un tat irr prochable Enclencher la tension de service...

Страница 63: ...EN 60068 2 271 50 g 6 ms Chocs permanents selon EN 60068 2 291 50 g 2 ms Vibration selon EN 60068 2 61 12 g 10 2000 Hz Indice de protection selon CEI 60529 tat viss IP 67 7 3 Alimentation lectrique Te...

Страница 64: ...ntage du capteur de position BTL6 A 3801 2 Poids Env 25 g Bo tier Plastique Temp rature de service 40 C 85 C 8 2 Brides de fixation collier BTL6 A MF01 A 43 15 3 7 30 18 7 5 3 57 42 7 35 32 3 0 Fig 8...

Страница 65: ...8 6 Connecteur BCC M488 0000 1A 000 43x834 000 BCC M478 0000 1A 000 43x834 000 Connecteur droit assembler M12 8 p les Fig 8 7 Connecteur BCC M478 0000 1A 000 43x834 000 8 Accessoires suite 1 2 3 4 5...

Страница 66: ...capteur de position 2 2 capteurs de position Type d interface Ethernet E EhterCAT Longueur nominale 4 chiffres M0500 donn e m trique en mm longueur nominale 500 mm Forme de construction A1 Bo tier pr...

Страница 67: ...787 Tab 10 1 Conversion mm pouce 1 pouce 25 4 mm pouce mm 1 25 4 2 50 8 3 76 2 4 101 6 5 127 6 152 4 7 177 8 8 203 2 9 228 6 10 254 Tab 10 2 Conversion pouce mm 10 Annexe 10 2 Plaque signal tique Fig...

Страница 68: ...hone 49 7158 173 0 Fax 49 7158 5010 balluff balluff de Global Service Center Germany Balluff GmbH Schurwaldstrasse 9 73765 Neuhausen a d F Phone 49 7158 173 370 Fax 49 7158 173 691 service balluff de...

Страница 69: ...BTL6 V11E M0500 A1 S115 BTL1035 BTL6 V1_E M_ _ _ _ A1 S115 Manuale d uso italiano...

Страница 70: ...www balluff com...

Страница 71: ...ontaggio del trasduttore di posizione 7 4 2 Collegamento elettrico 8 4 3 Schermatura e posa dei cavi 8 5 Messa in funzione 9 5 1 Messa in funzione del sistema 9 5 2 Avvertenze per il funzionamento 9 6...

Страница 72: ...mation GmbH Si tratta di un software PLC che funziona su un PC con Windows Il marchio CE la conferma che i nostri prodotti sono conformi ai requisiti della Direttiva UE 2004 108 CE direttiva CEM Il tr...

Страница 73: ...tare misure di sicurezza adeguate Il gestore ha la responsabilit di far rispettare le norme di sicurezza vigenti localmente In particolare il gestore deve adottare provvedimenti tali da poter escluder...

Страница 74: ...onda protetta da un corpo in alluminio Lungo la guida d onda viene spostato un datore di posizione Questo datore di posizione collegato al componente dell impianto del quale deve essere determinata la...

Страница 75: ...imali si consiglia una distanza B di 6 8 mm Tab 4 1 Distanza e sfasamento per il datore di posizione vedere la figura 4 1 figura 4 2 Se si utilizzano pi datori di posizione deve essere mantenuta una d...

Страница 76: ...trico devono trovarsi sullo stesso potenziale di terra Schermatura Per garantire la compatibilit elettromagnetica CEM necessario rispettare le seguenti avvertenze Collegare il trasduttore di posizione...

Страница 77: ...tare le avvertenze di sicurezza del produttore dell impianto o del sistema 1 Controllare che i collegamenti siano fissati saldamente e che la loro polarit sia corretta Sostituire i collegamenti danneg...

Страница 78: ...ato superiore al numero di datori di posizione impostato nel registro Config 6 Profilo del dispositivo Avvertenza suggerimento Il file di descrizione dell apparecchio in formato XML pu essere scaricat...

Страница 79: ...tivo continua 6 3 Aggiunta manuale di un modulo Prima di collegare i moduli alla rete EtherCAT il sistema EtherCAT deve trovarsi in uno stato di sicurezza a tensione disattivata Attivare la tensione d...

Страница 80: ...nente secondo EN 60068 2 291 50 g 2 ms Vibrazioni secondo EN 60068 2 61 12 g da 10 a 2000 Hz Grado di protezione IEC 60529 con connettore avvitato IP67 7 3 Alimentazione elettrica Tensione stabilizzat...

Страница 81: ...osizione BTL6 A 3801 2 Peso circa 25 g Corpo materiale plastico Temperatura di esercizio da 40 C a 85 C 8 2 Staffe fascetta di fissaggio BTL6 A MF01 A 43 15 3 7 30 18 7 5 3 57 42 7 35 32 3 0 Fig 8 3 S...

Страница 82: ...onnettore BCC M488 0000 1A 000 43x834 000 BCC M478 0000 1A 000 43x834 000 Connettore a spina diritto confezionabile liberamente M12 a 8 poli Fig 8 7 Connettore BCC M478 0000 1A 000 43x834 000 8 Access...

Страница 83: ...e di posizione 2 2 datori di posizione Tipo interfaccia Ethernet E EhterCAT Lunghezza nominale a 4 cifre M0500 indicazione metrica in mm lunghezza nominale 500 mm Forma costruttiva A1 corpo profilato...

Страница 84: ...di conversione mm pollici 1 pollice 25 4 mm pollice mm 1 25 4 2 50 8 3 76 2 4 101 6 5 127 6 152 4 7 177 8 8 203 2 9 228 6 10 254 Tab 10 2 Tabella di conversione pollici mm 10 Appendice 10 2 Targhetta...

Страница 85: ...F Phone 49 7158 173 0 Fax 49 7158 5010 balluff balluff de Global Service Center Germany Balluff GmbH Schurwaldstrasse 9 73765 Neuhausen a d F Phone 49 7158 173 370 Fax 49 7158 173 691 service balluff...

Отзывы: