background image

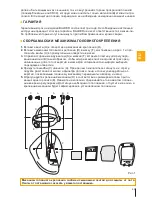
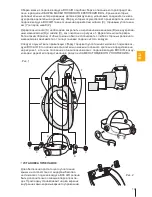
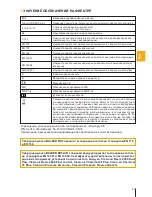
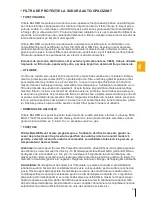
 ЗНАЧЕНИЕ ОБОЗНАЧЕНИЙ НА ФИЛЬТРЕ

Название изделия сварочной маски

Номер стандарта (сварочной маски)

Воздействие энергии средней мощности

Обозначение сертификата DIN

Степень затемнения в открытом (4)

и закрытом (6-8 / 9-13) состоянии

Номер стандарта (сварочной маски с автоматическими фильтрующими 

устройствами)

Оценки оптических классов (оптическое качество, рассеивание света, 

гомогенность, угловое распределение)

Номер стандарта (сварочной маски с аппаратом для дыхания сжатым 

воздухом)

Название продукта автоматически затемняющего сварочного фильтра

Номер стандарта (сварочной маски)

Маркировка CE

Обозначение сертификата DIN Plus
Руководство пользователя

Идентификационный номер производителя

Номер стандарта (автоматически затемняющего сварочного фильтра)

Номер стандарта (автоматически затемняющего сварочного фильтра)
Повышенная прочность

Символ на изделии или на его упаковке указывает, что оно не подлежит 

утилизации в качестве бытовых отходов. Вместо этого его следует сдать 

в соответствующий пункт приемки электронного и электрооборудования 

для последующей утилизации. Соблюдая правила утилизации изделия, 

Вы поможете предотвратить причинение окружающей среде и здоровью 

людей потенциального ущерба, который возможен, в противном случае, 

вследствие  неподобающего  обращения  с  подобными  отходами.  За  бо-

лее подробной информацией об утилизации этого изделия просьба об-

ращаться к местным властям, в службу по вывозу и утилизации отходов 

или в магазин, в котором Вы приобрели изделие.

Учреждение, уполномоченное для тестирования по стандарту CE:

DIN Certco, Alboinstrasse 56, D-12103 Berlin, 0196

Примечание: вышеуказанная информация предоставлена в качестве примера.

Сварочная маска BALDER BH3 прошла тестирование согласно стандартам EN 175

и EN 166.

Сварочная маска BALDER BH3 AIR с подачей воздуха прошла тестирование соглас

-

но стандартам EN 12941 и EN 14594. Сертификаты действительны только вместе с 

одной из следующих установок подачи чистого воздуха: Clean-air Basic 2000 Dual 

flow, Clean-air Basic 2000 Flow control, Clean-air Chemical 2F Plus, Clean-air Chemical 

3F Plus, Clean-air Pressure 2A соотв., Clean-air Pressure Flow control 2A.

BH3

EN 379

S

ANSI-Z87.1

Grand GDS ADC plus

EN 175

B

DIN

EN 166

DIN Plus

BL

4 / 6-8 / 9-13

EN 12941

EN 14594

1/1/1/1

81

RU

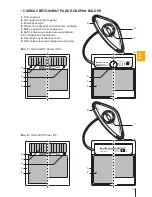
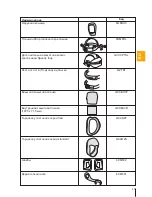
Содержание BH3

Страница 1: ...TETTIVA PER SALDATURA Manuale di istruzioni SV EC KUKLA N vod k pou it CASCO DE SOLDADURA Manual de instrucciones SVETSNINGSHJ LM Instruktionsmanual MASCA DE SUDUR Manual de instruc iuni HITSAUSMASKI...

Страница 2: ......

Страница 3: ...Instrukcja u ytkowania MASCHERA PROTETTIVA PER SALDATURA Manuale di istruzioni SV EC KUKLA N vod k pou it CASCO DE SOLDADURA Manual de instrucciones SVETSNINGSHJ LM Instruktionsmanual MASCA DE SUDUR M...

Страница 4: ...t is correctly assembled and that it completely blocks any accidental light In the front light may enter the helmet only through the viewing area of the autodarken ing welding filter Adjust the headge...

Страница 5: ...most comfortable distance from the filter opening by adjusting the possition of headgear within the two rectangular holes in the helmet shell The headgear size D can be adjusted by turning the rear wh...

Страница 6: ...one of the four holes in the tilt adjustment part Choose the right hole for your maximum comfort Tighten the nuts D and washers C1 C2 on the screws A Place the helmet with speedy loop over the hard h...

Страница 7: ...ternal protection screen into its po sition with four side holders Hold the protection screen with your thumb and middle finger and place it on the side of your thumb into the slots of both side holde...

Страница 8: ...d with the aid of the other fingers place it in both side slots 3 b Close the helmet shell with the external frame Insert the bottom two pins in the lowest two openings of the helmet shell and push th...

Страница 9: ...6 9 5 7 8 4 1 2 9 GB...

Страница 10: ...pro tection screens make sure that all parts are firmly in place thus preventing any light from entering the helmet Should there still be any light entering repeat the procedure until the problem is...

Страница 11: ...grill which are to be assembled by the manufacturer only the BH3 AIR helmet has also a hose holder X face seal Y and a pair of washers Z Hose holder X needs to be fixed onto the headgear D between th...

Страница 12: ...into the two outside upper latches 5 Slide the lower part of the face seal holder into the gap between the helmet and airduct 6 Assemble the headgear as described in the section BH3 HELMET AND HEADGEA...

Страница 13: ...nsions caused by the fixing frame or mounting system as they could cause severe dam age to the filter Make sure that solar cells and photo sensors are not covered by any part of the helmet as this cou...

Страница 14: ...is recommended to use a shorter delay with spot welding applications and a longer delay with applications using higher currents and longer welding intervals Longer delay can also be used for low curre...

Страница 15: ...2 3 4 BALDER Grand ES 4 9 13 BL 1 1 1 1 379 ANSI Z87 1 DESCRIPTION OF BALDER FILTER FEATURES 1 Solar cells 2 Photo sensors Photo diodes 3 Filter housing 4 Liquid crystal shutter viewing area 5 Shade...

Страница 16: ...160 g 125 g 150 g 145 g 110 g 4 4 4 4 4 4 6 8 9 13 9 13 9 13 6 8 9 13 9 13 9 13 yes external no no yes external no no yes external yes external yes internal yes external yes external yes internal yes...

Страница 17: ...s that this product may not be treated as household waste Instead it shall be handed over to the applicable collection point for the recycling of electrical and electronic equipment By ensur ing this...

Страница 18: ...ANSI Z87 1 ORIGINAL SPARE PARTS Item Code Grand GDS Power GDS Grand ES Power ES Grand DS Power DS GFV613BGGAP GFV913BGESAP GFV913BGDSAP GFV613BPGDSAP GFV913BPESAP GFV913BPDSAP Shield BH3 with frame Sh...

Страница 19: ...cept with Speedy loop 6NMPOL GVCCPTSL 6OKBH3 Sweat band neck pad comfort set GZTB1 External protection screen Internal protection screen 107 5 x 71 5 mm GPCBH3F GPCBH3R Face seal flexi Face seal stand...

Страница 20: ...ich nung g ltig VOR BEGINN DES SCHWEISSENS berzeugen Sie sich dass die Maske korrekt zusammengebaut ist und dass sie keinerlei Licht durchl sst An der Vorderseite darf das Licht nur durch das Sichtfel...

Страница 21: ...e die Bewegung des Helmmechanismus nach vorne und hinten erm glichen die Entfernung der Maske und des Filters von den Augen bzw dem Gesicht an Der Helmmechanismus D wird durch Drehen des Knopfes auf d...

Страница 22: ...im Kippeeinstellungsteil einrastet W hlen Sie das richtige Loch f r Ihren maximalen Komfort aus Schrauben Sie die Muttern D und die Scheiben C1 C2 auf die Schrauben A Legen Sie die Maske mit dem Speed...

Страница 23: ...mit vier seitlichen Halterungen ein Fassen Sie die Schutzfolie mit dem Daumen und dem Mittel finger und stecken Sie sie auf der Daumenseite in die Spalte beider seitlichen Halterungen ein wobei Ihnen...

Страница 24: ...n Sie sie mit Hilfe von zwei weiteren Fingern in beide seitlichen Spalten 3 b Schlie en Sie die Maske mit dem Au enrah men ein Setzen Sie die unteren zwei Bolzen in die untersten zwei ffnungen der Mas...

Страница 25: ...6 9 5 7 8 4 1 2 25 DE...

Страница 26: ...utzscheibe achten Sie darauf dass alle Teile gut ineinander greifen und so kein Licht in die Maske durchdringt Soll te weiterhin Licht eintreten wiederholen Sie den Vorgang bis das Problem behoben ist...

Страница 27: ...hverbinder und Luftgrill die nur vom Hersteller zusammengebaut werden d rfen noch die Schlauchhalterung X die Dichtlippe Y und ein Paar Dichtungsringe Z Die Schlauchhalterung X ist auf den Kopfband D...

Страница 28: ...oberen Fallen 5 Lassen Sie den unteren Teil der Dichtlippen Halterung in die L cke zwischen der Maske und dem L ftungskanal gleiten 6 Bauen Sie den Kopfband wie im Abschnitt ZUSAMMENBAU DER MASKE UND...

Страница 29: ...entsprechend in die Schutzmaske einspannen lassen In der Maske d rfen keine Kr fte des Spannungsmechanismus punktuell auf den Filter einwirken da sie den Filter irreparabel besch digen k nnen Achten...

Страница 30: ...stufe 10 Schutzstufe 11 Schutzstufe 12 Schutzstufe 13 LICHTZUSTAND Durchl ssigkeit Wellenl nge DUNKLE SCHUTZSTUFE te Empfindlichkeit einstellen und sie danach bis zu der Stufe verringern bei der es we...

Страница 31: ...1 379 ANSI Z87 1 BILDBESCHREIBUNG DER BALDER FILTER 1 Solarzelle 2 Fotosensoren Fotodioden 3 Filtergeh use 4 Sichtfeld der Fl ssigkeitskristall Sichtscheibe 5 Schalter f r den Schutzstufeneinstellbere...

Страница 32: ...96 x 68 5 mm 96 x 68 5 mm 96 x 46 5 mm 96 x 46 5 mm 96 x 46 5 mm 165 g 160 g 125 g 150 g 145 g 110 g 4 4 4 4 4 4 6 8 9 13 9 13 9 13 6 8 9 13 9 13 9 13 ja au en nein nein ja au en nein nein ja au en ja...

Страница 33: ...ling von elektrischen und elektronischen Ger ten abgegeben werden Das Symbol auf dem Produkt der Gebrauchsanleitung oder der Verpackung weist darauf hin Die Werkstoffe sind gem ihrer Kennzeichnung wie...

Страница 34: ...79 ANSI Z87 1 ORIGINAL ERSATZTEILE Artikel Code Grand GDS Power GDS Grand ES Power ES Grand DS Power DS GFV613BGGAP GFV913BGESAP GFV913BGDSAP GFV613BPGDSAP GFV913BPESAP GFV913BPDSAP Maske BH3 mit Rahm...

Страница 35: ...schutz mit Speedy Loop 6NMPOL GVCCPTSL 6OKBH3 Schwei band Nackenkissen GZTB1 u ere Schutzscheibe Innere Schutzscheibe 107 5 x 71 5 mm GPCBH3F GPCBH3R Dichtlippe Flexi Dichtlippe Standard GCAOZF GCAOZS...

Страница 36: ...Z CIEM SPAWANIA Sprawdzi czy he m zosta odpowiednio zmontowany i czy nie przepuszcza przypadkowego wiat a W przedniej cz ci wiat o mo e dociera do wn trza he mu wy cznie przez zapew niaj cy widoczno o...

Страница 37: ...na regulowa przez pokr canie tylnym pokr t em E w celu dopasowania do okre lonego rozmiaru g owy Nacisn pokr t o i przytrzyma podczas obracania zwolni pokr t o po osi gni ciu ustawienia zapewniaj ceg...

Страница 38: ...ciwy otw r dla uzyskania maksymalnej wygody Dokr ci nakr tki D i podk adki C1 C2 na rubach A Umie ci he m wraz z systemem Speedy Loop na he mie przeciwuderzeniowym jak pokazano na rys 2 Zatrzask po st...

Страница 39: ...os on ochronn na swoim miejscu przy u yciu czterech uchwy t w bocznych Przytrzyma os on kciukiem i palcem rodkowym i przemie ci j na boku kciuka w szczeliny obydwu bocznych uchwyt w Wg bienie w skorup...

Страница 40: ...palc w w obydwu szczelinach bocznych 3 b Zamkn skorup he mu z ram zewn trzn W o y dwa dolne sworznie w otwory skorupy he mu umieszczone na samym dole i we pchn cz g rn ramy w skorup he mu tak aby dwa...

Страница 41: ...6 9 5 7 8 4 1 2 41 PL...

Страница 42: ...at a do he mu Je eli w jakim miejscu wiat o wnika do wewn trz nale y powtarza procedur monta ow a do roz wi zania problemu W przeciwnym razie nie wolno rozpoczyna w nim spawania Przed wymian os on och...

Страница 43: ...atka s montowane wy cznie przez producenta He m ochronny BH3 AIR posiada r wnie uchwyt przewodu X uszczelk cz ci przedniej Y oraz par podk adek Z Uchwyt przewodu X nale y zamocowa na opasce D mi dzy o...

Страница 44: ...a zewn trzne zaciski g rne 5 W o y doln cz uchwytu uszczelki maski ochronnej w szczelin mi dzy he mem a prze wodem powietrza 6 Zamocowa przy bic zgodnie z opisem w sekcji MONTA HE MU BH3 I PRZY BICY P...

Страница 45: ...enia punktowe wywierane przez le dobran ram wsporcz lub system mocowania poniewa mo e to spowodowa powa ne uszkodzenie filtra Nale y r wnie upewni si czy fotosensory i czujniki wiat a s onecznego nie...

Страница 46: ...cja wietlna 8 Izolacja wietlna 9 Izolacja wietlna 10 Izolacja wietlna 11 Izolacja wietlna 12 Izolacja wietlna 13 STAN JASNY Przechodzenie D ugo fali STAN CIEMNY zacznie reagowa tylko na rozb yski uku...

Страница 47: ...13 BL 1 1 1 1 379 ANSI Z87 1 OPIS DO RYSUNK W FILTRA BALDER 1 Bateria s oneczna 2 Fotokom rki diodowe 3 Obudowa filtra 4 Obszar widoku zas ony ciek okrystalicznej 5 Wyb r zakresu dostosowywania przyc...

Страница 48: ...25 g 150 g 145 g 110 g 4 4 4 4 4 4 6 8 9 13 9 13 9 13 6 8 9 13 9 13 9 13 tak zewn trzna nie nie tak zewn trzna nie nie tak zewn trzna tak zewn trzna tak wewn trzna tak zewn trzna tak zewn trzna tak we...

Страница 49: ...pu surowc w wt rnych zajmuj cego si z omowanym sprz tem elek trycznym i elektronicznym W a ciwa utylizacja i z omowanie pomaga w elimi nacji niekorzystnego wp ywu z omowanych produkt w na rodowisko na...

Страница 50: ...IENNE Cz Kod Grand GDS Power GDS Grand ES Power ES Grand DS Power DS GFV613BGGAP GFV913BGESAP GFV913BGDSAP GFV613BPGDSAP GFV913BPESAP GFV913BPDSAP Os ona BH3 z ram Os ona BH3 z ram i otworem do regula...

Страница 51: ...piecze stwa z systemem mocowania Speedy Loop 6NMPOL GVCCPTSL 6OKBH3 Potnik Poduszka na kark GZTB1 Os ona zewn trzna Os ona wewn trzna 107 5 x 71 5 mm GPCBH3F GPCBH3R Uszczelka maski typu flexi Standar...

Страница 52: ...at do helmy pouze skrz pr zor samozatm vac ho sv e sk ho filtru Upravte n hlavn sponu tak aby zajistila co nejv t pohodl a poskytovala co nejv t zorn pole Vyberte sva ovac filtr v rozm ru 110 x 110 mm...

Страница 53: ...o sv maxim ln pohodl Ut hn te matice C roub A P ed jejich p im en m uta en m dejte n hlavn sponu do nej pohodln j vzd lenosti od otvoru pro filtr pomoc dvou obd ln kov ch otvor v pl ti kukly Velikost...

Страница 54: ...y otvor d lu pro se izov n sklonu Zvolte otvor kter v m zajist maxim ln pohodl Na roubech A ut hn te matice D a podlo ky C1 C2 Kuklu s rychlosponou nasu te na ochrannou p ilbu podle obr 2 Polohu zaji...

Страница 55: ...orky 2 b Vlo te vn j ochrannou clonu do r mu se ty mi postrann mi dr ky Podr te ochrannou clonu palcem a prost edn kem a na stran pal ce ji zasu te do t rbin obou bo n ch dr k Prohlube ve sko epin kuk...

Страница 56: ...te ochrannou clonu a pomoc ostatn ch prst ji zasu te do obou bo n ch t rbin 3 b Uzav ete sko epinu kukly vn j m r mem Zasu te spodn dva kol ky do nejni ch otvo r sko epiny kukly a zam kn te horn st r...

Страница 57: ...6 9 5 7 8 4 1 2 57 CZ...

Страница 58: ...a sv m m st a nemohlo tak doj t k vniknut sv tla do kuk ly Pokud by existovala n jak mo nost pr chodu sv tla opakujte postup a do od stran n probl mu jinak se kukla nesm pro sva ov n pou t P ed vlo en...

Страница 59: ...r a vzduchov m ka kter m e montovat pouze v robce m kukla BH3 AIR rovn dr k hadice X obli ejov t sn n Y a dv podlo ky Z Dr k hadice X se upevn na n hlavn sponu D mezi n hlavn sponu D a matici C podle...

Страница 60: ...it n ch horn ch z padek 4 Zam kn te vn j horn st dr ku obli ejov ho t sn n do obou vn j ch horn ch z padek 5 Zasu te spodn st dr ku obli ejov ho t sn n do mezery mezi kuklou a vzduchovodem 6 N hlavn s...

Страница 61: ...v te zda nejsou sol rn l nky a sv teln idla zakryta dnou st kukly proto e to by br nilo spr vn funkci filtru Pokud nastane kter koliv z v e uveden ch situac m e b t filtr nezp sobil k pou it ROZSAH PO...

Страница 62: ...nastavit mezi 0 1 a 1 0 sekundami U aplikac bodov ho sva ov n se doporu uje pou t krat prodlevu u ap likac pou vaj c ch vy proudy a del sva ovac intervaly se doporu uje pou t del prodlevu Del prodlev...

Страница 63: ...4 3 4 2 1 2 3 4 BALDER Grand ES 4 9 13 BL 1 1 1 1 379 ANSI Z87 1 POPIS PRO OBR ZKY FILTRU BALDER 1 Sol rn l nek 2 Sv teln idla Fotodiody 3 Pouzdro filtru 4 Pr zor clony z tekut ch krystal 5 Volba rozs...

Страница 64: ...6 5 mm 96 x 46 5 mm 165 g 160 g 125 g 150 g 145 g 110 g 4 4 4 4 4 4 6 8 9 13 9 13 9 13 6 8 9 13 9 13 9 13 ano extern ne ne ano extern ne ne ano extern ano extern ano vnit n ano extern ano extern ano v...

Страница 65: ...k ho za zen Zaji t n m spr vn likvidace tohoto v robku pom ete zabr nit negativn m d sledk m pro ivotn prost ed a lidsk zdrav kter by jinak byly zp sobeny nevhodnou likvidac tohoto v robku Podrobn j i...

Страница 66: ...1 1 1 1 379 ANSI Z87 1 P VODN N HRADN D LY Polo ka K d Grand GDS Power GDS Grand ES Power ES Grand DS Power DS GFV613BGGAP GFV913BGESAP GFV913BGDSAP GFV613BPGDSAP GFV913BPESAP GFV913BPDSAP t t BH3 s r...

Страница 67: ...s rychlosponou Speedy loop 6NMPOL GVCCPTSL 6OKBH3 Potn p ska Kr n podlo ka GZTB1 Vn j ochrann clona Vnit n ochrann clona 107 5 x 71 5 mm GPCBH3F GPCBH3R Obli ejov t sn n flexi Obli ejov t sn n standa...

Страница 68: ...BALDER BALDER BH3 10 60 C BALDER BALDER BALDER BALDER BH3 B S 110 x 110 BALDER 20 C 65 C 45 C BALDER 68 RU...

Страница 69: ...A A C C B D E F A D D F 1 A F B D E 1 CR39 BALDER BALDER 1 2 3 4 5 69 RU...

Страница 70: ...G H 1 A A E C1 C1 C2 C2 D D B F BH3 BH3 HH BH3 BH3 Speedy Loop A Speedy Loop E Speedy Loop E F 1 A B Speedy loop E F D C1 C2 A Speedy loop 2 Speedy Loop Speedy Loop G H 2 1 2 3 4 5 6 70 RU...

Страница 71: ...1 2 b 3 a 2 a 3 b 4 1 2 Grand DS Power DS 1 2 a 2 b 3 a 3 b 2 4 1 2 3 4 71 RU...

Страница 72: ...1 2 b 3 a 2 a 3 b Grand GDS Grand ES Power GDS Power ES 1 2 a 2 b 3 a 3 b 2 4 5 6 4 7 8 9 1 2 3 4 5 6 7 8 9 72 RU...

Страница 73: ...6 9 5 7 8 4 1 2 73 RU...

Страница 74: ...1 a 1 b 2 1 2 2 1 1 a 1 b 2 3 4 BH3 AIR BH3 AIR BH3 BH3 Balder Balder 1 2 3 74 RU...

Страница 75: ...A A C C B D X E F Z Z Y BH3 AIR 1 2 BH3 AIR BH3 BH3 AIR X Y Z X D D C 1 BH3 AIR 1 BH3 AIR 75 RU...

Страница 76: ...1 2 3 6 5 4 BH3 1 2 3 4 5 6 BH3 PAPR 25 30 1 2 3 4 5 6 7 8 76 RU...

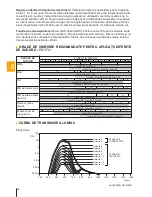
Страница 77: ...ER IR UV UV IR BALDER EN 379 CE DIN DIN Plus CR39 PPE BALDER MIG MAG TIG WIG 6 8 9 13 BALDER Power DS Power ES Grand DS Grand ES 9 13 DIN Power GDS Grand GDS 6 8 9 13 Range 6 8 DIN 9 13 DIN Range TIG...

Страница 78: ...er DS Grand GDS Power GDS Grand ES Power ES Grand DS Power DS Grand GDS Power GDS Grand ES Power ES Grand DS Power DS MMA MAG TIG MIG MIG 6 10 15 30 40 60 70 100 125 150 175 200 225 250 300 350 400 9...

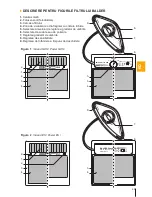
Страница 79: ...Z87 1 S e n s it iv it y D e l a y SHA D E W e ld G r i n d 7 9 8 6 S e n s it iv it y D e l a y SHA D E 7 9 8 5 3 4 2 1 2 3 4 3 4 2 1 2 3 4 BALDER Grand ES 4 9 13 BL 1 1 1 1 379 ANSI Z87 1 BALDER 1 2...

Страница 80: ...6 x 68 5 96 x 68 5 96 x 68 5 96 x 46 5 96 x 46 5 96 x 46 5 165 g 160 g 125 g 150 g 145 g 110 g 4 4 4 4 4 4 6 8 9 13 9 13 9 13 6 8 9 13 9 13 9 13 0 15 0 15 0 15 0 15 0 15 0 15 0 1 1 0 c 0 1 1 0 c 0 1 1...

Страница 81: ...AIR EN 12941 EN 14594 Clean air Basic 2000 Dual flow Clean air Basic 2000 Flow control Clean air Chemical 2F Plus Clean air Chemical 3F Plus Clean air Pressure 2A Clean air Pressure Flow control 2A BH...

Страница 82: ...ANSI Z87 1 Se nsi tivi ty D el ay SHA D E BALDER Grand ES 4 9 13 BL 1 1 1 1 379 ANSI Z87 1 Grand GDS Power GDS Grand ES Power ES Grand DS Power DS GFV613BGGAP GFV913BGESAP GFV913BGDSAP GFV613BPGDSAP...

Страница 83: ...Speedy loop 6NMPOL GVCCPTSL 6OKBH3 GZTB1 107 5 x 71 5 GPCBH3F GPCBH3R flexi standard GCAOZF GCAOZS 6CM002 6CM001 83 RU...

Страница 84: ...trunderii accidentale a luminii prin intermediul acesteia n partea frontal lumina poate p trunde n casc numai prin vizorul filtrului de sudur auto opacizant Ajusta i casca pentru a asigura un confort...

Страница 85: ...celor dou g uri dreptunghiulare din carcasa c tii Dimensiunea curelelor D poate fi reglat prin r sucirea butonului din spate E pentru a se potrivi oric rei dimensiuni Ap sa i pe buton i ine i ap sat...

Страница 86: ...lin rii Selecta i orificiul corect pentru confort maxim Str nge i piuli ele D i aibele C1 C2 de pe uruburi A Trece i masca mpreun cu Speedy Loop pe casc a a cum se arat n figura 2 Pozi ia va fi p stra...

Страница 87: ...b Introduce i ecranul exterior de protec ie n loca ul s u cu ajutorul celor patru suporturi laterale ine i ecranul de protec ie cu degetul mare i cel mijlociu i a eza i l al turi de degetul mare ntre...

Страница 88: ...anul de protec ie i cu ajutorul celorlalte degete a eza i l n ambele fante laterale 3 b nchide i carcasa m tii cu cadrul exterior In troduce i cele dou plinturi inferioare n cele dou deschideri inferi...

Страница 89: ...6 9 5 7 8 4 1 2 89 RO...

Страница 90: ...locuirii ecranelor de protec ie asigura i v c toate piesele sunt bine fixate pentru a mpiedica p trunderea luminii n masc Dac nc mai p trunde lumina repeta i procedura p n ce proble ma este eliminat n...

Страница 91: ...gril de aer ce vor fi asamblate numai de c tre produc tor masca BH3 AIR are de asemenea i un suport de furtun X o garnitur pentru fa Y i o pereche de aibe Z Suportul de furtun X trebuie s fie fixat p...

Страница 92: ...rioar a suportului garniturii pentru fa n cele dou puncte de prindere exterioare superioare 5 Glisa i partea inferioar a p r ii inferioare a suportului garniturii pentru fa n spa iul dintre masc i con...

Страница 93: ...sistemului de montare pentru c ar putea cauza deteriorarea sever a filtrului Asigura i v de faptul c celulele solare i senzorii foto nu sunt acoperi i de casc pentru c acest lucru ar putea mpiedica b...

Страница 94: ...ica ii de suda re electric prin puncte i temporiz ri mai lungi la aplica ii ce utilizeaz curen i mai puternici i in tervale de sudur mai mari Temporizarea mai lung poate fi utilizat de asemenea i la s...

Страница 95: ...379 ANSI Z87 1 DESCRIERE PENTRU FIGURILE FILTRULUI BALDER 1 Celula solar 2 Fotosenzorii fotodiodele 3 Carcasa filtrului 4 Zona de vizualizare a diafragmei cu cristale lichide 5 Selectarea nivelului de...

Страница 96: ...8 5 mm 96 x 68 5 mm 96 x 68 5 mm 96 x 46 5 mm 96 x 46 5 mm 96 x 46 5 mm 165 g 160 g 125 g 150 g 145 g 110 g 4 4 4 4 4 4 6 8 9 13 9 13 9 13 6 8 9 13 9 13 9 13 da extern nu nu da extern nu nu da extern...

Страница 97: ...pamentelor electrice i electronice Asigu r ndu v c a i eliminat n mod corect produsul ajuta i la evitarea poten ialelor consecin e negative pentru mediul nconjur tor i pentru s n tatea persoane lor co...

Страница 98: ...Z87 1 PIESE DE SCHIMB ORIGINALE Articol Cod Grand GDS Power GDS Grand ES Power ES Grand DS Power DS GFV613BGGAP GFV913BGESAP GFV913BGDSAP GFV613BPGDSAP GFV913BPESAP GFV913BPDSAP Scut BH3 cu cadru Scut...

Страница 99: ...y loop 6NMPOL GVCCPTSL 6OKBH3 Band anti transpira ie confort Band pentru g t GZTB1 Ecran de protec ie extern Ecran de protec ie intern 107 5 x 71 5 mm GPCBH3F GPCBH3R Garnitur pentru fa flexi Garnitur...

Страница 100: ...gai surinktas ir kad visi kai nepraleid ia atsitiktin s viesos I priekio viesa pro alm gali patekti tik per savaime u tams jan io filtro skirto suvirinimo darbams i r jimo zon Sureguliuokite po alm ki...

Страница 101: ...dami patalpinkite po alm patogiausiu atstumu nuo filtro kiaurym s naudodami dvi kvadratines kiaurymes almo gaubte Galvos rangos D dydis pritaikomas galiniu reguliavimo ratuku E Paspauskite ratuk ir su...

Страница 102: ...tis b t u fiksuotas vienoje i keturi kiaurymi pak li mo reguliavimo dalyje Pasirinkite patogiausi pad t Ant var t A u maukite tarpines C1 C2 ir priver kite ver les D U d kite alp su Speedy Loop iedu a...

Страница 103: ...i u sifiksuot vir utiniame fiksatoriuje 2 b I orin apsaugin plok tel viet statykite naudodami keturis laikiklius Laikydami apsaugi n langel nyk iu ir viduriniuoju pir tu statykite du laikiklius nyk i...

Страница 104: ...ai vietos j s nyk iui 3 a Viduriniuoju pir tu sulenkite apsaugin langel ir kitais pir tais statykite abu laikiklius kitoje pus je 3 b U darykite almo gaubt i oriniu r meliu Apatin dal statykite du apa...

Страница 105: ...6 9 5 7 8 4 1 2 105 LT...

Страница 106: ...dalys tinkamai sistatyt savo vietas ir apsaugot nuo viesos pate kimo vid Jei viesa vis dar patenka kar tokite proced r kol problema i sispr s kitu atveju almo negalima naudoti suvi rinimo darbams Prie...

Страница 107: ...ltro kuri surinkimas turi b ti atliekamas tik gamintojo BH3 AIR almas taip pat turi arnel s laikikl X veido zonos izoliacij Y ir dvi tarpines Z arnel s laikiklis X turi b ti tvirtinamas galvos rangoje...

Страница 108: ...os laiki klio dal ir du vir utinius vidinius skl s ius 4 spauskite i orin vir utin veido izoliacijos laikiklio dal du i orinius vir utinius skl s ius 5 statykite apatin veido izoliacijos laikiklio dal...

Страница 109: ...r sitikinkite kad saul s baterij element ir viesos jutikli nedengia kokia nors almo dalis Jei dengia filtras gali veikti netinkamai Jei atsitikt vienas i i atvej filtras naudoti netinkamas PRITAIKYMO...

Страница 110: ...und i Ta kinio suvirinimo metu rekomenduojama naudoti trumpesn u laikym o naudojant auk tesnes sroves ir ilgesnius virinimo intervalus ilgesn u laikym Ilgesnis u laikymas taip pat gali b ti naudojamas...

Страница 111: ...LDER Grand ES 4 9 13 BL 1 1 1 1 379 ANSI Z87 1 BALDER FILTR APRA YMAS 1 Saul s baterija 2 viesos jutiklis fotodiodas 3 Filtro korpusas 4 Skyst j kristal vaizdo zona 5 U tamsinimo reguliavimo parinkima...

Страница 112: ...96 x 46 5 mm 165 g 160 g 125 g 150 g 145 g 110 g 4 4 4 4 4 4 6 8 9 13 9 13 9 13 6 8 9 13 9 13 9 13 taip i orinis ne ne taip i orinis ne ne taip i orinis taip i orinis taip vidinis taip i orinis taip i...

Страница 113: ...uoti atitinkam surinkimo punktui kad elektros ir elektronikos ranga b t perdirbta Tinkamai i mesdami produkt j s prisid site prie apsaugos nuo galimo neigiamo poveikio aplinkai ir moni sveikatai kur g...

Страница 114: ...IN S DALYS Dalis Kodas Grand GDS Power GDS Grand ES Power ES Grand DS Power DS GFV613BGGAP GFV913BGESAP GFV913BGDSAP GFV613BPGDSAP GFV913BPESAP GFV913BPDSAP Gaubtas BH3 su r meliu Gaubtas BH3 su r mel...

Страница 115: ...dy Loop iedu 6NMPOL GVCCPTSL 6OKBH3 Prakait sugerianti juostel reguliuojama kaklo juostel GZTB1 I orinis apsauginis langelis Vidinis apsauginis langelis 107 5 x 71 5 mm GPCBH3F GPCBH3R Veido zonos izo...

Страница 116: ...a spr vne zmontovan a aby plne zabra ovala pr stupu ak ho ko vek n hodn ho priameho svetla Vpredu m e svetlo vstupova do helmy iba cez oblas priezoru v automaticky sa stmavuj com zv racom filtri Nasta...

Страница 117: ...odlnej ej vzdialenosti od otvoru filtra pou it m dvoch tvorcov ch otvorov v kukle helmy Ve kos s pravy na hlavu D mo no nastavova ot an m zadn ho kolieska E tak aby sede la na ak ko vek ve kos hlavy K...

Страница 118: ...e dosiahli maxim lne pohodlie Utiahnite matice D a podlo ky C1 C2 na skrutk ch A Helmu so slu kou nasa te na prilbu pozri obr 2 V aka avej a pravej z padke bud dr a v spr vnej polohe Ak je to potrebn...

Страница 119: ...ornej chytky 2 b Vonkaj iu ochrann clonu zalo te na miesto po mocou tyroch postrann ch dr iakov Ochrann clonu pridr iavajte palcom a prostredn kom a vlo te ju do dr ok oboch bo n ch dr iakov Z rez v p...

Страница 120: ...rann clonu prehnite a pomocou ostatn ch prstov ju vsu te do oboch bo n ch dr ok 3 b Kuklu helmy uzatvorte pomocou vonkaj ieho r mu Do dvoch najspodnej ch otvorov v pl ti helmy vlo te dva doln kol ky a...

Страница 121: ...6 9 5 7 8 4 1 2 121 SK...

Страница 122: ...e e v etky asti pevne dr ia na svojom mieste o zabr ni prenikaniu svet la do helmy Ak by e te st le nejak svetlo prenikalo tak opakujte tento postup pok m probl m neodstr nite inak sa helma ne smie po...

Страница 123: ...zduchov trubica hadicov pr pojka vzduchov mrie ka a ktor m e montova iba v robca m maska BH3 AIR e te dr iak hadice X tv rov tesnenie Y a p r podlo iek tesnen Z Dr iak hadice X treba pripevni k sade n...

Страница 124: ...aj iu horn as dr iaka tv rov ho tesnenia zatla te do dvoch vonkaj ch horn ch z pa diek 5 Spodn as dr iaka tesnenia vsu te do medzery medzi maskou a vzduchovou trubicou 6 S pravu na hlavu zmontujte pos...

Страница 125: ...v ne po kodenie filtra Ubezpe te sa e sol rne l nky a foto sn ma e nie s prekryt iadnou as ou helmy ke e by to mohlo zabra ova spr vnej funkcii filtra Za tak chto podmienok sa filter nem pou va POLE...

Страница 126: ...nastavi od 0 1 do 1 0 sek nd Pri bodovom zv ran sa odpor a pou va krat as oneskorenia a pri pou it vy ch pr dov a pri dlh ch zv rac ch intervaloch zase dlh as V ie oneskorenie sa tie m e pou va pri zv...

Страница 127: ...ES 4 9 13 BL 1 1 1 1 379 ANSI Z87 1 POPIS SELN CH DAJOV PRE FILTRE SPOLO NOSTI BALDER 1 Sol rny l nok slne n bat ria 2 Foto sn ma e Foto di dy 3 Kryt filtra 4 Clona priezoru z tekut ch kry t lov 5 Vo...

Страница 128: ...6 5 mm 96 x 46 5 mm 96 x 46 5 mm 165 g 160 g 125 g 150 g 145 g 110 g 4 4 4 4 4 4 6 8 9 13 9 13 9 13 6 8 9 13 9 13 9 13 no extern nie nie no extern nie nie no extern no extern no intern no extern no ex...

Страница 129: ...recykl ciu elektrick ch alebo elektronick ch zariaden Zabezpe te e tento v robok bude zlikvidovan spr vnym postupom aby ste predi li negat vnym vplyvom na ivotn prostredie a udsk zdravie o by bolo sp...

Страница 130: ...1 379 ANSI Z87 1 P VODN N HRADN D LY Polo ka K d Grand GDS Power GDS Grand ES Power ES Grand DS Power DS GFV613BGGAP GFV913BGESAP GFV913BGDSAP GFV613BPGDSAP GFV913BPESAP GFV913BPDSAP t t BH3 s r mom t...

Страница 131: ...a ahovacou slu kou 6NMPOL GVCCPTSL 6OKBH3 S prava pre zv enie komfortu p s na zachyt vanie potu a vypch vka ku krku GZTB1 Vonkaj ia ochrann clona Vn torn ochrann clona 107 5 x 71 5 mm GPCBH3F GPCBH3R...

Страница 132: ...ANAS P rliecinieties ka aizsargmaska ir pareizi piestiprin ta un ka t vis piln b aiztur jebk das nejau as gaismas iek anu No priek puses gaisma aizsargmask var iepl st tikai caur auto m tiskas aptum...

Страница 133: ...rt kaj att lum no filtra atv r anas vietas izmantojot divas maz s kvadr tveida atveres iveres karkas Galvas stiprin juma izm ru D var main t grie ot aizmugur jo ritenti u E Lai noregul tu galvas stipr...

Страница 134: ...gul anas deta as atve r m ir ievietota neliela tapi a Iestatiet tapi u vis rt kaj caurum Pievelciet uzgrie us D un papl ksnes C1 C2 uz skr v m A Uzst diet aizsargmasku ar Speedy Loop stiprin jumu uz i...

Страница 135: ...j skav 2 b Ievietojiet r jo aizsargpl ksni t s poz cij ar etriem s nu tur t jiem Turot aizsargekr nu ar k i un vid jo pirkstu ievietojiet to ab s k a puses s nu spraug s Padzi in jums aizsarg maskas...

Страница 136: ...sargekr nu un ar citu pirkstu pal dz bu ievietojiet to ab s s na spraug s 3 b Aizveriet aizsargmaskas karkasu ar r jo ietvaru Ievietojiet abas apak j s tapi as aizsargmaskas karkasa apak j s atver s u...

Страница 137: ...6 9 5 7 8 4 1 2 137 LV...

Страница 138: ...izsargekr nu mai as laik p rbaudiet vai visas da as ir stingri nostip rin tas un ne auj aizsargmask iepl st gais mai Ja v l notiek k da gaismas caurpl de atk rtojiet proced ru l dz probl ma tiek no v...

Страница 139: ...sa re is kas ir samont tas jau ra otn BH3 AIR aizsargmaska iek auj ar tenes tur t ju X sejas bl vi Y un starpliku p ri Z tenes tur t js X galvas stiprin jumam D j uzst da starp galvas stiprin jumu D u...

Страница 140: ...zvietotajos aizsl gos 4 Ieb diet sejas bl ves tur t ja r jo aug da u abos aug jos rpus izvietotajos aizsl gos 5 Ieb diet sejas bl ves tur t ja apak da u spraug starp aizsargmasku un gaisa kan lu 6 Sam...

Страница 141: ...tru P rliecinieties ka neviena maskas da a nep rkl j saules elementus un fotosensorus jo tas var tu kav t pareizu filtra darb bu Ja ir sp k k ds no iepriek min tajiem apst k iem filtrs nav piem rots l...

Страница 142: ...t interv l no 0 1 l dz 1 0 sekund m Punktveida metin anas darbos ieteicams iestat t s ku aizkavi bet metin anas darbos ar liel ku str vu un ilg ku metin anas laiku ilg ku Ilg ku aizkavi var izmantoti...

Страница 143: ...4 BALDER Grand ES 4 9 13 BL 1 1 1 1 379 ANSI Z87 1 BALDER FILTRU Z M JUMU APRAKSTS 1 Saules elements 2 Fotosensori Foto diodes 3 Filtra karkass 4 idro krist lu aizsl ga skata zona 5 Aptum ojuma diapaz...

Страница 144: ...68 5 mm 96 x 68 5 mm 96 x 68 5 mm 96 x 46 5 mm 96 x 46 5 mm 96 x 46 5 mm 165 g 160 g 125 g 150 g 145 g 110 g 4 4 4 4 4 4 6 8 9 13 9 13 9 13 6 8 9 13 9 13 9 13 Ir r js Nav Nav Ir r js Nav Nav Ir r js I...

Страница 145: ...ktronisko ie k rtu sav k anas punktos p rstr d anai Nodro inot pareizu atbr vo anos no produkta j s pal dz siet izvair ties no potenci l m negat v m sek m apk r t jai videi un cilv ka vesel bai kuras...

Страница 146: ...ba Kods Grand GDS Power GDS Grand ES Power ES Grand DS Power DS GFV613BGGAP GFV913BGESAP GFV913BGDSAP GFV613BPGDSAP GFV913BPESAP GFV913BPDSAP Karkass BH3 ar ietvaru Karkass BH3 ar ietvaru un atveri r...

Страница 147: ...Loop stiprin jumu 6NMPOL GVCCPTSL 6OKBH3 Sviedrus uzs co lente kakla polster jums GZTB1 r jais aizsargekr ns Iek jais aizsargekr ns 107 5 x 71 5 mm GPCBH3F GPCBH3R Sejas bl ves Flexi versija Sejas bl...

Страница 148: ...le masque est bien assembl et qu il bloque compl tement toute lumi re acci dentelle La lumi re ne peut p n trer par l avant qu travers le champ de vision du filtre de soudage auto obscurcissant Ajuste...

Страница 149: ...confortable de l ouverture du filtre en utilisant les deux orifices rectangulaires de la coque du masque La taille du harnais D peut tre ajust e en tournant la molette arri re E pour s adapter au tour...

Страница 150: ...de r glage de l inclinaison Choisissez le trou qui vous offre un confort optimal Serrez les crous C et les rondelles C1 C2 sur les vis A Placez le masque et le Speedy loop au dessus du casque comme su...

Страница 151: ...on ext rieur dans sa position avec les quatre supports lat raux Tenez l cran de protection entre votre pouce et votre majeur et placez le du c t de votre pouce dans les encoches des deux supports lat...

Страница 152: ...s deux encoches lat rales l aide de vos autres doigts 3 b Fermez la coque du masque avec le cadre ext rieur Introduisez les deux goupilles inf rieures dans les deux ouvertures les plus basses de la co...

Страница 153: ...6 9 5 7 8 4 1 2 153 FR...

Страница 154: ...du remplace ment des crans de protection v rifiez que toutes les pi ces sont bien en place afin d viter toute entr e de lumi re dans le masque Si la lumi re entre r p tez la pro c dure jusqu la suppr...

Страница 155: ...r qui doivent tre uniquement assembl es par le fabricant le masque BH3 AIR poss de galement un support de tuyau X un joint facial Y et une paire de joints Z Le support du tuyau X doit tre fix sur le h...

Страница 156: ...support du joint facial dans les deux loquets sup rieurs externes 5 Glissez la partie inf rieure du support du joint facial dans l espace entre le masque et le tuyau d air 6 Montez le harnais comme i...

Страница 157: ...pl mentaire caus par le cadre de fixation ou le syst me de montage car ils pourraient causer de graves d g ts au filtre Assurez vous que les cellules solaires et les capteurs optiques ne sont pas cou...

Страница 158: ...ment 8 Obscurcissement 9 Obscurcissement 10 Obscurcissement 11 Obscurcissement 12 Obscurcissement 13 TAT CLAIR Transmission Longueur d onde TAT SOMBRE qu la lumi re de soudage sans d clenchements inte...

Страница 159: ...379 ANSI Z87 1 DESCRIPTION POUR LES FIGURES DU FILTRE BALDER 1 Pile solaire 2 Capteurs optiques photodiodes 3 Bo tier du filtre 4 Champ de vision de l obturateur cristaux liquides 5 S lection de la g...

Страница 160: ...96 x 46 5 mm 165 g 160 g 125 g 150 g 145 g 110 g 4 4 4 4 4 4 6 8 9 13 9 13 9 13 6 8 9 13 9 13 9 13 oui externe non non oui externe non non oui externe oui externe oui interne oui externe oui externe o...

Страница 161: ...chargeant du recyclage du mat riel lectrique et lectronique En vous assurant que ce produit est limin correctement vous favorisez la pr vention des cons quences n gatives pour l environnement et la sa...

Страница 162: ...ES DE RECHANGE ORIGINALES Article Code Grand GDS Power GDS Grand ES Power ES Grand DS Power DS GFV613BGGAP GFV913BGESAP GFV913BGDSAP GFV613BPGDSAP GFV913BPESAP GFV913BPDSAP Masque BH3 avec cadre Masqu...

Страница 163: ...e Speedy loop 6NMPOL GVCCPTSL 6OKBH3 Ensemble confort bandeau frontal bandeau de cou GZTB1 cran de protection externe cran de protection interne 107 5 x 71 5 mm GPCBH3F GPCBH3R Joint facial flexi Join...

Страница 164: ...IZIARE A SALDARE Assicurarsi che la maschera sia montata correttamente e che nella parte frontale impedi sca ogni possibile passaggio di luce tranne attraverso il campo visivo del filtro protettivo pe...

Страница 165: ...tangolari che permettono di muovere il copricapo avanti e indietro collocare il copricapo alla distanza pi comoda dal filtro Il copricapo D pu essere regolato adattandolo alla misura della testa ruota...

Страница 166: ...blocchi in uno dei quattro fori del regolatore Scegliere il foro adatto per garantire il massimo comfort Stringere i dadi D sulle viti A e sulle rondelle C1 C2 Collocare la maschera con l anello sopra...

Страница 167: ...re lo schermo protettivo esterno in po sizione all interno delle quattro staffe Tenere lo schermo con il pollice e il dito medio e spingerlo nelle due apposite fessure che si trovano da entrambe le pa...

Страница 168: ...tre dita inserir lo nelle due apposite fessure 3 b Coprire il corpo del casco con la cornice esterna Inserire i due perni inferiori nelle fessure pi in basso del corpo del casco e spingere la parte su...

Страница 169: ...6 9 5 7 8 4 1 2 169 IT...

Страница 170: ...siano saldamente collocate in modo da impedire alla luce di penetrare nella ma schera Qualora penetri la luce ripetere la procedura fino a correggere il problema Se il problema persiste non utilizzar...

Страница 171: ...ttore la maschera ad aria BH3 AIR dotata anche di un supporto per tubo flessibile X una guarnizione facciale Y e un paio di rondelle Z Il supporto per tubo flessibile X va montato sul sopricapo D tra...

Страница 172: ...4 Spingere la parte esterna superiore del supporto nelle due serrature esterne in alto 5 Fare scorrere la parte inferiore del supporto nell apertura tra la maschera e la conduttura d aria 6 Montare il...

Страница 173: ...ma non devono essere creati ulteriori punti di tensione che potrebbero danneggiare seriamente il filtro Assicurarsi che le celle solari e i fotosensori non siano coperti da parte della maschera in qua...

Страница 174: ...4 Oscuramento 6 Oscuramento 7 Oscuramento 8 Oscuramento 9 Oscuramento 10 Oscuramento 11 Oscuramento 12 Oscuramento 13 STATO CHIARO Trasmissione Lunghezza d onda STATO SCURO Regolazione del tempo di a...

Страница 175: ...Grand ES 4 9 13 BL 1 1 1 1 379 ANSI Z87 1 DESCRIZIONE DELLE FIGURE DEI FILTRI BALDER 1 Cella solare 2 Fotosensori fotodiodi 3 Alloggiamento del filtro 4 Campo visivo dell otturatore a cristalli liqui...

Страница 176: ...68 5 mm 96 x 46 5 mm 96 x 46 5 mm 96 x 46 5 mm 165 g 160 g 125 g 150 g 145 g 110 g 4 4 4 4 4 4 6 8 9 13 9 13 9 13 6 8 9 13 9 13 9 13 s esterno no no s esterno no no s esterno s esterno s interno s es...

Страница 177: ...nel punto di raccolta appropriato per il riciclaggio di apparecchiature elettriche ed elettroniche Provvedendo a smaltire questo prodotto in modo appropriato si contribuisce a evitare potenziali cons...

Страница 178: ...ANSI Z87 1 RICAMBI ORIGINALI Articolo Codice Grand GDS Power GDS Grand ES Power ES Grand DS Power DS GFV613BGGAP GFV913BGESAP GFV913BGDSAP GFV613BPGDSAP GFV913BPESAP GFV913BPDSAP Maschera BH3 con corn...

Страница 179: ...PTSL 6OKBH3 Completo di nastro antisudore cuscinetto proteggi collo GZTB1 Schermo protettivo esterno Schermo protettivo interno 107 5 x 71 5 mm GPCBH3F GPCBH3R Guarnizione di tenuta facciale flexi Gua...

Страница 180: ...En la parte frontal la luz puede ingresar en el casco nicamente a trav s del rea del visor del filtro para soldadura autooscurecible Ajuste el mecanismo para la cabeza para asegurar una m xima comodid...

Страница 181: ...damente la distancia entre el casco la cara y los ojos con la ayuda de los orificios cuadrados en la armaz n del casco El tama o de la armaz n D puede ser ajustado girando el bot n de la parte trasera...

Страница 182: ...nclinaci n Elija el hueco adecuado para garantizar su mayor confort Ajuste la tuerca D y las juntas C1 C2 en el tornillo A Coloque el casco con el speedy loop sobre el hard hat tal como se muestra en...

Страница 183: ...pantalla externa de protecci n en su posici n junto con los cuatro soportes laterales Sostenga la pantalla de protecci n con su dedo pulgar y su dedo medio y f jela junto a su pulgar en las ranuras en...

Страница 184: ...esto de los dedos f jelo en ambas ranuras laterales 3 b Cierre la armaz n del casco con el marco externo Inserte los dos pins inferiores en las dos aberturas inferiores de la armaz n del casco y presi...

Страница 185: ...6 9 5 7 8 4 1 2 185 ES...

Страница 186: ...allas de protecci n aseg rese de que las partes est n firmemente fijadas en su lugar y de este modo se evite el ingreso de luz en el casco En caso de que esto suceda repita el procedimiento hasta elim...

Страница 187: ...das exclusivamente por el fabricante el casco BH3 AIR cuenta tambi n con un soporte para mangue ra X un precinto facial Y y un par de arandelas Z El soporte de la manguera X debe ser fijado en el meca...

Страница 188: ...rte de precinto facial en los dos ganchos superiores externos 5 Deslice la parte inferior del soporte de precinto facial en el espacio entre el casco y el conduc to de aire 6 Ensamble el mecanismo par...

Страница 189: ...as y externas sean adecuadamente montadas en el casco No deber a haber un aumento de puntos de tensi n cau sado por el marco de fijaci n o el sistema de montaje ya que podr a causar severos da os en e...

Страница 190: ...UZ Transmisi n Longitud de onda ESTADO DE OSCURIDAD al m ximo al comienzo y luego ir reduci ndola gradualmente hasta que el filtro reaccione nica mente a la luz de la soldadura y sin conmutaciones per...

Страница 191: ...N DE LAS FIGURAS DEL FITRO BALDER 1 C lula solar 2 Foto sensores foto diodos 3 Armaz n del filtro 4 rea de visi n con obturadores de cristal l quido 5 Bot n para fijar el nivel de la sombra 6 Bot n p...

Страница 192: ...68 5 mm 96 x 46 5 mm 96 x 46 5 mm 96 x 46 5 mm 165 g 160 g 125 g 150 g 145 g 110 g 4 4 4 4 4 4 6 8 9 13 9 13 9 13 6 8 9 13 9 13 9 13 s externo no no s externo no no s externo s externo s interno s ex...

Страница 193: ...unto de recolecci n de equipos el ctricos y electr nicos para reciclaje Al asegurarse de que este producto se deseche correctamente usted ayudar a evitar posibles consecuencias negativas para el ambie...

Страница 194: ...DE RECAMBIO ORIGINALES Art culo C digo Grand GDS Power GDS Grand ES Power ES Grand DS Power DS GFV613BGGAP GFV913BGESAP GFV913BGDSAP GFV613BPGDSAP GFV913BPESAP GFV913BPDSAP Pantalla BH3 con marco Pan...

Страница 195: ...MPOL GVCCPTSL 6OKBH3 Set de confort banda antitranspirante almo hadilla para nuca GZTB1 L mina protectora externa Lamina protectora interna 107 5 x 71 5 mm GPCBH3F GPCBH3R Precinto facial flexi Precin...

Страница 196: ...n i hj lmen endast genom f nstret med det ljusd mpande svetsfiltret Justera hj lmen p huvudet s att den sitter s bekv mt som m jligt att du har st rsta m jliga synf lt V lj ett l mplgt svetsfilter f r...

Страница 197: ...tt h l f r maximal bekv mlighet Dra t alla muttrar C och skruvar A Innan du drar t dem placera hj lmen p det bekv maste avst ndet fr n filter ppningen genom att anv nda de tv rektangul ra h len som fi...

Страница 198: ...ett av de fyra h len i lutningsjusteringen V lj det h l som ger b sta bekv mlighet Dra fast muttrarna D och brickorna C1 C2 p skruvarna A Placera hj lmen med Speedy Loop ver skyddshj lmen som visas p...

Страница 199: ...t i vre f stet 2 b F r in yttre skyddsglas i dess position med fyra sidoh llare H ll skyddssk rmen med tumme och l ngfinger och placera sidan vid tummen i sp ren i sidans b da h llare F rdjupningen i...

Страница 200: ...rarna 3 b St ng hj lmstommen med den yttre ramen F r in de tv undre stiften i de tv l gre pp ningarna i hj lmskalet och tryck ramens vre del in i hj lmstommen tills de tv vre stiften sn pper fast i pp...

Страница 201: ...6 9 5 7 8 4 1 2 201 SE...

Страница 202: ...ter sitter s kert p plats f r att hindra ljus fr n att tr nga in i hj lmen Kommer ljus in i hj lmen p n got s tt nd upprepa proceduren tills proble met r l st annars f r hj lmen inte anv n das f r sve...

Страница 203: ...anganslutning och luftgaller vilka monteras av tillverkaren har hj lmen BH3 AIR ven en slangh llare X ansikts t tning Y och ett par brickor Z Slangh llaren X ska f stas p huvudst llningen D och mutter...

Страница 204: ...yttre vre f stena 5 Skjut in nedre delen av ansiktst tningens h llare i springan mellan hj lmen och luftkanalen 6 Montera huvudst llningen enligt beskrivningen i avsnitt BH3 MONTERING AV HJ LM OCH HUV...

Страница 205: ...er monte ringssystemet eftersom de kan orsaka allvarliga skador p filtret Kontrollera att solcellerna och fotosensorerna inte t cks av n gon hj lm del d detta kan hindra egenfunktion av filtret Om n g...

Страница 206: ...den kan justeras fr n 0 1 till 1 0 sekunder Vi rekommenderar att anv nda en kortare f rdr jning vid punktsvetsningstill mpn ingar och en l ngre vid till mpningar med h gre str mmar och l ngre svetsint...

Страница 207: ...DER Grand ES 4 9 13 BL 1 1 1 1 379 ANSI Z87 1 BESKRIVNING AV BALDER FILTRETS NUMRERING 1 Solceller 2 Fotosensorer fotodioder 3 Filter kapsling 4 Synf lt genom flytande kristall 5 Ratt f r reglering av...

Страница 208: ...96 x 46 5 mm 96 x 46 5 mm 96 x 46 5 mm 165 g 160 g 125 g 150 g 145 g 110 g 4 4 4 4 4 4 6 8 9 13 9 13 9 13 6 8 9 13 9 13 9 13 ja extern nej nej ja extern nej nej ja extern ja extern ja intern ja extern...

Страница 209: ...r hanteras som hush llsavfall Den skall i st llet l mnas in p uppsamlingsplats f r ter vinning av el och elektronikkomponenter Genom att s kerst lla att produkten hanteras p r tt s tt bidrar du till a...

Страница 210: ...SI Z87 1 ORIGINAL RESERVDELAR Artikel Code Grand GDS Power GDS Grand ES Power ES Grand DS Power DS GFV613BGGAP GFV913BGESAP GFV913BGDSAP GFV613BPGDSAP GFV913BPESAP GFV913BPDSAP Sk rm BH3 med ram Sk rm...

Страница 211: ...med Speedy Loop 6NMPOL GVCCPTSL 6OKBH3 Svettband fodrat nackband komfortset GZTB1 Yttre skyddssk rm Inre skyddssk rm 107 5 x 71 5 mm GPCBH3F GPCBH3R Ansiktst tning flexi Ansiktst tning standard GCAOZF...

Страница 212: ...ussuodattimen kautta S d p pannan korkeus ja ymp rysmitta sek maskin kulma kasvoihin n hden itsellesi ja ty h si sopivaksi Valitse sopiva hitsaussuodatin suojukselle Suodattimen mitat 110 x 110 mm ks...

Страница 213: ...sta itsellesi parhaiten sopiva Kiinnit mutterit C ruuveihin A Ennen niiden lopullista kirist mist aseta p hinekehikko sopivalle et isyydelle hitsauslasin aukosta k ytt en apuna kahta maskin kuoressa o...

Страница 214: ...hteen nelj st kallistuksen s t osassa olevista rei ist Valitse sinulle sopiva reik Kirist ruuvien A mutterit D ja tiivisteet C1 C2 Aseta kyp r ja Speedy Loop panta suojakyp r n yl puolelle kuten kuvas...

Страница 215: ...2 b Aseta ulkosuojalevy paikoilleen nelj ll pidik keell Pid suojalevyst peukalolla ja keskisor mella ja aseta se peukalon puolelta molemmilla puolilla olevien pidikkeiden koloihin Kyp r n kuoren pyk...

Страница 216: ...vuta suojalevy kes kisormen avulla ja kiinnit se muiden sormien avulla molemmilla puolilla oleviin loviin 3 b Sulje kyp r n kuori ulkokehikolla Aseta alaosan kaksi tappia kyp r n kuoren kahteen alimpa...

Страница 217: ...6 9 5 7 8 4 1 2 217 FI...

Страница 218: ...n kokoamisen aikana tai suojalevyj vaihdettaessa niin ettei valo p se kyp r n sis lle Mik li valo kuitenkin l p isee maskin toista menettely uudel leen kunnes ongelma on ratkaistu Muuten maskia ei saa...

Страница 219: ...tajan kokoamien lis osien ilmakanava letkuliitin ja ilmaritil lis ksi BH3 AIR kyp r ss on letkunpidike X kasvotiiviste Y ja tiivistepari Z Letkunpidike X pit kiinnitt p kehikkoon D p kehikon D ja mutt...

Страница 220: ...mpi sis puoli kahteen sis puolella olevaan yl pidikkeeseen 4 Paina kasvotiivisteenpidikkeen ylempi ulkopuoli kahteen ulkopuolella olevaan yl pidikkeeseen 5 Liu uta kasvotiivisteenpidikkeen alapuoli ky...

Страница 221: ...yp r n kunnolla Kehikko tai kasettikokoonpano ei saa painaa miss n olosuhteissa suodatinta koska se voi vahingoittaa suodatinta vakavasti Tarkista ettei kyp r osittain peit aurinkoparistoja ja valosen...

Страница 222: ...tummasta kirkkaaseen voi daan s t v lill 0 1 1 0 sekuntia On suositeltavaa k ytt lyhyemp viivett pistehitsaus laitteitten kanssa ja pidemp viivett kun k ytet n korkeampaa virtaa ja pidempi hitsausjak...

Страница 223: ...4 3 4 2 1 2 3 4 BALDER Grand ES 4 9 13 BL 1 1 1 1 379 ANSI Z87 1 BALDER HITSAUSKYP R LASIEN OSIEN KUVAUS 1 Aurinkokenno 2 Sensorit s hk diodit 3 Hitsauskyp r lasin johdot 4 Nestem isen kristallihimmen...

Страница 224: ...g 125 g 150 g 145 g 110 g 4 4 4 4 4 4 6 8 9 13 9 13 9 13 6 8 9 13 9 13 9 13 kyll ulkoinen ei ei kyll ulkoinen ei ei kyll ulkoinen kyll ulkoinen kyll sis inen kyll ulkoinen kyll ulkoinen kyll sis inen...

Страница 225: ...tyksest huolehtivaan ker yspisteeseen T m n tuotteen asianmukaisen h vitt misen varmistamisella autetaan est m n sen mahdolliset ymp rist n ja terveyteen kohdistuvat haittavaikutukset joita voi aiheu...

Страница 226: ...Z87 1 ALKUPER ISET VARAOSAT Tuote Koodi Grand GDS Power GDS Grand ES Power ES Grand DS Power DS GFV613BGGAP GFV913BGESAP GFV913BGDSAP GFV613BPGDSAP GFV913BPESAP GFV913BPDSAP Suojus BH3 kehikolla Suoj...

Страница 227: ...rvakyp r Speedy Loop pannalla 6NMPOL GVCCPTSL 6OKBH3 Hikinauha niskatuki GZTB1 Ulkoinen suojalevy Sis inen suojalevy 107 5 x 71 5 mm GPCBH3F GPCBH3R Flexi kasvotiiviste Standard kasvotiiviste GCAOZF G...

Страница 228: ...som mulig p hodet for oppn maksimal komfort og for gi st rst mulig synsfelt Velg et filter som passer til skjoldet Dimensjoner p filteret 110 x 110 mm se BALDERhefte Sjekk anbefalt skyggeniv for sveis...

Страница 229: ...k at du oppn r maksimal komfort Stram til mutrene C p skruene A F r du strammer dem skikkelig til setter du hodeb ylen i den mest komfortable avstanden fra filter pningen ved bruke de to firkantede hu...

Страница 230: ...re hullene i tippejusteringsdelen Velg riktig hull for maksimal komfort Stram mutterne D og underlagsskivene C1 C2 p skruene A Plasser hjelmen med Speedy Loop over vernehatten som vist i figur 2 Venst...

Страница 231: ...en 2 b Sett p plass den utvendige beskyttelses skjermen med fire sideholdere Hold beskyt telsesskjermen med tommelen og langfingeren og plasser den p siden av tommelen din inn i sporene p begge sideho...

Страница 232: ...langfingeren og plasser den i begge sidesporene ved hjelp av de andre fingrene 3 b Lukk hjelmskallet med den ytre rammen Sett inn de nederste to pinnene i de nederste to pningene p hjelmskallet og sk...

Страница 233: ...6 9 5 7 8 4 1 2 233 NO...

Страница 234: ...sesskjermene m du passe p at alle deler er satt helt p plass for forhindre at lys kommer inn i hjelmen Skulle det fremdeles trenge inn lys gjenta prosedyren inntil problemet er eliminert siden hjelmen...

Страница 235: ...angekontakt og luftrist som bare skal monteres av produsenten har BH3 AIR hjelmen ogs en slangeholder X et ansikts segl Y og et par underlagsskiver Z Slangeholderen X festes p hodeb ylen D mellom hode...

Страница 236: ...ndige vre delen av ansiktsseglholderen inn i de to utvendige vre l sene 5 Skyv den nedre delen av ansiktsseglholderen inn i pningen mellom hjelpen og ventilasjons kanalen 6 Monter hodeb ylen som beskr...

Страница 237: ...t for rsaket av fiksering ramme eller mon tering system fordi de kunne for rsake flere skader til filteren V r sikker at solceller og foto f lere er ikke dekket av hjelmets delene for det kunne forhin...

Страница 238: ...tsettelsen av pningen kan v re satt fra 1 0 til 1 0 sekunder Det er anbefalt bruke en kortere utsettelse ved punktsveising og en lengre forsinkelse med sveising med h yere str mbruk Lengre utsettelse...

Страница 239: ...1 2 3 4 3 4 2 1 2 3 4 BALDER Grand ES 4 9 13 BL 1 1 1 1 379 ANSI Z87 1 BESKRIVELSE 1 Solceller 2 Fotosensorer Fotodioder 3 Filterhus 4 Synsomr de for flytende krystallukker 5 Bryter for skyggegrad in...

Страница 240: ...x 46 5 mm 165 g 160 g 125 g 150 g 145 g 110 g 4 4 4 4 4 4 6 8 9 13 9 13 9 13 6 8 9 13 9 13 9 13 ja utvendig nei nei ja utvendig nei nei ja utvendig ja utvendig ja indre ja utvendig ja utvendig ja ind...

Страница 241: ...Det skal derimot bringes til et mottak for resir kulering av elektrisk og elektronisk utstyr Ved s rge for korrekt avhending av apparatet vil du bidra til forebygge de negative konsekvenser for milj o...

Страница 242: ...ORIGINALE RESERVEDELER Artikler Kode Grand GDS Power GDS Grand ES Power ES Grand DS Power DS GFV613BGGAP GFV913BGESAP GFV913BGDSAP GFV613BPGDSAP GFV913BPESAP GFV913BPDSAP BH3 skjerm med ramme BH3 skj...

Страница 243: ...ed Speedy loop 6NMPOL GVCCPTSL 6OKBH3 Svetteb nd nakkepute komfortsett GZTB1 Utvendig beskyttelsesskjerm Innvendig beskyttelsesskjerm 107 5 x 71 5 mm GPCBH3F GPCBH3R Fleksibelt ansiktssegl Standard an...

Страница 244: ...orkant mag er alleen maar licht in de helm binnendringen door het venster in het elektro optische lasfilter Stel het helmmechanisme zo in dat dit comfortabel zit en een goed zicht door het filter moge...

Страница 245: ...het verschuiven van het helmmechanisme mogelijk maken de meest comfortabele afstand in vanaf het filter De afmetingen van de helm kunnen worden aangepast door aan het wieltje E op de ach terkant van...

Страница 246: ...pening in functie van een optimaal comfort Schroef de moeren D en afdichtingen C1 C2 op de schroeven A aan Plaats de helm met de snelsluiting over de veiligheidshelm zoals aangegeven op afbeelding 2 D...

Страница 247: ...Breng het externe beschermende scherm in po sitie met de vier zijhouders Houd het bescher mende scherm in positie met uw duim en mid delvinger vast en plaats het met de zijkant van uw duim in de sleu...

Страница 248: ...n uw andere vingers plaatst u het in beide zijsleuven 3 b Sluit de helm af met het externe frame Steek de twee onderste pinnen in de onderste openingen van de helm en duw het bovenste gedeelte van het...

Страница 249: ...6 9 5 7 8 4 1 2 249 NL...

Страница 250: ...lle onderdelen stevig op hun plaats houdt zodat er geen licht in de helm kan binnendringen Mocht er alsnog licht binnendringen her haal dan de procedure totdat het probleem is opgelost anders mag de h...

Страница 251: ...worden gemonteerd beschikt de BH3 AIR helm ook over een slanghouder X gezichtsafdichting Y en een set afdichtingen Z De slanghouder X moet op het helmmechanisme D worden gemonteerd tussen het helmme c...

Страница 252: ...gezichtsafdichtinghouder in de twee buiten ste bovenklemmen 5 Schuif de onderste deel van de gezichtsafdichtinghouder in de ruimte tussen de helm en het luchtkanaal 6 Monteer het helmmechanisme zoals...

Страница 253: ...beschermende schermen goed op de helm wordt gemonteerd Door het frame of montagesysteem te bevestigen mag er geen verhoogde spanning zijn aangezien dit de filter zou kunnen beschadigen Zorg ervoor dat...

Страница 254: ...d 10 Verduisteringsgraad 11 Verduisteringsgraad 12 Verduisteringsgraad 13 LICHTE TOESTAND Doorlaatbaarheid Golflengte DONKERE TOESTAND de hoogste gevoeligheid in te stellen en deze vervolgens langzaam...

Страница 255: ...1 1 1 379 ANSI Z87 1 OMSCHRIJVING VAN DE AFBEELDINGEN VAN DE FILTERS BALDER 1 Zonnecel 2 Lichtsensoren lichtdiodes 3 Filterbehuizing 4 Lichtfilter met vloeibare kristallen 5 Verduisteringsinstelling k...

Страница 256: ...mm 96 x 46 5 mm 96 x 46 5 mm 96 x 46 5 mm 165 g 160 g 125 g 150 g 145 g 110 g 4 4 4 4 4 4 6 8 9 13 9 13 9 13 6 8 9 13 9 13 9 13 ja extern nee nee ja extern nee nee ja extern ja extern ja intern ja ext...

Страница 257: ...ar elektrische en elektronische apparatuur wordt gerecy cled Als u ervoor zorgt dat dit product op de correcte manier wordt verwijderd voorkomt u mogelijk voor mens en milieu negatieve gevolgen die zi...

Страница 258: ...VEONDERDELEN Item Code Grand GDS Power GDS Grand ES Power ES Grand DS Power DS GFV613BGGAP GFV913BGESAP GFV913BGDSAP GFV613BPGDSAP GFV913BPESAP GFV913BPDSAP Schild BH3 met frame Schild BH3 met frame e...

Страница 259: ...loop 6NMPOL GVCCPTSL 6OKBH3 Zweetband nekkussen comfortset GZTB1 Extern beschermend scherm Intern beschermend scherm 107 5 x 71 5 mm GPCBH3F GPCBH3R Flexibele gezichstafdichting flexi Standaard gezich...

Страница 260: ...hogy a pajzs megfelel en legyen ssze ll tva s teljesen elz rja a sz r d f ny tj t F ny el lr l csak az automatikusan s t ted hegeszt sz r n z ny l s n kereszt l l phet be a sisakba A maxim lis k nyel...

Страница 261: ...zor tan ket ll tsa a sisakot a sz r ny l st l a legk nyelmesebb t vols gra a pajzstokon tal lhat k t sz gletes lyuk seg ts g vel A fejp nt m rete D a h ts ker k E forgat s val ll that be a k v nt fejm...

Страница 262: ...n gy furat nak egyik ben r gz tve van egy kis szeg A maxim lis k nye lem rdek ben v lassza a jobb oldali furatot A csavarokra A fesz tse r az any kat D s al t teket C1 C2 Helyezze a hegeszt sisakot a...

Страница 263: ...t 2 b Illessze a k ls v d lemezt a hely re a n gy oldals tart elemhez Fogja meg h velyk s k z ps ujj val a v d szit t s a h velykujja fel li oldalon helyezze be a k t oldals tart r seibe A sisakon l v...

Страница 264: ...szit t s t bbi ujj t haszn lva helyezze be a mindk t oldals ny l sba 3 b Z rja le a hegeszt sisakot a k ls kerettel Helyezze be a k t als pecket a sisak k t legals ny l s ba s nyomja a keret fels r s...

Страница 265: ...6 9 5 7 8 4 1 2 265 HU...

Страница 266: ...ly n legyen csak gy lehet ugyanis megel zni hogy b rmi f ny jusson a sisak ba Ha m gis jutna be f ny a fenti elj r st addig ism telje am g a probl m t ki nem k sz b li ellenkez esetben a pajzsot tilos...

Страница 267: ...k t ml csatlakoz s l gr cs a BH3 AIR t pus tartalmaz egy t ml tart t X egy cs sz gy r s t m t st s k t al t tet is Z A t ml tart t az 1 br n l that m don a fejp ntra D kell r gz teni a fejp nt D s az...

Страница 268: ...ls fels r sz t a k t k ls fels reteszbe 5 Tolja a t m t start als r sz t a sisak s a l gvezet k k z tti r sbe 6 Szerelje ssze a fejp ntot A BH3 T PUS SISAK S A FEJP NT SZEREL SE c m r szben le rtak s...

Страница 269: ...gyeljen r hogy a napelemeket s a f ny rz kel ket ne fedje a pajzs mivel ez g tolhatja a sz r megfelel m k d s t A fenti esetek b rme lyike is lehetetlenn teszi a sz r megfelel haszn lat t ALKALMAZ SI...

Страница 270: ...szabbat pedig nagyobb ramer ss ggel s hosszabb hegeszt si id k z kkel j r alkalmaz sokhoz c lszer haszn lni Hosszabb k sleltet s alkalmazhat kis ramer ss g AVI hegeszt shez is a sz r kiny l s nak mege...

Страница 271: ...1 2 3 4 BALDER Grand ES 4 9 13 BL 1 1 1 1 379 ANSI Z87 1 MAGYAR ZAT A BALDER SZ R BR J HOZ 1 Napelem 2 F ny rz kel fotodi d k 3 Sz r foglalat 4 Folyad kkrist lyos zsalu n z ter lete 5 Az rny kol si t...

Страница 272: ...m 96 x 46 5 mm 96 x 46 5 mm 165 g 160 g 125 g 150 g 145 g 110 g 4 4 4 4 4 4 6 8 9 13 9 13 9 13 6 8 9 13 9 13 9 13 igen k ls nem nem igen k ls nem nem igen k ls igen k ls igen bels igen k ls igen k ls...

Страница 273: ...hogy gondoskodik ezen term k helyes hullad kba helyez s r l seg t megel zni azokat a k rnyezetre s az emberi eg szs g re gyakorolt potenci lis kedvez tlen k vetkezm nyeket amelyeket ellenkez esetben...

Страница 274: ...7 1 EREDETI P TALKATR SZEK Cikk K d Grand GDS Power GDS Grand ES Power ES Grand DS Power DS GFV613BGGAP GFV913BGESAP GFV913BGDSAP GFV613BPGDSAP GFV913BPESAP GFV913BPDSAP BH3 sisak kerettel BH3 sisak k...

Страница 275: ...speedy loop 6NMPOL GVCCPTSL 6OKBH3 Izzads g tl p nt nyakp nt komfort k szlet GZTB1 K ls v d szita Bels v d szita 107 5 x 71 5 mm GPCBH3F GPCBH3R Cs sz gy r s t m t s Cs sz gy r s t m t s standard GCAO...

Страница 276: ...Optoelectronic elements and measuring systems Ltd Teslova ulica 30 SI 1000 Ljubljana Slovenija tel fax e mail web 386 1 477 67 13 386 1 426 45 79 386 1 426 45 82 info balder si www balder eu...

Отзывы: