background image

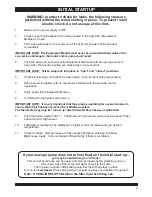
WARNING: In order to check for leaks, the following steps are 

performed without the wood skirting in place.  To prevent risk of 

electric shock, do not use spa at this time.

1.

Make sure the power supply is OFF.

 
2.

Check to see that the Black Drain Valve (located to the right side of Equipment 
Module) is closed.  

 
3.

Fill the spa with water to the center line of the skimmer (located inside spa next 
to headrest).


IMPORTANT NOTE: The Equipment Module must never be operated without water in the
spa, serious damage to the heater and/or pump could result.
 

4.

The slide valves on each side of the Equipment Module should be open (the valve is 
open when the handle is pulled out, closed when it is pushed in).

IMPORTANT NOTE:  Valves snap lock into place in "open" and "closed" positions.

 
5.

Check all plumbing connections for water leaks, if any, fix them before proceeding.

 
6.

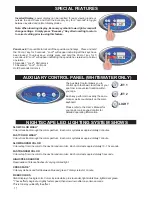
Before power is applied, refer to and become familiar with the spa side control 
operations.  

7.

Apply power to the Equipment Module.

 
8.

9.

10.

11.

Check for leaks!  Although spas are fully checked at factory, shipping & delivery  

           Might cause a leak.  Call your dealer or Baja directly if there is a problem.

Circulation Pump System will come on.

IMPORTANT NOTE:  It is very important that the pump be operating for several minutes to 
assure that all air has been removed from filtration system.  
The thermostat may only be "turned up" after full water flow has been established.

Push the button marked "JET 1".  The Booster Pump will now operate at low speed. Press 
button twice for High speed. 

Temperature reading will be displayed on digital control. Increase setting to desired 
temperature.  

If your new spa pump does not prime (flow) on the initial start-up...

you may be experiencing an “air lock”.


This normal occurrence can be easily corrected by loosening the plumbing union on 

the suction side of the pump until water flows into the pump.  

Then quickly re-tighten fitting taking care that the O-Ring stays in place.  

Turn on the 

Low Speed

 Pump setting and you should now have normal flow through jets.  

Note:  OPEN AIR RELIEF VALVE on the filter top when filling spa.

INITIAL STARTUP

8

Содержание Whitewater XS

Страница 1: ...Please read and follow all instructions before installing operating or enjoying your spa Please refer to the operational video that is supplied with spa Save these instructions for future reference RE...

Страница 2: ...HTSCAPE LED LIGHTING SYSTEM PAGE 11 IN HOUSE CONTROL PANEL PAGE 12 BAJA BREEZE AROMATHERAPY PAGE 12 JET FILTER OPERATION PAGE 12 WINTERIZING YOUR SPA PAGE 13 SUMMERIZING YOUR SPA PAGE 13 REGULAR SPA M...

Страница 3: ...Spa is the modern machine for today s great thinkers It blends many advanced features to help you enjoy the benefits of warm water for recreation and therapy Baja Products Ltd originated the acrylic...

Страница 4: ...alternative a spa may be installed within 5 feet of metal surfaces if each metal surface is permanently connected by a minimum No 8 2 AWG 8 4 mm solid copper conductor to the wire connector on the te...

Страница 5: ...betes should consult a physician before using a spa f Persons using medication should consult a physician before using a spa since some medication may induce drowsiness while other medication may affe...

Страница 6: ...any electrical wires 7 In selecting the ideal outdoor location for your spa we suggest you take into consideration the following a The view you ll have from the spa b The proximity to your home for ch...

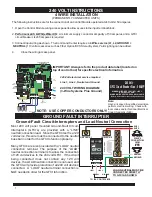
Страница 7: ...NING Improper electrical connections or conductor sizing may cause the Equipment Module to operate improperly create the potential for an electrical hazard and may void the warranty CAUTION Use only a...

Страница 8: ...it Interrupter s GFCI s are provided with a LINE neutral connection lead Since the GFCI itself is a 120 volt device this wire must be connected to the neutral buss bar in order for the GFCI to functio...

Страница 9: ...r to the Equipment Module 8 9 10 11 Check for leaks Although spas are fully checked at factory shipping delivery Might cause a leak Call your dealer or Baja directly if there is a problem Circulation...

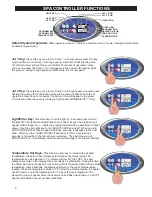
Страница 10: ...t of light shows Use the spa s light key to turn NIGHTSCAPE on and off When you turn NIGHTSCAPE off and then on again within five seconds it advances to the next show When you turn NIGHTSCAPE off and...

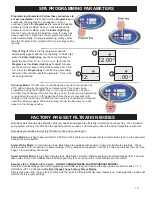
Страница 11: ...st the minutes from 00 to 59 Press the Program key to confirm the new setting and wait until controller resets Temperature Time Spa will be programmed 2 SPA PROGRAMMING PARAMETERS 1 2 3 00 1 00 1 Baja...

Страница 12: ...on through the color spectrum Each color cycle takes approximately 1 minute SLOW RANDOM COLOR Colors step from one color to the next in random order Each color lasts approximately 10 15 seconds FAST R...

Страница 13: ...with fresh aromatherapy spa scents To install Baja Breeze scents simply 1 Turn off the Booster pump 2 Unscrew Baja Breeze aromatherapy cap located on top of spa 3 Place aromatherapy scents pack or bag...

Страница 14: ...sors If the sensor registers an ambient temperature below 59 F the systems Smart Winter Mode will activate This mode once activated will continue for a period of 24 hours The system will activate any...

Страница 15: ...CLEAN FILTER IF NECESSARY CLEAN FILTER CARTRIDGE CLEAN THE INSULATED SPA COVER TEST THE GFCI DRAIN THE SPA COMPLETELY REFILL WITH WATER AND REPLENISH CHEMICALS WHILE THE SPA IS EMPTY CLEAN WITH ANONA...

Страница 16: ...a component is being supplied with the proper voltage if a fuse has blown or by simply pressing a switch if the complete system is being supplied with voltage from the breaker panel The following inf...

Страница 17: ...If 3 flashing dots appear below the temperature display an error has occurred and a service call is needed If the actual spa water temperature greatly differs from the displayed temperature or the dis...

Страница 18: ...l in the LEFT CORNER position on models 1044 67 68and in RIGHT SIDE panel position on models 1042 46 Black drain valve located to the right of the equipment pack attached to clear hose with a hose cla...

Страница 19: ...er Condition Care _________________________ _________________________ Skirting Condition Care _________________________ _________________________ Overall Spa Appearance _________________________ _____...

Страница 20: ...NOTES SPA SCHEMATIC 19...

Страница 21: ...Baja Products Ltd 4065 North Romero Road Tucson AZ 85705 Customer Service 800 845 2252 Ext 23 E Mail Address Info bajaspa com Date _________Model ____________________ Serial Number BPL03 05 200...

Отзывы: