12
Maintenance and Storage
No scheduled maintenance is required as long as the system is stored in a cool, dry place. Do not expose
a charged Float cylinder to temperatures exceeding 130°F (55°C) or below -22°F (-30°C). If subjected to
adverse conditions, check that all connections are free of contaminants. Pack can be cleaned with warm
soapy water and connections can be cleaned with a damp cloth. Do not use lubricants.
Periodic Deployment
BCA recommends deploying your Float airbag at least once per year, both to make sure the system
is operating correctly and to be sure the user knows how to operate the equipment efficiently. Put it
on, pull the trigger, repack the airbag and refill the cylinder before the season starts. Your Float airbag
is designed to undergo a minimum of 30 deployments and is warranted for three years. With proper
care, it should last five years or more.
Discharging Compressed Air Cylinder
If the compressed air cylinder
v
is pressurized but the pressure is below 2500 psi (172 bar) at 70°F
(21°C), it should not be used in the backcountry but it may be used for a practice deployment. Simply
deploy the airbag by pulling on the trigger handle.
If the compressed air cylinder must be discharged without deploying the airbag, disconnect the quick
connect fitting
u
between the compressed air cylinder and the air hose (coupler gauge
x
will need
to be removed), close the compressed air system compartment, close the pack and pull the trigger
handle. The compressed air will empty directly into the pack.
DO NOT POINT CYLINDER OUTLET PORT (COUPLER) AT ANYONE OR ANYTHING, AS IT
COULD CAUSE DAMAGE OR INJURY. DISCHARGING A COMPRESSED AIR CYLINDER IS
LOUD – PERSONAL EAR PROTECTION IS RECOMMENDED.
Installing Compressed Air Cylinder
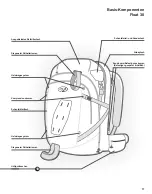
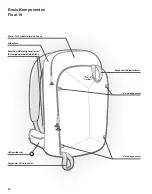
1. Remove packaging caps from pressurized air cylinder. Unzip the fabric inner liner in the pack (Float
18 and 30 only).
2. Position air cylinder
v
next to the ejector assembly
14
as shown on page 7. Secure air cylinder
into place with the elastic and Velcro straps.
3. Connect the quick connect fitting
u
by pulling the large ring toward the air cylinder. It should click
back into place when air hose nipple is properly connected. Coupler gauge
x
should fit in place to
ensure air hose is connected properly.
4. Screw the trigger cable nut
z
onto the trigger pin
{
. To grasp trigger cable nut before threading it
on the trigger pin, it will be necessary to push the trigger handle
12
back in, to expose more cable on
the other end.
Maintenance
1
4
1


