background image

USING THE MACHINE TO POSITION EMBROIDERY PATTERNS FOR CREATING CUTWORK

27

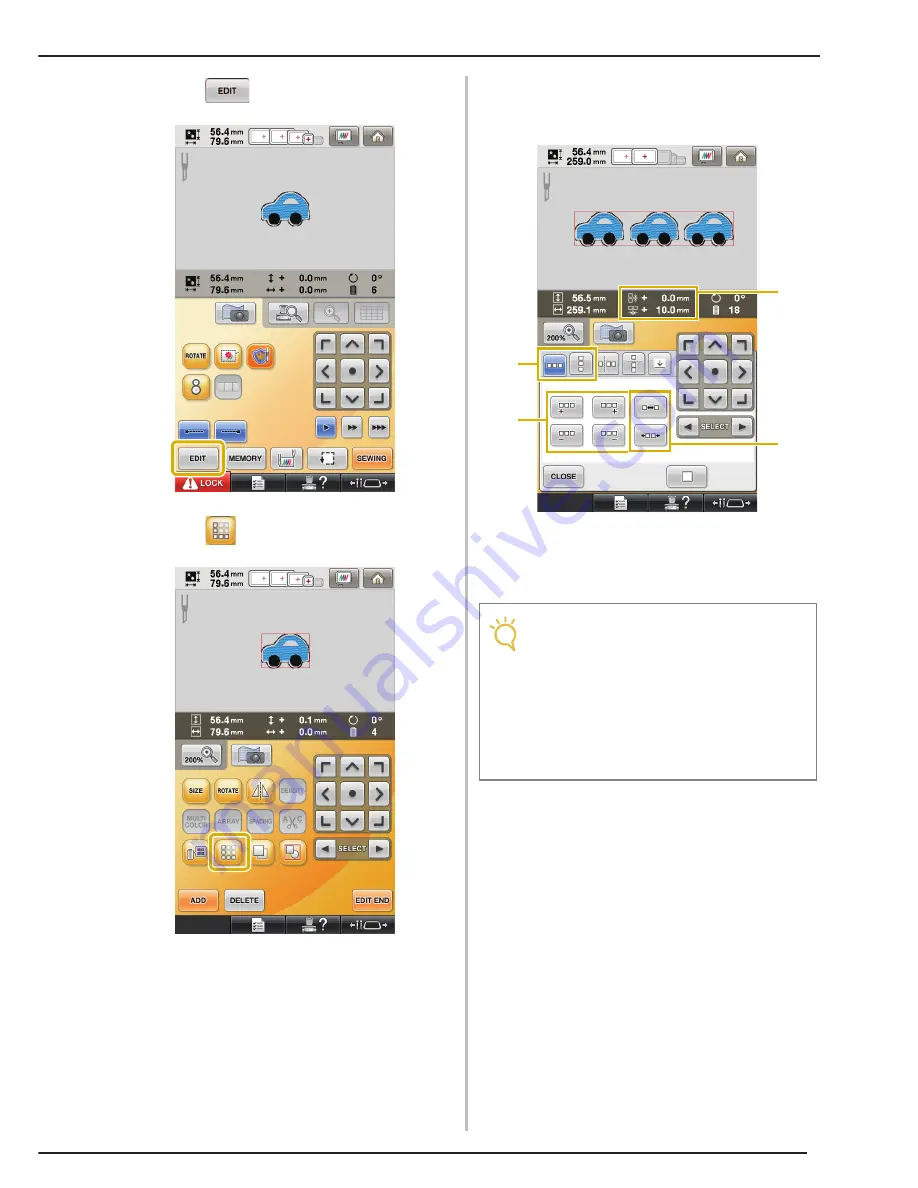
c

Touch .

d

Touch 

 in the pattern editing screen.

e

Select the direction in which the pattern 
will be repeated, and then adjust the 
spacing of the repeated pattern.

a

Horizontal and vertical direction

b

Repeating and deleting keys

c

Spacing keys

d

Pattern spacing

Note

• For details on the border function, refer to 

“Designing repeated patterns” in chapter 5 
of your machine’s Instruction and 
Reference Guide.

• We recommend spacing of more than 

10 mm between the patterns. Making 
spaces of less than 10 mm may cause 
pattern shrinkage or distortion during 
embroidering and cutting.

d

b

c

a

Содержание BNCW

Страница 1: ......

Страница 2: ...oluble Stabilizer 17 Drying 17 2 2 Cleaning 17 USING THE MACHINE TO POSITION EMBROIDERY PATTERNS FOR CREATING CUTWORK 18 Sample Pattern 18 Using Editing Functions on Embroidery Patterns 18 3 3 Creatin...

Страница 3: ...ng on your machine model or version Fabric can be cut if cutwork needles are installed in specific needle bars of the machine This allows embroidering and cutting to be done with the same machine page...

Страница 4: ...dery An instructional movie for basic cutwork embroidery can be viewed by clicking Basic Cutwork Embroidery in the chapter index of the supplied DVD Advanced Cutwork Embroidery An instructional movie...

Страница 5: ...stitching around the desired pattern Refer to USING THE MACHINE TO POSITION EMBROIDERY PATTERNS FOR CREATING CUTWORK on page 18 An original cutwork pattern designed in Palette Version 9 2 with Cutwor...

Страница 6: ...fabric Using thicker fabrics may result in damage to the cutwork needles or machine it may also effect the finish of the design or cause fraying Embroidery frames used with cutwork When creating cutw...

Страница 7: ...Attaching Water Soluble Stabilizer on page 15 A sheet of non woven water soluble stabilizer is supplied Optional film type water soluble stabilizers are available for use Various patterns on the encl...

Страница 8: ...utwork mode For details on switching the machine to Cutwork mode refer to Switching to Cutwork Mode on page 11 Cutwork mode functions A cutwork pattern can be designed with your desired embroidery pat...

Страница 9: ...he displays for embroidery needles 1 through 4 change to cutwork needles Cutting will be done with needles 1 through 4 and embroidering with the remaining needles When using the cutwork needles the fa...

Страница 10: ...play may appear as APPLIQUE MATERIAL APPLIQUE POSITION or APPLIQUE Cutwork mode OFF Cutwork mode ON Note Depending on the pattern the cutting line may not be cut In that case the cutting line will be...

Страница 11: ...as practice CREATING CUTWORK a Switching to Cutwork Mode page 11 b Installing the Cutwork Needles page 11 c Turning On the Machine page 12 d Importing a Pattern page 12 e Checking the Pattern page 13...

Страница 12: ...rk mode touch beside Cutwork in the settings screen described in step a As directed in the message that appears turn off the machine replace the cutwork needles with the embroidery needles and then tu...

Страница 13: ...needle plate hook and bobbin case after using the machine This machine is equipped with a memory feature so that if the machine is turned off while it is being operated it will resume the stopped oper...

Страница 14: ...pattern is not edited continue to the next screen The embroidering settings screen appears b Touch The embroidering screen appears Note To import a cutwork pattern from the enclosed CD ROM to the mach...

Страница 15: ...ng b Fabric wrong side Note Specify pause locations if necessary referring to Specifying Pause Locations Before Embroidering on page 29 When the Cutwork mode has been turned on the cutwork needles app...

Страница 16: ...the cutout pieces without stretching the fabric c Reattach the embroidery frame or if you have moved the frame toward you using and on the 10 needle machine touch to move it back into position Embroid...

Страница 17: ...ss the start stop button to restart embroidering When all embroidering is finished the following screen appears b Touch to return to the embroidering settings screen Note Use a sheet of water soluble...

Страница 18: ...nstruction and Reference Guide a Turn off the embroidery machine b Remove the needle plate and then use the brush to remove any lint and dust Carefully clean and dust under and around the needle plate...

Страница 19: ...ttern can be designed by either cutting out an embroidery pattern or outlining it with satin stitching Creating an Appliqu from an Embroidery Pattern page 20 An embroidery pattern can be selected to c...

Страница 20: ...to Cut the Design Out page 24 After satin stitching is sewn in a desired shape around the embroidered pattern it can be cut out along that outer boundary This is useful for adding an artistic touch t...

Страница 21: ...n settings screen appears c Touch and make sure is highlighted With the Appliqu Distance keys specify the distance of the appliqu outline from the embroidery pattern a Appliqu key b Outline tab c Appl...

Страница 22: ...ing settings screen after specifying the settings clears all settings and edited data described above An appliqu piece can also be created by using water soluble stabilizer instead of fabric as the ap...

Страница 23: ...utline around a pattern on page 20 b Touch Next touch until the desired frame shape appears and then select it If desired change the size and position of the frame a Appliqu key b Frame type keys c Fr...

Страница 24: ...c Continue the procedure starting with step d in Creating an appliqu with the outline around a pattern on page 20 Cutting the fabric along the outline of a desired frame shape a Follow steps a and b...

Страница 25: ...on page 20 b Touch and make sure is highlighted With the Appliqu Distance keys specify the distance of the satin stitching from the edge of the pattern With the Cutting Line Distance keys specify the...

Страница 26: ...iqu with the outline around a pattern on page 20 Editing Cutwork Patterns Notes on creating cutwork patterns z Cutwork cannot be created if the pattern is too large or too complicated or an outline ha...

Страница 27: ...attern in order to make all cuts at one time a Follow steps a and b in Cutting the fabric along the outline of a pattern on page 23 b Touch and then touch Arranging Multiple Copies of a Single Pattern...

Страница 28: ...pattern a Horizontal and vertical direction b Repeating and deleting keys c Spacing keys d Pattern spacing Note For details on the border function refer to Designing repeated patterns in chapter 5 of...

Страница 29: ...e machine display and then start embroidering Note We recommend ungrouping the patterns in order to cancel color sorting and create a cleaner finish for the sewing Specify pause locations if necessary...

Страница 30: ...ng the pause location Create a sample of the procedure described in Arranging Multiple Copies of a Single Pattern to Make All Cuts at One Time following steps a on page 26 through step g on page 28 Th...

Страница 31: ...ead color or cutwork needle with the pause location to be deleted at the top of the thread color sequence display and then touch An unnecessary pause location can also be deleted after a trial embroid...

Страница 32: ...HC when saved on the machine s memory Only cutwork patterns either included on the supplied CD ROM or created in Palette Version 9 2 with Cutwork can be correctly recognized and work properly with the...

Страница 33: ...fferent pattern z Increase Appliqu Distance and Cutting Line Distance so that the combined pattern will have a single cutting line z Shorten the distance between the objects so that the combined patte...

Страница 34: ...is available for use z Reposition the selected pattern z Resize the selected pattern or decrease Appliqu Distance and Cutting Line Distance so that the cutting line fits within the embroidering area I...

Страница 35: ...English 111 001...

Отзывы: