


W H I T E
A X M I N S T E R
W
16
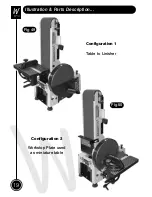
Assembly Configurations...
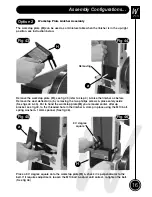
Workstop Plate Linisher Assembly
Option 2
Fig 43
Fig 44
Fig 45
Fig 46
The workstop plate
(H)
can be used as a miniature table when the linisher is in the up-right
position, see instruction below.
Remove the workstop plate
(H)
, see fig 43 (refer to step 4) & raise the linisher as before.
Remove the dust deflector (a) by removing the two phillips screws & place safely aside
(See figs 44 & 45). Put to hand the workstop plate
(H)
you removed earlier, offer up
bracket, see fig 43, to the threaded hole in the linisher & clamp in place using the M10 bolt,
spring washer & 14mm spanner (See fig 46).
Place a 90˚ degree square onto the workstop plate
(H)
& check it is perpendicular to the
belt. If it requires adjustment, loosen the M10 bolt & adjust until correct, re-tighten the bolt.
(See fig 46)
H
H
a
a
Removing
90˚ degree
square
Содержание AS408
Страница 4: ...03 W H I T E AXMINSTER W www axminster co uk What s in the Box B C D E...
Страница 25: ...W H I T E AXMINSTER W 24 Parts Breakdown...
Страница 26: ...25 W H I T E AXMINSTER W Parts List www axminster co uk...
Страница 27: ...W H I T E AXMINSTER W 26 Parts List FREEPHONE 0800 371822...


