


W H I T E
A X M I N S T E R
W
14
Assembly...
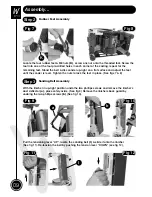
Locate the mitre fence
(B)
and slide it into the table’s ‘T’ slot
(E)
(See figs 35 & 36). Place a
90˚ degree square against the mitre fence
(B)
& check that the table is perpendicular to
disc.
Your belt & disc sander is now assembled, go round and check that all fixings are
secure before operating the machine.
Fig 35
Fig 36
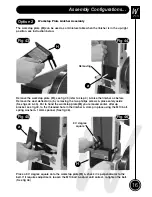
Offer up your extraction hose to the 35mm outlet & slot it into place
Fig 37
Fig 38
Dust Extraction Assembly
Step 6
The dust extraction moulding
(C)
has a 35mm outlet, insert a jubilee clip over the hose and
insert it over the outlet & clamp in place. Alternately if you have a vacuum cleaner with the
same diameter holes insert it over the outlet as before, it should be a snug fit (See figs 37 &
38).
CONNECT THE SANDER TO THE MAINS SUPPLY
!
DISCONNECT THE SANDER FROM THE MAINS SUPPLY
!
Remove all tools away for the machine,
switch on, wait until the machine has reached
full speed
& check that the belt is tracking properly. If not
switch off, wait for the
machine to come to a complete stop disconnect the sander
& go to page 10 for
“Tracking the Belt”.
Reconnect
, switch on & check again. If everything is fine,
switch off &
wait until the machine has come to a complete stop.
C
Vacuum hose
Содержание AS408
Страница 4: ...03 W H I T E AXMINSTER W www axminster co uk What s in the Box B C D E...
Страница 25: ...W H I T E AXMINSTER W 24 Parts Breakdown...
Страница 26: ...25 W H I T E AXMINSTER W Parts List www axminster co uk...
Страница 27: ...W H I T E AXMINSTER W 26 Parts List FREEPHONE 0800 371822...


