


W H I T E
A X M I N S T E R
W
Assembly...
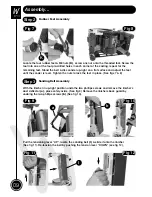
Sanding Disc & Table Assembly
Step 5
Fig 17
Fig 18
Fig 19
Fig 20
Using an abrasive pad, clean the disc drive shaft in readiness for fitting the 200mm cast iron
disc
(G)
(See fig 17). Remove the philips screw from the casting as shown in fig 18 & place
safely aside, locate the plastic disc guard moulding
(F)
& M5 x 50mm phillips screw
(L)
.
Slide the guard moulding
(F)
over the drive shaft & line the pre-drilled hole in the guard with
the hole in the casting (See fig 19).
Note: Make sure plastic cylinder to the back of the
guard slots into the machined hole in the casting
(See fig 17). insert the M5 x 50mm
phillips screw and lightly tighten (See fig 20).
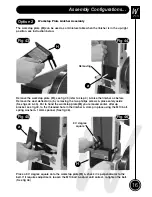
Fig 21
Fig 22
Machined hole
F
J
G
L
Phillips screw
Phillips screw
11
Find the phillips screw you removed earlier, see fig 18 & slot it through the pre-drilled hole
to the rear of the guard moulding
(F)
& screw it into the casting (See fig 21). Tighten the M5
x 50mm phillips screw
(L) DO NOT OVERTIGHTEN.
Locate the 200mm cast iron disc
(G)
& 200mm sanding disc
(J)
, peel the cover from the adhesive surface and apply CAREFULLY
to the flat surface of the cast iron disc
(G)
(See fig 22). Use a piece of cloth in your hand or
wear a glove, to firmly press the abrasive to the disc, it will be reinforced by a gentle
sanding action across the face when you first use the new sanding disc.
Содержание AS408
Страница 4: ...03 W H I T E AXMINSTER W www axminster co uk What s in the Box B C D E...
Страница 25: ...W H I T E AXMINSTER W 24 Parts Breakdown...
Страница 26: ...25 W H I T E AXMINSTER W Parts List www axminster co uk...
Страница 27: ...W H I T E AXMINSTER W 26 Parts List FREEPHONE 0800 371822...


