


13
W H I T E
A X M I N S T E R
W
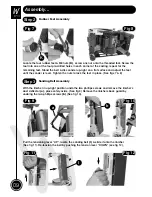
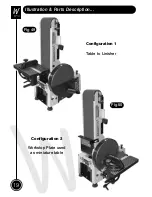
Assembly...
Fig 29
Fig 30
Locate the table support rod
(D)
loosen the bolt to the left side of the sanding disc, insert
the table support rod
(D)
& tighten the bolt using a 13mm spanner (See fig 29). Locate the
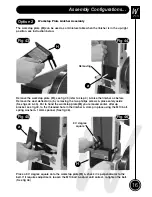
table
(E)
, Offer up the machined hole to the base of the table
(E)
to the support rod
(D)
slide it onto the support rod so the edge of the table is just clear of the sanding disc
(J)
,
place a level on the table, adjust until the table is level. Clamp the table using the lower lift
& shift handle (b) (See figs 30,31 & 32).
Make sure the bubble is
between the black lines.
Upper lift & shift handle (a)
Lower lift & shift handle (b)
Fig 31
Fig 32
D
E
E
J
J
13mm
Spanner
a
b
Place a 90˚ square on the table & check that the table is perpendicular to disc
Fig 33
Fig 34
Place a 90˚ square up against the sanding disc
(J)
& check that the table
(E)
is
perpendicular to the disc (See figs 33 & 34). If it requires adjustment loosen the upper lift &
shift handle (a), see fig 32 until correct & re-tighten.
NOTE: Check that the pointer is reading ZERO on the scale. If not undo the phillips
screw and adjust until correct, re-tighten the screw (See fig 32).
Pointer
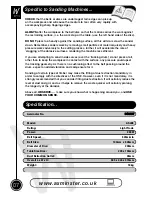
Содержание AS408
Страница 4: ...03 W H I T E AXMINSTER W www axminster co uk What s in the Box B C D E...
Страница 25: ...W H I T E AXMINSTER W 24 Parts Breakdown...
Страница 26: ...25 W H I T E AXMINSTER W Parts List www axminster co uk...
Страница 27: ...W H I T E AXMINSTER W 26 Parts List FREEPHONE 0800 371822...


