Axminster 107677 Скачать руководство пользователя страница 5

5

Specific to Sanding Machines

Specification

DO NOT sand very small pieces of work with bare hands; 
try to construct some form of holder.
Make sure you are comfortable before you start work, 
balanced, not reaching etc. If the work you are carrying 
out is liable to generate excessive grit or dust or chips 
wear the appropriate safety clothing, goggles, masks etc. 
If the work operation appears to be excessively noisy wear 
ear-defenders. If you wear your hair in a long style wearing 
a cap, safety helmet, hairnet, even a sweatband, will 
minimise the possibility of your hair being caught up in 
the rotating parts of the machine Likewise, consideration 
should be given to the removal of rings and wristwatches 
if these are liable to be a ‘snag’ hazard.
DO NOT work with cutting/abrasive tools of any 
description if you are tired, your attention is wandering 
or you are being subjected to distraction.
DO NOT use the machine within the designated safety 
areas of flammable liquid stores or in areas where there 
may be volatile gases.
Check that sanding surfaces are still sufficiently abrasive 
to carry out the work you intend. Sanding belt cleaning 
sticks are an efficient method of prolonging the life of 
the belts and discs and will also maintain their operating 
performance.
Check that the belts or discs are undamaged; torn edges 
can pick up on the workpiece and will cause the medium 
to tear, often very rapidly with accompanying sharp 
flapping edges.

Always offer the workpiece to the belt/disc so that the 
motion carries the work against the restraining surface i.e. 
the work stop or the table (use the left hand side of the 
disc).
DO NOT press too heavily against the sanding surface, all 
this will do is slow the sander down. Remember, sanders 
work by removing small particles of material quickly and 
heavy pressure works adversely to the cutting process. 
Further, it will accelerate the rate of ‘clogging’ of the 
abrasive surfaces, rendering the machine less efficient.
If you are attempting to sand inside curves (over the 
‘tracking drum’) do not press at all, other than to keep the 
workpiece in contact with the surface, any pressure could 
upset the tracking geometry. As there is no cushioning 
effect to the belt passing around the drum, expect an 
added vibration and compensate for it.
Sanding of certain types of timber may make the fitting 
of dust extraction mandatory in order to comply with the 
directives of the HSE. However, even if it is not mandatory, 
it is strongly recommended that you consider fitting dust 
extraction. It will certainly reduce the level of dust and grit, 
and as it helps to remove the waste quicker will certainly 
prolong the longevity of the abrasive.
Above all, OBSERVE…. make sure you know what is 
happening around you, and USE YOUR COMMON
SENSE.

Code 107677
Rating Workshop
Power


190 W

Voltage 


230 V

Belt Speed


860 m/min

Belt Size


25 mm x 760 mm

Disc Diameter


125 mm

Table Size Belt


125 mm x 125 mm

Table Size Disc


88 mm x 184 mm

Dust Extraction Outlet


2 x 45 mm

Overall L x W x H


370 mm x 300 mm x 380 mm

Weight


7 kg

Содержание 107677

Страница 1: ...AW125BDS Mini Belt Disc Sander Code 107677 Original Instructions AT 09 02 2022 BOOK VERSION 02...

Страница 2: ...should be worn The symbols below advise the correct safety procedures when using this machine 6 Cert No MM411 Axminster Tool Centre Ltd Axminster Devon EX13 5PH UK axminstertools com Type Mini Belt D...

Страница 3: ...M 1 Instruction Manual 1 Guarantee Card A B D C G H E F L M I J Having opened the box remove the top packaging and lift the machine out and place upon a clear flat surface taking care not to trap or p...

Страница 4: ...d size are undamaged and are kept clean and sharp this will maintain their operating performance and lessen the loading on the machine OBSERVE make sure you know what is happening around you and USE Y...

Страница 5: ...panying sharp flapping edges Always offer the workpiece to the belt disc so that the motion carries the work against the restraining surface i e the work stop or the table use the left hand side of th...

Страница 6: ...ing using the M8 washer I and M8 x 20mm lift and shift handle G Clamp the table in position See figs 2 3 and 4 NOTE You my find it easier if you remove the lift and shift handle G and screw the clampi...

Страница 7: ...le C M6 x 15mm lift and shift handles H and M6 washers J Line up the table C pins with the machined L shaped slots on either side of the sanding disc push the table in until fully home See figs 7 8 Re...

Страница 8: ...uare on the sanding disc table C and check that the table is perpendicular to the sanding disc If it requires adjustment loosen the two lift and shift handles H adjust until correct and re tighten the...

Страница 9: ...D until it is perpendicular to the belt 90 Square perpendicular to sanding belt Using a Hex key fine adjust the table if the square still does not line up correctly The clamping nut beneath the table...

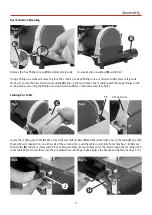
Страница 10: ...LY NEEDSTO BEVERY SLIGHT Adjusting the Platen The Platen f should be adjusted so that it almost touches the back of the abrasive belt If it requires adjustment loosen the two caphead screws g that sec...

Страница 11: ...he Belt Reconnect switch on and check again If everything is fine switch off and wait until the machine has come to a complete stop DISCONNECTTHE SANDER FROM THE MAINS SUPPLY Dust Extraction The dust...

Страница 12: ...ve disc Belt guard Pointer Pointer rest screw Pointer rest screw Pointer A D C B E F H G A AW125BDS Belt and Disc Sander E Mitre Fence B Dust Extraction Moulding F Rubber Feet C Sanding Disc Cast Iron...

Страница 13: ...3 Illustration and Parts Description Platen Clamping Knob Belt Access Cover Disc Guard Dust extraction outlet Dust extraction outlet Chassis On Off On Off Control Box Grub screw for levelling the tabl...

Страница 14: ...ver reconnect to the mains and check again DISCONNECTTHE SANDER FROM THE MAINS SUPPLY Remove the lift and shift handle H sanding disc table C dust extraction moulding B and place safely aside Lift the...

Страница 15: ...LEM POSSIBLE CAUSE REMEDY Motor will not run 1 Defective or broken ON OFF switch 2 Defective or damaged switch cord 3 Defective or damaged switch relay 4 Burned out motor 5 Blown fuse 1 3 Replace all...

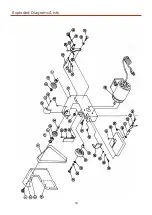
Страница 16: ...16 Exploded Diagrams Lists...

Страница 17: ...17 Exploded Diagrams Lists...

Страница 18: ...tic Washer 1 33 Washer 1 34 Belt Wheel 1 35 Insert 1 36 Bolt 1 37 Screw 1 38 Table 1 39 Nut 1 40 Washer 1 41 Bolt 1 Part Description Qty 42 Handle 1 43 Spring 1 44 Screw 1 45 Screw 3 46 Motor 1 47 Scr...

Страница 19: ...19 Wiring Diagram...

Страница 20: ...ars For more information visit axminstertools com 3years Axminster Tools Axminster Devon EX13 5PH axminstertools com The packaging is suitable for recycling Please dispose of it in a responsible manne...

Отзывы: