


Index of Contents
2
EU Declaration of Conformity
03
What’s Included
03
General Instructions for 230V Machines
04
Specific to Sanding Machines
04-05
Specification
05
Assembly
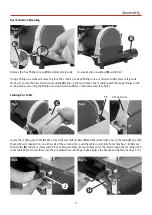
06-07-08
Setting Up
08-09-10-11
Sanding Configurations
11
Illustration and Parts Description
12-13
Changing the Abrasive Belt/Disc
14
Maintenance
15
Trouble Shooting
15
Exploded Diagrams/Lists
16-17-18
Wiring Diagram
19
EU Declaration of Conformity
Fully read manual
and safety instructions
before use
Eye protection
should be worn
Ear protection
should be worn
HAZARD
Motor gets hot
Dust mask
should be worn
The symbols below advise the correct safety procedures when using this machine.
6
Cert No: MM411
Axminster Tool Centre Ltd
Axminster Devon
EX13 5PH UK
axminstertools.com
Type
Mini Belt & Disc Sander
Model
AW125BDS
and conforms to the machinery example for which the
EC Type-Examination Certificate No AM 50340636
has been issued by Jiangsu Jinfeida Power Tools Co., Ltd.
at: Xiejia Town, Gaoyou, 225644 Jiangsu, China (Mainland)
and complies with the relevant essential health and safety requirements.
2006/42/EC
2006/95/EC
06/42/EC - Annex I/05.2006
EN 61029-1:2009+A11
declares that the machinery described:-
This machine complies with the following directives:
EU Declaration of Conformity
EN ISO 12100:2010
Signed
Andrew Parkhouse
Operations Director
Date: 01/06/2016
Содержание 107677
Страница 1: ...AW125BDS Mini Belt Disc Sander Code 107677 Original Instructions AT 09 02 2022 BOOK VERSION 02...
Страница 16: ...16 Exploded Diagrams Lists...
Страница 17: ...17 Exploded Diagrams Lists...
Страница 19: ...19 Wiring Diagram...


