AXIS T99A11 Positioning Unit 24 V AC/DC
6
Sunshield
7
Sunshield screws (2x, T20)
15 Positioning unit back cover screws (2x, T20)
16 Positioning unit back cover
17 Back lid
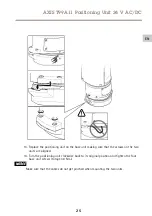
6. Fasten the positioning unit back cover on the camera with the screws (torque 1.0 Nm).
7. Fasten the sunshield using the screws (torque 1.0 Nm).
8. Remove the SD card lid and insert the microSD card (optional) into the SD card slot in
the camera. Fasten the SD card lid.
9. Fasten the back lid with the screw (T20, torque 1.0 Nm).
Install the PTZ driver
This product supports several devices. For a complete list of supported devices, see
1. Go to the camera’s webpage.
2. In the installation wizard, go to
Select a PTZ mode
and select
PTZ driver
from the
drop-down list.
3. Once you’ve accessed the live view, go to
Settings > System > Accessories
.
4. Select one of the following actions:
4.1 If the PTZ driver is not uploaded, select
Upload driver
.
4.2 If the PTZ driver is uploaded, go to
Select driver to use
and select PTZ driver
from the drop-down list.
31
EN
Содержание T99A11
Страница 1: ...AXIS T99A11 Positioning Unit 24 V AC DC Installation Guide ...
Страница 2: ......
Страница 14: ...14 ...
Страница 42: ...42 ...
Страница 68: ...68 ...
Страница 72: ...72 ...
Страница 98: ...98 ...
Страница 102: ...102 ...
Страница 128: ...128 ...
Страница 132: ...132 ...
Страница 159: ...AXIS T99A11 Positioning Unit 24 V AC DC 輸 輸 輸送 送 送 注記 本製品を運搬する際は 製品が損傷しないよう 元の梱包か同等の梱包を 使 してください 159 JA ...
Страница 160: ...160 ...
Страница 188: ...AXIS T99A11 Positioning Unit 24 V AC DC 产 产 产品 品 品概 概 概述 述 述 1 后盖 2 定位单元后盖 3 适配器 4 定位单元 5 盖 6 底座单元 7 底座单元螺丝 188 ...
Страница 201: ...AXIS T99A11 Positioning Unit 24 V AC DC 3 摄像机 4 适配器 5 适配器螺丝 2 颗 T20 2 将摄像机向后滑入适配器 使用适配器螺丝 扭矩 1 0 Nm 从背面将其 固定好 201 ZH ...
Страница 211: ...211 ...


