


AXIS T99A11 Positioning Unit 24 V AC/DC
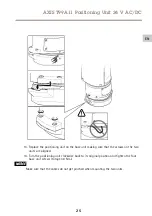
1
I/O connector
2
Power connector
3
O-ring
NO
NO
NOTICE
TICE
TICE
Make sure the protective earth wire is about 10 mm (3/8 in) longer than the other two
wires (in the power cable), so that it will not be disconnected accidentally if pulled.
Note
We recommend that you strip approximately 90 mm (3
½
in) of the power cable jacket and
70 mm (2
¾
in) of the I/O cable jacket for ease of installation.
11. Install the power and I/O connectors, see
12. Adjust the network, I/O and power cables so that the distance from the cable gasket to
the end of the connector is 240 mm (10 in), 170 mm (7 in), and 160 mm (7 in) respectively.
NO
NO
NOTICE
TICE
TICE
Make sure that the O-ring is fitted correctly around the transparent base unit cover.
24
Содержание T99A11
Страница 1: ...AXIS T99A11 Positioning Unit 24 V AC DC Installation Guide ...
Страница 2: ......
Страница 14: ...14 ...
Страница 42: ...42 ...
Страница 68: ...68 ...
Страница 72: ...72 ...
Страница 98: ...98 ...
Страница 102: ...102 ...
Страница 128: ...128 ...
Страница 132: ...132 ...
Страница 159: ...AXIS T99A11 Positioning Unit 24 V AC DC 輸 輸 輸送 送 送 注記 本製品を運搬する際は 製品が損傷しないよう 元の梱包か同等の梱包を 使 してください 159 JA ...
Страница 160: ...160 ...
Страница 188: ...AXIS T99A11 Positioning Unit 24 V AC DC 产 产 产品 品 品概 概 概述 述 述 1 后盖 2 定位单元后盖 3 适配器 4 定位单元 5 盖 6 底座单元 7 底座单元螺丝 188 ...
Страница 201: ...AXIS T99A11 Positioning Unit 24 V AC DC 3 摄像机 4 适配器 5 适配器螺丝 2 颗 T20 2 将摄像机向后滑入适配器 使用适配器螺丝 扭矩 1 0 Nm 从背面将其 固定好 201 ZH ...
Страница 211: ...211 ...


