


6-3 Setting Up Your Remote Control
Service Manual
Model No.:
- 25 -
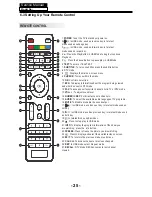
REMOTE CONTROL
1
2
3
4
5
6
7
8
9
10
11
13
12
14
15
16
17
18
19
20
21
22
23
24
25
26
27
1:
POWER
:To set the TV to standby or power on.
2: :In USB mode, used as reverse key, in teletext
mode used as subpage key.
3: : In USB mode, used as forword key, in teletext
mode used as reveal key.
4: : Press the Play Button in USB Mode to begin or continue
Playback.
5: : Press the Pause Button to pause play in USB Mode.
6:
TEXT
:To enter or TELETEXT.
7:
SUBTITLE
: To turn on subtitles press the subtitle button
in DTV mode.
8 : : Displays the main on-screen menu.
9 :
CURSOR
: To move within the menu.
10:
OK
: Confirms selection.
11:
EPG
: To display information about the program being viewed
and what's on next in DTV mode.
12:
FAV
: To access your favourite channels list in TV or DTV mode.
13:
VOL+/-
: To adjust sound level.
14:
NUMERIC KEY
: For direct access to channels.
15:
AUDIO
: To select the available audio language of TV programs .
16:
MUTE
: To disable or enable the sound output.
17: : In USB mode, used as next key, in teletext mode used as
list key.
18: : In USB mode, used as previous key, in teletext mode used
as hold key.
19: :In teletext mode used as index.
20:
: Press to stop play in USB mode.
21:
INFO
: To display the program information of the show you
are watching, press the info button.
22:
FREEZE:
Press to freeze the picture you are watching.
23: : Press to display and select the available video sources.
24:
EXIT
: To return to the previous menu or exit menu.
25:
CH+/CH-
: To access the next or previous channels.
26:
REP
: In USB mode,select Repeat mode.
27:
RECALL
: DTV Mode:RECALL:Jumps to last channel
viewed.
VOL
CH
REP
FREEZE
Содержание MSDV1636-O3
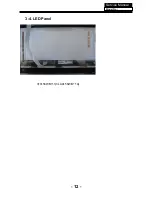
Страница 13: ...3 4 LED Panel 12 Service Manual Model No 316156WB111 CLAA156WB 11A ...
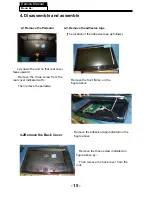
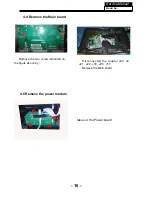
Страница 17: ... 0 4 5 Remove the power module Service Manual Model No 16 4 4 Remove the Main board take out the Power board ...
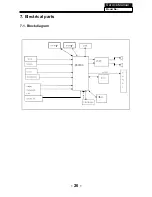
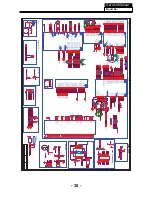
Страница 28: ...7 Electrical parts 7 1 Block diagram Service Manual Model No 26 06 ...
Страница 48: ...Service Manual Model No 46 9 Trouble shooting 9 1 Simple check ...
Страница 50: ...Service Manual Model No 48 3 Panel display abnormally connector j20 is at normal level ...
Страница 54: ...Service Manual Model No 52 7 PC no picture or picture abnormal ...
Страница 55: ...Service Manual Model No 8 YPBPR AV SCART no picture or picture abnormal Check Y 53 ...


