Avision AM6120 Скачать руководство пользователя страница 158


5-9

The Message During Sending E-Mails 
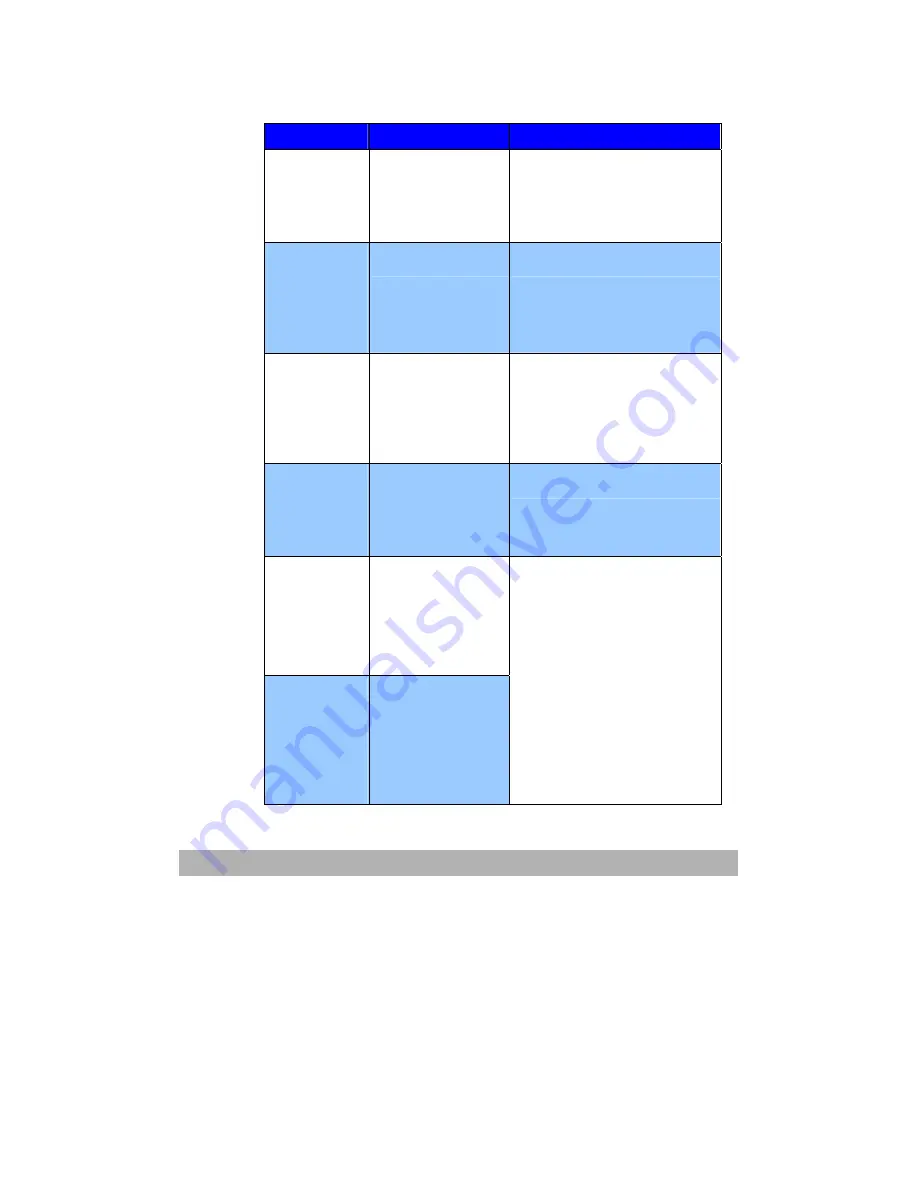
 

Mesage 

Meaning 

Solution 

Device 
internal 
failure 
Reboot the 
scanner 

Device internal 

failure 

Reboot your machine.    If 

this message occurs again, 

contact your dealer. 

Fail to 
connect 
Mail server 
Contact 
network 
administrator 

Fail to connect 

Mail server 

Contact your network 

administrator. 

Fail to get 
Mail server 
response 
Contact 
network 
administrator 

Fail to get Mail 

server response 

Contact your network 

administrator.  

Unpredicted 
error 
Contact 
network 
administrator 

Unpredicted error    Contact your network 

administrator. 

Service 
unavailable 
Contact 
network 
administrator 

SMTP [421] 

Service not 

available, closing 

transmission 

channel. The 

Server is going to 

shut down. 

No support 
SMTP 
Login 
extension 
Contact 
network 
administrator


Mail server doesn’t 

support SMTP 

service extension 

Check your network 

administrator.  

Содержание AM6120

Страница 1: ...AM6120 Color MFP...

Страница 2: ...their respective companies We disclaim any and all rights to those marks Warranty The information contained in this document s is subject to change without notice The manufacturer makes no warranty o...

Страница 3: ...A caution provides additional information which if ignored may result in equipment malfunction or damage Warning A warning provides additional information which if ignored may result in a risk of per...

Страница 4: ...in a humid or dusty place Be sure to use the proper AC power source Place the equipment securely on an even flat surface Tilted or uneven surfaces may cause mechanical or paper feeding problems Retai...

Страница 5: ...9 SCAN TO E MAIL 1 19 SCAN TO FTP 1 19 SCAN TO FTP 1 20 2 INSTALLING YOUR MACHINE 2 1 MINIMUM CONFIGURATION REQUIREMENTS 2 1 CHECKING PACKAGE CONTENTS 2 2 INSTALLING THE AM6120 PRINTER 2 3 MOVING YOUR...

Страница 6: ...ENT ITEMS 3 8 CREATING YOUR E MAIL ADDRESS BOOK 3 10 CREATING YOUR ADDRESS BOOK BY THE HOMEPAGE OF AM6120 3 10 CREATING YOUR ADDRESS BOOK BY NETWORK SETUP TOOL 3 13 CREATING YOUR FILING PROFILE DESTIN...

Страница 7: ...RINTING FROM MICROSOFT OFFICE APPLICATION 3 40 PRINTING SPECIFIC COLOURS E G A COMOPANY LOGO 3 41 ACCESSING THE COLOURS MATCHING OPTIONS 3 41 SETTING THE COLOURS MATCHING OPTIONS 3 42 USING THE COLOUR...

Страница 8: ...4 11 INCREASING COPY COUNT 4 12 TO USE AM6120 MFP AS A SCANNER 4 13 A GLANCE OF THE USER INTERFACE 4 15 5 TROUBLESHOOTING 5 1 INFORMATION CODE AND MESSAGE 5 1 THE MESSAGE DURING INITIALIZATION 5 1 THE...

Страница 9: ...ONER CARTRIDGE REPLACEMENT 5 33 IMAGE DRUM REPLACEMENT 5 40 REPLACING THE BELT UNIT 5 45 FUSER REPLACEMENT 5 48 INSTALLING ADDITIONAL MEMORY 5 51 MEMORY UPGRADE 5 51 TECHNICAL SUPPORT 5 55 APPENDIX a...

Страница 10: ...y traditional methods such as fax mail or courier Features Scan to E mail Connected to an Ethernet network and a SMTP server the AM6120 allows you to transmit document s over the internet via e mail W...

Страница 11: ...ure to modify your scanned image Multiple Pages Sending With the Auto Document Feeder AM6120 allows a stack of 50 page document s to be continuously scanned at one time in reliable quality to increase...

Страница 12: ...per 6 ADF paper tray and ADF paper support Lload multi page document up to 50 sheets of plain paper 7 Document cover 8 AM6120 control panel Display AM6120 status and operation button 9 Upper support 1...

Страница 13: ...er 5 Printer USB port To connect the AM6120 max length 2 meters 6 Printer power socket To connect printer power cable 7 ADF cable To connect the ADF unit 8 USB port To connect the computer 9 ADF port...

Страница 14: ...ay the paper path through the printer is essentially straight This avoids bending the paper around curves in the paper path and enalbes feeding of up to 203g m2 meida The Control Panel The Scaling Are...

Страница 15: ...ed to select copy quality Used to select density level Numeric Keypad Used to enter network parameter or copy count LCD display and Function Keys Used to display current operation and select a working...

Страница 16: ...the LCD The up down keys can be used to switch the indication of the function The left key can be used to return to the upper level of the setting The right key can be used to go to the lower level o...

Страница 17: ...Used to go to sleep mode immediately A continuous press is invalid Power LED indicates power on and ready status Alarm LED indicates error status Sleep LED indicates power saving status Used to send...

Страница 18: ...uires attention Detailed printer status is provided by the Status Monitor The Status Panel incorporates 4 LEDs and 2 push button switches as follows 1 Power Ready LED green 2 Paper LED amber 3 Consuma...

Страница 19: ...b cancellation 5 second press Press 5 Press the switch and hold it for 5 seconds or more The operation starts 5 seconds after pressing the switch even if you hold it pressed for more than 5 seconds Fu...

Страница 20: ...mory overflow or invalid data Recover from the error and shifts to ON LINE Paper Jam After the waste toner has become full cover open close Recognises the toner has been replaced Recognises the toner...

Страница 21: ...l When several different status situations occur concurrently only the status with the highest priority is displayed on the LEDs Warning status combined with the highest priority normal status is disp...

Страница 22: ...on screen whenever an abnormal condition occurs LED Illumination Status OFF Power OFF ON ONE LINE idle Blinking 1 2S cycle OFF LINE this blinking pattern always takes place while an error is occurring...

Страница 23: ...An error has occurred You need to replace consumables or remove jammed paper for example The printer then recovers from the error and printing becomes possible again Blinking 3 120 mS cycle A serious...

Страница 24: ...eway IP DNS Server SMTP Server SMTP Port POP3 Port POP3 Port Explanation of contents 1 DHCP Enable Obtain IP subnet gateway addresses automatically from DHCP server 2 IP Address The Internet Protocol...

Страница 25: ...ver assigned by your network administrator 8 POP3 Server The IP address of your POP3 server 9 POP3 Port The port number of your POP3 Server Please enter the DNS name or IP and port number of your POP3...

Страница 26: ...ne identifying the network and the one identifying your node The IP address is usually written as four numbers separated by periods Each number can be zero to 255 For example 10 1 30 186 could be an I...

Страница 27: ...DF JPEG TIFF or MTIF Multi page TIFF file format and then transmitted to remote recipients simultaneously as an e mail attachment When you send an e mail to someone via the AM6120 it uses Simple Mail...

Страница 28: ...document directly to a designated server or a personal computer on the network in a standard PDF JPEG TIFF or MTIFF file format CIFS is the sharing system of Microsoft Windows What s unique about thi...

Страница 29: ...this chapter before installing the machine Minimum Configuration Requirements To make the best of the AM6120 the following configuration is required To send e mails from the AM6120 y TCP IP network y...

Страница 30: ...er Support USB cable one for 60cm the other 180 cm CD Quick Guide Paper Stopper ADF Pad Y type cable adapter Adapter Power Cord Be sure to use the supplied power adapter model 077 242090 I3 made by YH...

Страница 31: ...2 3 INSTALLING THE AM6120 PRINTER 1 Remove the handler to lift the box 2 Remove the protective material...

Страница 32: ...Installing Your Machine 2 4 3 Open the protective plastic bag 4 Choose a proper location for the machine 800mm 500mm 200mm 200mm...

Страница 33: ...2 5 5 Place the installation base on the location 500mm 200mm 200mm 6 Lift the printer to place it in a selected place 26...

Страница 34: ...Installing Your Machine 2 6 7 Place the printer upon the installation base 26...

Страница 35: ...2 7 8 Turn the lock switch to Unlocked position...

Страница 36: ...Installing Your Machine 2 8 9 Remove the protective tape paper cushion 10 Open multi purpose tray...

Страница 37: ...2 9 11 Remove the tape and paper 12 Close the multi purpose tray...

Страница 38: ...Installing Your Machine 2 10 13 Open the protective plastic bag...

Страница 39: ...2 11 14 Place the AM6120 scanner to the support of the printer and move it backward...

Страница 40: ...Installing Your Machine 2 12 15 Move the lock switch to Locked position...

Страница 41: ...2 13 16 Turn the lock switch on the scanner to the Unlcoked position...

Страница 42: ...Installing Your Machine 2 14 17 Press the release button to open the cover...

Страница 43: ...2 15 18 Pull the release lever to raise the image drum 5...

Страница 44: ...Installing Your Machine 2 16 19 Open the image drum 20 Remove paper and protective film...

Страница 45: ...2 17 21 Close the drum and move 4 levers to the p position 5 22 Close the printer top cover...

Страница 46: ...Installing Your Machine 2 18 23 Pull out the output tray 24 Adjust the paper size in the paper tray...

Страница 47: ...2 19 25 Insert the printing paper 26 Make sure the paper size properly fit in the tray...

Страница 48: ...Installing Your Machine 2 20 27 Gently pull back the paper tray...

Страница 49: ...s switched off before removing any accessories 2 Please refer to the manual to install the accessories 3 Use protective material to pack the printer and then pack into box If you have no protective ma...

Страница 50: ...Installing Your Machine 2 22 26...

Страница 51: ...2 23 Installing the AM6120 Installing the Paper Feed Tray and Paper Support 1 Attach the Paper Support to the Paper Feed Tray 2 Attach the Paper Feed Tray to the machine Paper Support Paper Feed Tray...

Страница 52: ...he document cover as shown below If you are copying or sending a batch of document in A4 or Letter size please pull the lever up to stop paper from falling apart If your paper is larger than A4 or Let...

Страница 53: ...e it on the installation base on a selected location 2 Move the lock switches at the right and left sides of the printer to the unlocked position 3 Lift the AM6120 with both hands and gently place it...

Страница 54: ...Installing Your Machine 2 26 3 Move the AM6120 MFP backward as illustrated 4 Move the lock switch at both sides to the locked position as illystrated...

Страница 55: ...below and then move the lock switch to the locked position If the scan unit is not at the home position please turn on the scanner to let the scan unit return to the home position Note Before moving t...

Страница 56: ...ct the ADF Auto Document Feeder cable attached to the document s cover to the ADF port at the back of the AM6120 Connecting the Network Cable 1 Connect one end of your Ethernet LAN cable to an availab...

Страница 57: ...to USB port of the the printer 2 Connect the retangle end to the Copy port of the AM6120 scanner 3 Turn on your printer Caution To make copies through your printer please FIRST turn on your printer a...

Страница 58: ...off the power switch of the AM6120 scanner 2 Insert the adapter fixer to the socket as illustrated 3 Insert the power adapter to the fixer Insert the small end of the power cord to the power jack of t...

Страница 59: ...the printer cable to an available power outlet 6 Turn on the power switch of the AM6120 scanner After warming up the LCD display will show a ready mode Caution The AM6120 scanner is designed with a p...

Страница 60: ...ter and scanner with an USB cable 60cm 6 Y type Power Cable Used to connect the power adapter and the power cable of the printer 7 Printer Power Jack Used to connect the power of the AM6120 printer 8...

Страница 61: ...rinter Driver 1 Insert the supplied CD into the CD Rom drive 2 The following installation graphic appears Choose Install Network Printer If the installation graphic does not appear please double click...

Страница 62: ...Installing Your Machine 2 34 4 Choose Directly to the network using TCP IP and click Next 5 Type IP address of your printer and then click Next...

Страница 63: ...2 35 6 Choose AM6120P and then click Next 7 Choose AM6120P as your printer name and then click Next...

Страница 64: ...Installing Your Machine 2 36 8 Choose if your printer need to be shared and then click Next 9 The system then is copying the files 10 Click Finish to complete the installation...

Страница 65: ...driver TWAIN driver FIRST before connecting the USB cable to your computer Otherwise the scanner driver may not work properly 1 In the Installation grahic choose Install TWAIN Driver 2 Choose your la...

Страница 66: ...20 scanner Connect one end of the USB cable 180cm to the USB port of your computer Then connect the other end to the USB port marked Scan at the back of the AM6120 scanner 4 A Found New Hardware Wizar...

Страница 67: ...2 39 5 The system is installin the software Click Next to continue 6 Click Finish to complete the installtion...

Страница 68: ...Machine 2 40 7 After Found New Hardware Wizard has completed the installation of the scanner driver the Found New Hardware Wizard for the local printer driver will prompt 8 Select language and proper...

Страница 69: ...2 41 9 The system is now installing the software 10 Click Finish to complete the installation of a local printer driver...

Страница 70: ...and 20 e mail group each group contains up to 50 e mail addresses In addition you can setup 20 profiles filing destination and manage several AM6120 in the network The installation steps 1 Choose ins...

Страница 71: ...2 43 3 Read the license and then choose Yes to continue 4 Choose your destination and then click Next...

Страница 72: ...Installing Your Machine 2 44 5 Choose your program folder and then click Next 6 The system is then installing the driver...

Страница 73: ...45 7 Click Finish to complete the installation of the Network Setup Tool Note For further information on how to use the Network Setpup Tool please refer to the online help of the software application...

Страница 74: ...e system administrator before the AM6120 can be used to distribute the scanned document on the network Network and E mail parameters Defines the parameters for TCP IP SMTP and POP3 protocols to send y...

Страница 75: ...ey to select your desired item Configuring the Machine from the Homepage 1 Turn on your computer 2 Start yoru browser Netscape 6 0 or higher Microsoft I E 5 0 or higher or Mozilla 3 Type the IP addres...

Страница 76: ...Settings are blocked by password It is recommended that the system administrator creates a new password since the machine is shipped without specific password 2 To execute the homepage of the AM6120 y...

Страница 77: ...prompts the following Menu item Contents of each menu Information Items Description or Choice Model Display the model name Serial number Display serial number F W version Display firmware version Prin...

Страница 78: ...tom COM9 COM10 Monarch DL C5 Envelope1 Tray 1 Media Weight Light Medium Heavy Tray 1 Media Type Plain Letterhead Bond Recycled Rough MP Media Weight Medium Heavy Ultra Heavy MP Media Type Plain Letter...

Страница 79: ...able DHCP Device Name The device name of this machine Mail Server Item Description SMTP Server The IP address of your SMTP server SMTP Port The port number of your SMPT server Default 25 POP3 Server T...

Страница 80: ...message from the AM6120 Def From Default From for the From field in e mail message from the AM6120 Up to 64 characters are allowed Scan Size Limit The limitation for the attachment to be sent from th...

Страница 81: ...e AM6120 1 Press the Menu button on the control panel This prompts the following items 2 Choose Management the login screen appears Enter your password to prompt the following items Item Description P...

Страница 82: ...s for your pin ID PIN ID under four characters will be denied Pow Save Mode Choose to use the power saving mode Choice On Off Time to Power Save Select to enter power saving mode after the machine has...

Страница 83: ...Setup Tool please refer to the online help of the Network Setup Tool software application Creating Your Address Book By the homepage of AM6120 1 Start your browser such as Netscape Communicator 6 0 o...

Страница 84: ...prompt the login dialog For security please enter your password Up to 8 digits or characters are allowed and the password is case sensitive 4 The Address Book Manager dialog box appears Click New to...

Страница 85: ...w Group Set to create a group which contains up to 50 e mail addresses Refer to the following Add a New Group Set dialog box to enter group name To insert members please choose the e mail address list...

Страница 86: ...ow If you have not installed the software yet please install from the supplied CD ROM 2 Choose New Device from the File menu or click from the Tool bar or click from the icon in the empty area of the...

Страница 87: ...r from the following ways a Choose Address Book from the Tools menu b Click from the tool bar c Right click and choose Address Book Manager 5 Click or Add a new email from the Address Book menu to add...

Страница 88: ...mail simultaneously to multiple receipients up to 50 individual email addresses can be set up in one group You can choose Add a new group from the Address Book or click from the tool bar to prompt the...

Страница 89: ...can use only the home page of this machine or the Network Setup Tool to create your filing profiles It is not allowed to use the control panel to create your filing profiles About how to use the Netwo...

Страница 90: ...haracters Note that the password is case sensitive 4 The following Profiel manager dialog box appears Click New to add a new profile 5 The following New Profile dialog appears Enter your filing protoc...

Страница 91: ...is different from the default please enter your port number in this field Default settings FTP 25 HTTP 80 CIFS 139 AVPP 80 User name The login name of your filing protocol Password The password for y...

Страница 92: ...anning resolution for the scanned document from a selection of 75 100 150 200 300 400 600 dpi A higher resolution reproduces your image with greater details yet it requires more disk space Density Cho...

Страница 93: ...from your programs The following main window appears If you have not installed the software yet please install from the supplied CD ROM 2 Choose Add a new device from the File menu Or click from the...

Страница 94: ...ss of your AM6120 and click OK The new device will appear in the window as below 4 You may access the following Profile Manager in one of these a Menu Tools Profile Manager b Tool bar c Right click yo...

Страница 95: ...choose Add a new profile from the Profile menu or click from the tool bar 6 Enter your filing destination file name and other scan settings and click OK to complete You may refer to the preceeding se...

Страница 96: ...u are not using the HTTP port to save the files you must change the HTTP Port AM6120 to the port for the Web Server Generally speaking Web Server such as IIS or the other HTTP server will use anonymou...

Страница 97: ...hen writing the file after scanning to the specified directory you have to set the directory for files saving as browse and allow for writing in Web Server otherwise the AM6120 will not be able to wri...

Страница 98: ...ox select Directory security tab and click Edit for Anonymous Access and Authentication Control Please make sure Anonymous Access is selected in Authentication Methods dialog box 3 Click on Edit to op...

Страница 99: ...he file system The setting for IIS privilege is as below Like the setting in anonymous access start Internet service manager and select Default Web site and right click C Inetpub wwwroot X cabinet and...

Страница 100: ...ct Security tab in the File dialog box and select Everyone Select the privileges for Read and Execute Folder Properties List Read and Write After that every user has the privilege to manage all files...

Страница 101: ...Apache CIFS CIFS Windows Network Share is a file saving protocol generally used for recourse sharing of network in Microsoft Windows systems Please set up the shared directory per the network settings...

Страница 102: ...3 29 Below is the Win98 CIFS server sharing set up screen for your reference Click Sharing A Select Full Enter your password...

Страница 103: ...show Windows XP Other Windows versions may appear slightly different but the principles are the same Printer Driver Settings You can make printer driver settings either from Windows Printers window c...

Страница 104: ...xt to the printer name is a Properties button When you click Properties a new window opens which contains a short list of the printer settings available in the driver which you can choose for this doc...

Страница 105: ...ulti purpose feeder You can also click on the appropriate part of the screen graphic to select your preferred tray 3 The setting for paper weight should match the type of paper on which you intend to...

Страница 106: ...l 2 You can print watermark text behind the main page image This is useful for marking documents as draft confidential etc 3 You can select up to 999 copies to print consecutively although you will ne...

Страница 107: ...r your document For example a photograph taken on a digital camera might require different colour matching from a business graphic created in a spreadsheet application Again for most general purpose u...

Страница 108: ...you print from Windows applications and will be remembered from one Windows session to the next General Tab 1 This area lists some of the main features of your printer 2 This button opens the same wi...

Страница 109: ...ogram needs a lot of time for further computation in the middle of printing causing the print job to pause for more than a short period the printer could prematurely assume that the document has finis...

Страница 110: ...based only on their priority settings 9 Specifies that the spooler should not delete documents after they are completed This allows documents to be re submitted to the printer from the spooler instead...

Страница 111: ...he colour settings in your printer driver please be aware that colour reproduction is a complex topic and there are many factors to take into consideration Some of the most important factors are liste...

Страница 112: ...nlit window compared to how they look under standard office fluorescent lighting Printer driver colour settings The driver settings for Manual colour can change the appearance of a print There are sev...

Страница 113: ...example a printout on recycled paper can look duller than one on specially formulated glossy paper Tips for Printing in Colour The following guidelines may help you to achieve good colour output from...

Страница 114: ...colours are too intense not intense enough use the Saturation control Accessing the Colours Matching Options The Colour Matching options in the printer driver can be used to help match your printed c...

Страница 115: ...operties button next to the printer name Setting the Colours Matching Options 1 On the Colour tab select Advanced Colour 1 below for Colour Matching 2 Choose the Manual colour setting 2 and select fro...

Страница 116: ...sRGB colour space This may be useful if colour matching from an sRGB input device such as a scanner or digital camera Using the Colour Swatch Feature To use the Colour Swatch feature you must install...

Страница 117: ...value for the particular shade that you liked 3 Using your program s colour picker enter these same RGB values and change the logo to that colour The RGB colour displayed on your monitor may not neces...

Страница 118: ...rrect utility has the following features y Microsoft Office palette colours can be individually adjusted This is useful if you want to change how a specific colour is printed y Colours can be adjusted...

Страница 119: ...tility 1 From your application program click File and point to Print 2 Click Properties This displays the printer driver options 3 Click the Colour tab 4 Click Advanced Colour 5 Click User Defined Sel...

Страница 120: ...or on the control panel 3 If you are pressing enter your e mail address by the numeric keypad or select one address from the address book by pressing in the To field or choose your desired profile by...

Страница 121: ...make sure that your paper meets the following specifications y Document s can range in size from 4 5 by 5 5 inches to 8 5 by 14 inches y Document s can range in weight from 16 to 28 lbs 0 002 to 0 006...

Страница 122: ...t 2 If you have multiple pages fan your document s to avoid occasional paper jam The ADF holds up to 50 pages at one time 3 Place your document s with the text FACE UP in the ADF and make sure that th...

Страница 123: ...acing Document s on the Glass 1 Open the document s cover to reveal the glass 2 Place your document s with the text FACE DOWN on the glass and align the document s in the upper left corner 3 Close the...

Страница 124: ...next item 3 Enter your e mail address in the To field from the Address Book by pressing on the control panel Use S T to select multiple e mail addresses and press Or you may simply type the initial le...

Страница 125: ...Operation 4 6 5 Type your message in the Memo field 6 Press to send your document s in black and white Or press key to send your document s in colors...

Страница 126: ...the From address in your e mail when you receive an e mail from the AM6120 Up to 60 characters can be entered in the field Reply To Address Enter Reply To Address address if you wish to specify a repl...

Страница 127: ...3 This machine allows you to send scanned document to multiple e mail addresses Simply add a comma between each address 4 Up to 60 characters can be entered in the Attachment To From CC BCC and the De...

Страница 128: ...and other scanning parameters Please add a new filing profile by either entering the machine s web page or installing and starting the Network Setup Tool in the supplied CD ROM Basic Operation 1 Plac...

Страница 129: ...ion 4 10 4 Press to send your document s in black and white Or press to send your document s in colors Note You can create up to 20 filing profiles from the machine s web site or from the Network Setu...

Страница 130: ...for the document to be scanned in colors from PDF TIFF JPEG and MTIFF B W output format Choose the file format for the document to be scanned in B W from PDF TIFF and MTIFF Resolution Choose the scan...

Страница 131: ...y on the keyboard to log out of the system in order to avoid people to misuse the user s ftp account for filing If there is no any other operation within 3 minutes the system will log out automaticall...

Страница 132: ...must not offset when exposed to the high fuser temperatures used in the printing process Envelopes should be free from twist curl or other deformations They should also be of the rectangular flap typ...

Страница 133: ...184 2 x 266 7 mm A4 210 x 297 mm Medium 75 90g m2 Letter 215 9 x 279 4 mm Legal 13 in 216 x 330 mm Heavy 121 176g m2 Legal 13 5 in 216 x 343 mm Legal 14 in 216 x 356mm If you have identical paper stoc...

Страница 134: ...loaded at one time subject to a maximum stacking depth of 10mm y Paper or transparencies should be loaded print side up and top edge into the printer Face Down Stacker The face down stacker on the to...

Страница 135: ...ray 1 Remove the paper tray from the printer 2 Fan the paper to be loaded at the edges 1 and in the middle 2 to ensure that all sheets are properly separated then tap the edges of the stack on a flat...

Страница 136: ...uides and rear stopper y Do not overfill the paper tray Capacity depends on the type of paper stock y Do not load damaged paper y Do not load paper of different sizes or types at the same time y Do no...

Страница 137: ...r support 4 is extended Paper is stacked in reverse order and tray capacity is approximately 100 sheets depending on paper weight 7 Always use the face up rear stacker for heavy paper card stock etc C...

Страница 138: ...re printed side up and top edge into the printer Envelopes should be loaded face up with top edge to the left and short edge into the printer Do not exceed the paper capacity of about 50 sheets or 10...

Страница 139: ...been turned on FIRST Then turn on the power of the AM6120 scanner Or an error message will occurs 1 Place your document s with text FACE UP in the ADF or FACE DOWN on the glass 2 Press to copy your do...

Страница 140: ...Additional Settings Below is the menu on the Additional Settings when all printer options are installed Note that when there is a change in the option condition the settings will be returned to the f...

Страница 141: ...1 4 in 1 Selection of Edge Erase 0 6 13 19 25 mm Selection of Margin Shift Right 0 6 13 19 25 mm Bottom 0 6 13 19 25 mm Selection of Input Tray Tray 1 MP Selection of Paper Supply Legal Letter A4 B5...

Страница 142: ...arge the original document 1 Press on the panel to prompt the Copy screen 2 Press S d to enlarge or reduce your document in 1 percent increment Or you may press the above Select key to choose a preset...

Страница 143: ...d you can change to Fine to improve your copy quality To change your copy quality 1 Press on the control panel to prompt the Copy screen 2 Click the Copy Quality button to choose your focus to Fine No...

Страница 144: ...trast you can improve the quality using the Adjusting Density feature To change your density 1 Press the Copy key on the panel to prompt the Copy screen 2 Press the Density button to choose your desir...

Страница 145: ...ith the numeric keypad To increase your copy count 1 Press the Copy key on the control panel to prompt the Copy screen 2 Enter your desired copy count with the numeric keypad The LCD display shows the...

Страница 146: ...e to perform scanning task from the image editing software application 1 Start your image editing software such as Roxio PhotoSuite 4 2 Choose Get Scanner TWAIN 3 Choose AM6120 from the scanner menu Y...

Страница 147: ...Operation 4 14 6 Click Exit to return to the main window of Roxio PhotoSuite Choose Open Library and Photo to open the scanned image 1 Preview 2 Zoom View 3 Scan 4 Exit 5 Open Library 5 4 3 1 2...

Страница 148: ...Color 3 Resolution Choice 50 72 100 144 150 200 300 600 1200 dpi 4 Brightness Adjust the brightness level from 100 to 100 5 Contrast Adjust the contrast level from 100 to 100 6 Further Tools Descreen...

Страница 149: ...Auto Area Resize your scanned area 10 Paper Size Select your paper size from Card 4 x2 5 Photo 5 x3 5 Photo 3 5 x5 Photo 4 x6 Photo 6 x4 A5 B5 A4 Letter Legal A3 or scanner maximum 11 Measuring Unit...

Страница 150: ...ck the lock switch of the AM6120 scanner If the scanner is locked turn the lock switch to the Unlocked position and reboot the machine If this message occurs again contact your dealer Failed to Detect...

Страница 151: ...transfer belt is not correctly installed 40992 Check the Printer The fuser is not correctly installed Printer is off line Check the Printer Press the Online key on the printer panel Printer Top Cover...

Страница 152: ...The selection of No will bring the printer to waste toner full warning status PaperJam Message ADF Paper Jam Check Scanner Clear the paper jam in the ADF Paper Jam MP Tray Open Front Cover Clear the p...

Страница 153: ...the error occurs again K Drum Near Life Order K Drum Y Drum Near Life Order Y Drum M Drum Near Life Order M Drum C Drum Near Life Order C Drum Fuser Unit Near Life Order Fuser Drum near life Belt Unit...

Страница 154: ...Drum If a drum life error occurs and a user opens closes the cover or reboots the printer this phenomenon happens When the printer printed 500 pages the error occurs again Fuser Unit Life Replace Fuse...

Страница 155: ...because of no permission for printing Related to JobAccount Cleared by pressing ON LINE switch 30114 Check the Printer Invalid data was received Press the On line switch and eliminate the warning Disp...

Страница 156: ...the server Connection reset by server Check network settings The connection reset by the server Connection time out Check network settings Connection timed out Connection failure Check network settin...

Страница 157: ...nput the IP of DNS server into DNS server item of network configuration in Admin Fail to get filing server s IP Please make sure the filing server s domain name in Target URL is correct and DNS server...

Страница 158: ...Fail to get Mail server response Contact network administrator Fail to get Mail server response Contact your network administrator Unpredicted error Contact network administrator Unpredicted error Con...

Страница 159: ...ed local error in processing Check your network administrator Insufficient system storage Contact network administrator SMTP 452 Requested action not taken insufficient system storage Check your netwo...

Страница 160: ...ntact network administrator SMTP 530 Authentication requires Mail server requires authentication in order to perform the requested action 1 Check network administrator for authentication 2 Choose SMTP...

Страница 161: ...failed Contact network administrator SMTP 554 Transaction fails Check network administrator Connection error Check network environment Connection broken during data transmission 1 Check if attachment...

Страница 162: ...ct your network administrator FTP Login error Check Login name FTP login name error Check login name and try again FTP Password error Check Password in folder FTP password incorrect Check password and...

Страница 163: ...ry Make sure privilege FTP can t create directory Check your previledge CIFS Login fail Check ID Password CIFS User level login fail Check the folder of profile fit UNC for example COMPUTER SHARE DIRE...

Страница 164: ...privilege CIFS fail to create file CIFS send data error CIFS send data error CIFS fail to access file attribute Make sure you have full control privilege CIFS fail to access file attribute Check you...

Страница 165: ...ot implemented Contact system administrator HTTP PUT method not implemented The server forbids you to save Check your network administrator HTTP server unavailable Contact server administrator HTTP se...

Страница 166: ...the event of a paper jam follow the procedures below to remove the paper 1 Gently open the ADF front cover to the left 2 Carefully pull the paper out of the ADF unit 3 Close the ADF front cover Your A...

Страница 167: ...n a jam occurs the printer immediately stops and the Alert LED on the Status Panel together with the Status Monitor informs you of the event If printing multiple pages or copies do not assume that hav...

Страница 168: ...Cyan cartridge 2 Magenta cartridge 3 Yellow cartridge 4 Black cartridge 1 2 3 4 1 Cyan cartridge 2 Magenta cartridge 3 Yellow cartridge 4 Black cartridge It will be necessary to remove the four image...

Страница 169: ...e Caution The green image drum surface at the base of the cartridge is very delicate and light sensitive Do not touch it and do not expose it to normal room light for more than 5 minutes 6 Repeat this...

Страница 170: ...t the front of the belt 1 carefully lift the sheet from the belt and pull it forwards into the internal drum cavity and withdraw the sheet Caution Do not use any sharp or abrasive objects to separate...

Страница 171: ...dge of the sheet from the belt push the fuser pressure release lever 4 towards the front and down to release the fuser s grip on the sheet and withdraw the sheet through the drum cavity area Then allo...

Страница 172: ...avity making sure to locate them in the correct order 1 2 3 4 1 Cyan cartridge 2 Magenta cartridge 3 Yellow cartridge 4 Black cartridge Holding the complete assembly by its top centre lower it into pl...

Страница 173: ...the rear exit tray 5 and check for a sheet of paper in the rear path area 6 Pull out any sheets found in this area If the sheet is low down in this area and difficult to remove it is probably still gr...

Страница 174: ...5 25 12 Lift the front cover release and pull open the front cover 13 Check inside the cover for sheets in this area and remove any that you find then close the cover...

Страница 175: ...ly positioned against the edges of the paper stack When satisfied replace the tray 15 Finally close the top cover and press down firmly at both sides so that the cover latches closed When the jam has...

Страница 176: ...5 27 Removing the Abnormal Line Image When the scanned image is with abnormal lines on it clean the strip of glass area as indicated below Clearn this area...

Страница 177: ...ginal state 1 Moisten a cotton swab with isopropyl alcohol 95 2 Open the ADF front cover to the left Wipe the feeding rollers by moving the swab from side to side Rotate the rollers forward with your...

Страница 178: ...commended to replace the pad module with a new one For ordering the pad module please consult your nearest dealer and follow the procedure below to replace it Disassembling Procedure 1 Pull the Paper...

Страница 179: ...g 5 30 Assembling Procedure 1 Take out the ADF pad module from the box 2 Press both arms of the ADF snap in pad module inwardly with your two fingers 3 Place it into the holes until it snaps into plac...

Страница 180: ...quality and performance To clean the glass 1 Open the document cover as shown below 2 Dip a soft clean cloth with isopropyl alcohol 95 3 Gently wipe the document glass and the white sheet beneath the...

Страница 181: ...ere is sufficient toner for 1 500 pages Conversely at 2 5 there is sufficient toner for 6 000 pages in the cartridge 1 The printer is shipped with sufficient toner for 3 000 A4 pages in each print car...

Страница 182: ...ewhere to place the used cartridge while you install the new one Dispose of the old cartridge responsibly inside the pack that the new one came in Follow any regulations recommendations etc which may...

Страница 183: ...1 Press the cover release and open the printer s top cover fully Warning If the printer has been powered on the fuser may be very hot and clearly labelled Do not touch 2 Note the positions of the fou...

Страница 184: ...nter release lever has 3 positions pull the coloured toner release lever on the cartridge to be replaced towards the front of the printer in the direction of the arrow and stop at the center upperight...

Страница 185: ...hen draw the cartridge to the right to release the left hand end as shown and withdraw the toner cartridge from the printer 1 2 5 Put the cartridge down gently onto a piece of paper to prevent toner f...

Страница 186: ...e wrap the cartridge inside a black plastic bag to keep it away from light Never expose the drum to direct sunlight or very bright room lighting 6 Remove the new cartridge from its box but leave its w...

Страница 187: ...e left end of the cartridge into the top of the image drum unit first pushing it against the spring on the drum unit then lower the right end of the cartridge onto the image drum unit 2 1 11 Pressing...

Страница 188: ...5 39 1 12 Finally close the top cover and press down firmly at both sides so that the cover latches closed...

Страница 189: ...nutes before opening the cover Caution Static sensitive device Handle with care The printer contains four image drums cyan magenta yellow and black 1 Press the cover release and open the printer s top...

Страница 190: ...ions of the four cartridges 1 2 3 4 1 Cyan cartridge 2 Magenta cartridge 3 Yellow cartridge 4 Black cartridge 3 Holding it by its top centre lift the image drum complete with its toner cartridge up an...

Страница 191: ...for longer than this please wrap the cartridge inside a black plastic bag to keep it away from light Never expose the drum to direct sunlight or very bright room lighting 5 With the coloured toner re...

Страница 192: ...the packaging material for disposal 8 Place the toner cartridge onto the new image drum cartridge as shown Push the left end in first and then lower the right end in It is not necessary to fit a new t...

Страница 193: ...e assembly by its top centre lower it into place in the printer locating the pegs at each end into their slots in the sides of the printer cavity 11 Finally close the top cover and press down firmly a...

Страница 194: ...cement approximately every 50 000 pages Switch off the printer and allow the fuser to cool for about 10 minutes before opening the cover 1 Press the cover release and open the printer s top cover full...

Страница 195: ...nd place them in a safe place away from direct sources of heat and light Warning The green image drum surface at the base of each cartridge is very delicate and light sensitive Do not touch it and do...

Страница 196: ...nt and the drive gear towards the rear of the printer Locate the drive gear into the gear inside the printer by the rear left corner of the unit and lower the belt unit flat inside the printer 8 Turn...

Страница 197: ...g If the printer has recently been powered on some fuser components will be very hot Handle the fuser with extreme care holding it only by its handle which will only be mildly warm to the touch A warn...

Страница 198: ...handle 1 lift the fuser straight up and out of the printer If the fuser is still warm place it on a flat surface which will not be damaged by heat 5 Remove the new fuser from its packaging and remove...

Страница 199: ...eir slots in the metal partition which separates the fuser area from the image drums 8 Push the two retaining levers 2 towards the rear of the printer to lock the fuser in place 2 C M Y K 9 Finally cl...

Страница 200: ...d with an additional memory board containing 64MB or 256MB giving a maximum total memory capacity of 288MB Installation takes a few minutes and requires a medium size cross head Philips type screwdriv...

Страница 201: ...tly at the two points shown and pull the cover away from the printer at the top Lift the cover slightly to detach it from the printer Place it safely to one side 6 Carefully remove the new memory boar...

Страница 202: ...closer to one end than the other 8 Identify the RAM expansion slot 1 in the printer 1 2 2 9 If the RAM expansion slot already contains a memory upgrade board that board will have to be removed before...

Страница 203: ...12 Locate the three retaining clips at the bottom of the side cover into their rectangular holes near the bottom of the printer 13 Close the top of the side cover up to the printer and refit the secu...

Страница 204: ...and contact our technical support center The seriel number of the machine The network parameters for your machine The error codes and the messages Avision Inc No 20 Creation Road I Hsinchu Science Par...

Страница 205: ...Quick Guide Placing Your Document For multi page transmission Place your document FACE UP in the ADF For single page transmission Place your documents FACE DOWN on the glass Auto Document Feeder Docu...

Страница 206: ...ke color copy Press to send your document in B W Press the Network Scan key Choose your e mail address from the Address Book i e Press to send your document in color Press to file your document in B W...

Страница 207: ...rning Power External Connections RJ 45 for Network connection ADF port Network Connection 10 100 Mbits auto negotiation Networked Workgroup Solution for Stand alone Copy E Mail via Internet Intranet F...

Страница 208: ...ion 600 x 600 dpi Copy Type Plain paper Ultra heavy Transparency Copy Quality Speed Fine Density Control 5 Levels Background Remove Yes Enlarge Reduce Whole Page 93 25 400 in 1 increment decrement Pre...

Страница 209: ...cifications Communication Protocol SMTP MIME POP3 File Formats B W Gray Color PDF TIFF MTIFF PDF TIFF MTIFF JPEG Default File Format PDF Separation Limit 1MB 3 MB 5MB 10 MB 30MB No limit Resolution 75...

Страница 210: ...ault File Format PDF Resolution 75 100 150 200 300 400 600 dpi Default Resolution B W Gray Color 200 dpi 150 dpi Max Number of Profiles 20 Printer Specifications Dimensions 425 x 561 x 345mm W x D x H...

Страница 211: ...ar stacker 80g m Printer life 420 000 pages or 5 years Duty cycle 20 000 pages per month max 4 000 pages per month average Toner life 3 000 pages at 5 coverage Image drum life 14 000 pages typical off...

Страница 212: ...olor 4 15 Internet Communication Features Scan to E mail Scan to Filing 1 19 Invert 4 15 LAN 2 28 LCD display 4 8 Manual Feed 4 8 Mirror Function 4 15 Multiple Pages Sending 1 3 network parameters IP...

Отзывы: