background image

RA4000e Series  User manual


26 


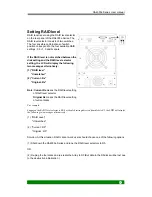
Setting RAID level 

RAID level is set using the RAID level selector 
on the rear panel of the RA4000e Series. The 
RAID level selector consists of two switches. 
The four possible combinations of switch 
position correspond to the four available RAID 
settings: 0, 0+1, 5 and 5+spare. 


If the RAID level is not matched between the 
disk setting and the RAID level selector 
setting, the LCD will display the following 
two messages alternatively: 

(1) “RAID level” 

“Unmatched” 

(2) “Current: Rx” 

     “Original: Rx” 


Note:


Current Rx

 means the RAID level setting 

of RAID level selector 


Original Rx

 means the RAID level setting 

of current disks  

For example: 

Supposed the RAID level selector is R0, but the disk setting detected from disks is R5, the 

LCD 

will


display 

the following two messages alternatively:  

(1) 


"RAID Level"


"Unmatched” 

(2) 


"Current : R0"


"Original : R5" 

Solution: At this situation, RAID cannot work, users should choose one of the following options :

(1) Shut down the RA4000e Series and tune the RAID level selectors to R5. 

OR  

(2) Re-plug the four disks and re-create the Array to R0 (But data in the R5 disks will be lost due 
to the destructive initialization ) 


Содержание RA4000e Series

Страница 1: ...RA4000e Series eSATA to Serial ATA Disk Array System User Manual Ver1 0 ...

Страница 2: ...arks This manual has been checked for accuracy but no guarantee is given that the contents are correct Information and specifications can change without notice AVerMedia is not responsible for data loss or other consequences caused by the use of this manual Copyright 2008 AVerMedia Technologies Inc All rights reserved Manual version 1 0 Before starting any kind of hardware installation please ensu...

Страница 3: ...rference to radio or television reception which can be determined by turning the equipment off and on the user is encouraged to try to correct the interference by one or more of the following measures Reorient or relocate the receiving antennas Increase the separation between the equipment and receiver Connect the equipment into an outlet on a circlet different from that to which the receiver is c...

Страница 4: ... pre installation notices Chapter 3 Setting up the RA4000e Series gives a detailed overview of the RA4000e Series features and guides you through the process of installing hard disk drives into Chapter 4 Setting up an array explains how to set the RAID level create an array and connect to a host computer Chapter 5 Partitioning the array tells you how partition the array in Windows Linux or Mac OS ...

Страница 5: ... steps Prepare Familiarize yourself with the features and capabilities of RA4000e Series Chapter 1 Decide whether to set up a RAID 0 0 1 5 or 5 spare array RA4000e Series Chapter 2 Set up Install drives into RA4000e Series Chapter 3 Set the RAID level Chapter 4 Create Create a RAID array and connect it to a host computer Chapter 4 Partition Partition the array using the host operating system Chapt...

Страница 6: ...icon indicates the existence of a potential hazard that could result in personal injury damage to your equipment or loss of data if the safety instruction is not observed This icon indicates useful tips on getting the most from your RA4000e Series Important terms commands and programs are put in Boldface font Screen text is given in screen font ...

Страница 7: ...rive rebuilding 11 Hard drive hot swapping 11 Warranty 11 Specifications 12 Available host intefaces and transfer speeds 12 Disk Interface Support 12 RAID Function Support 12 RA4000e Series Function Support 12 Mechanical Environmental and Safety Specifications 13 Chapter 2 14 Before you begin 14 Making sure you have everything 14 What s in the box 14 What else you need 15 Pre installation planning...

Страница 8: ... 1 28 Setting RAID 5 28 Setting RAID 5 spare 28 Creating an array 29 Create a new RAID 29 Over 2TB capacity 30 Checking the status of RA4000e Series 31 Removing replacing a drive 32 What if a disk fails 32 Swapping drives 32 Removing a drive 33 Connecting to a host computer 34 Setting the Display Time Date 35 Chapter 5 36 Partitioning the array 36 Partitioning the array Windows 36 Partitioning the...

Страница 9: ... disk status messages 51 RAID level Setting and Total RAID Capacity 51 Disk information Vendor model for example Western Digital Caviar 7200rpm 120G 51 Disk information mode Capacity 52 Error and failure messages 52 Where the speed of failed fan is 100 rpm 54 Disk rebuilding messages 55 Time setting 56 Appendix D 57 Updating Firmware 57 ...

Страница 10: ...s ideally suited for integration with databases e mail web servers and imaging systems The RA4000e Series is the ultimate approach to a flexible RAID solution It can manage three different RAID levels 0 0 1 and 5 and also offers the option of RAID 5 hot spare You will find detailed explanation on the features and suggested uses of these RAID levels later in this chapter The RA4000e Series features...

Страница 11: ...nd a drive fails the will automatically replace the faulty drive with the hot spare drive Automatic drive rebuilding If a member drive in a RAID 5 array is replaced on line the RA4000e Series will automatically start to rebuild data to the new drive Hard drive hot swapping Hot swapping allows for the removal and installation of disk drives without the need to power down the system while the system...

Страница 12: ...Series Function Support z Driverless z Plug Play z Multiple operating system support Mac OS 9 X 10 2 8 10 3 Windows 2000 2003 XP Windows Vista Linux 7 3 and later Fedora 6 7 z GUI support for system status monitoring z Support over 2TB RAID capacity Windows Vista only z On board 2MB buffer cache size z LCD panel for operation status display z Event notification through audible alarm or e mail z Al...

Страница 13: ... mm z Host Connectors one eSATA connector z Interface Connectors One RS 232 connector z Operation temperature 0 35 C z Operation humidity 5 95 non condensing z Storage humidity 5 95 non condensing z 200 W power supply Input 100 250 AC Output 5V 10 A 12V 10 A 3 3V 5A Specifications are subject to change without notice ...

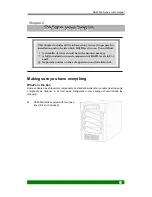
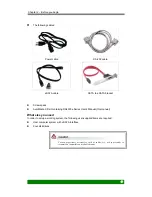
Страница 14: ...t of what should be in the product package Ö A full introduction to and comparison of RAID levels 0 0 1 and 5 Ö Ö Ö Important notices on the safe operation and installation of Making sure you have everything What s in the box Some vendors may ship certain components as standard while other vendors treat the same component as optional In its most basic configuration your package should include the ...

Страница 15: ...ia CD kit containing RA4000e Series User s Manual this manual What else you need In order to setup a working system the following user supplied items are required z Host computer system with eSATA interface z Four disk drives For non proprietary accessories such as cables etc ask your vendor to recommend compatible and reliable brands ...

Страница 16: ... mirroring and striping functions on a minimum of four hard disks Mirroring provides full redundancy and protects data in case of multiple drive failure providing that data on one of each mirrored pair of drives is intact RAID Level 5 arrays offer high I O transaction rates and are the ideal choice when used with on line transaction processing applications such as those used in banks insurance com...

Страница 17: ...istics Recommended use RAID 0 implements a striped disk array the data is broken down into blocks and each block is written to a separate disk drive I O performance is greatly improved by spreading the I O load across many channels and drives Fastest and most efficient array type but offers no fault tolerance Storage capacity No of disks capacity of smallest disk If installed 40 GB 50 GB 60 GB and...

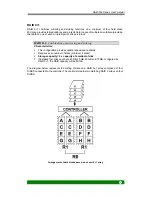
Страница 18: ... Characteristics This configuration provides optimal speed and reliability Requires even number of disks minimum 4 disks Storage capacity 2 x capacity of smallest of disk If installed four drives each are 40 GB 50 GB 60 GB and 70 GB configured as RAID 0 1 the RAID capacity will be 80 GB The diagram below represents the writing of data on a RAID 0 1 array composed of four DISKS connected to the con...

Страница 19: ...RAID 5 hot spare function RAID 5 Independent data disks with distributed parity blocks Characteristics Recommended use Each entire data block is written on a data disk Parity for blocks in the same rank is generated on Writes recorded in a distributed location and checked on Reads Highest Read data transaction medium Write data transaction rate Relatively low ratio of ECC Parity disks to data disk...

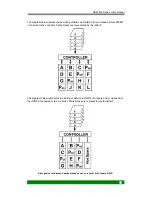
Страница 20: ... connected to the controller Parity blocks are represented by the letter P The diagram below represents the writing of data on a RAID 5 hot spare array composed of four DISKS connected to the controller Parity blocks are represented by the letter P Arrangement of data and parity blocks saved on a Level 5 hot spare RAID ...

Страница 21: ...rheating should be installed in a well ventilated area and in such a way that sufficient airflow is maintained across the controller chips Static electricity can damage electronic components To guard against such damage Work in a static free environment Wear a grounded anti static wrist strap Store uninstalled components in anti static bags Environmental requirements Temperature 0 35 C Operation h...

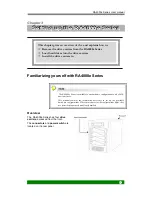
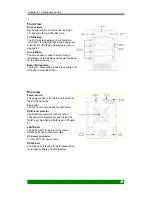
Страница 22: ...into the drive carriers Ö Install the drive carriers in Familiarizing yourself with RA4000e Series The RA4000e Series is available in one hardware configurations with eSATA host interfaces This manual contains the information necessary to set up the available hardware configurations Where procedures for the configurations differ they are described separately and clearly marked Overview The RA4000e...

Страница 23: ...date and time Enter Mute button The Enter Mute button is used to set date and time and to mute the buzzer Rear view Power switch The power switch is the main on off switch of the RA4000e Series Fan vent The fan vent should be kept unobstructed RAID level selector The RAID level selector consists of two switches which together are used to set the RAID level See Setting RAID level in Chapter 4 eSATA...

Страница 24: ...e into a drive carrier as follows 1 Pull the drive carrier handle to release the latch 2 Slide the drive carrier out of the RA4000e Series 3 Place the disk drive in the drive carrier and secure the disk in the carrier 4 Slide the loaded disk drive carrier into the RA4000e Series and push flat the carrier handle to lock the carrier in position ...

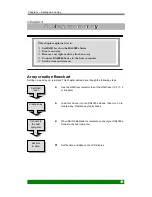
Страница 25: ...uter Ö Set the time and date on Array creation flowchart Setting up an array on is simple This chapter will lead you though the following steps z Use the RAID level selector to set the RAID level 0 0 1 5 or 5 spare z Load four drives into the RA4000e Series then turn on to create array Replace any faulty drives z When RAID initialization is complete connect your RA4000e Series to the host computer...

Страница 26: ...vel Unmatched 2 Current Rx Original Rx Note Current Rx means the RAID level setting of RAID level selector Original Rx means the RAID level setting of current disks For example Supposed the RAID level selector is R0 but the disk setting detected from disks is R5 the LCD will display the following two messages alternatively 1 RAID Level Unmatched 2 Current R0 Original R5 Solution At this situation ...

Страница 27: ... off to change RAID level To change RAID level 1 Power off 2 Set the new RAID level using the RAID level selector 3 Remove all four disks 4 Power on 5 Install the four disks to start RAID initialization Changing RAID level may lead to the loss of all data on the array ...

Страница 28: ... the RA4000e Series is turned off 2 Move both selector switch 1 and 2 to OFF Setting RAID 5 spare 1 Ensure the RA4000e Series is turned off 2 Move selector switch 1 to OFF and 2 to ON Initially in a R5 spare array the drive in the bottom drive carrier is the hot spare and its status indicator will be shown amber for notification In a RAID 0 1 array disk 1 2 and disk 3 4 are two independent RAID 1 ...

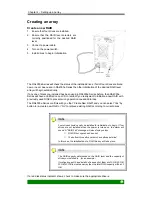
Страница 29: ...used DISK to prevent wrong operation caused data loss The RA4000e Series confirms with you that Create New RAID and you can select Yes by button to re create new RAID or No to retrieve existing RAID according to current drives Four drives should usually be installed for initialization to begin If four drives are not installed when the power is turned on the alarm will sound A RAID Fail message wil...

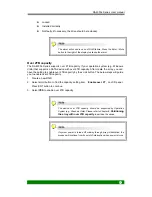
Страница 30: ...n have the setting to enable over 2TB capacity by the scroll button The below steps will guide you to enable over 2TB capacity 1 Create a new RAID 2 Select scroll button to find the capacity setting item Enable over 2T on LCD panel Press ENT button to continue 3 Select YES to enable over 2TB capacity The device over 2TB capacity should be supported by Operation System e g Windows Vista Please refe...

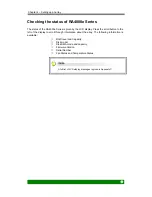
Страница 31: ...Press the scroll button to the left of the display to scroll through information about the array The following information is available Ö RAID level and Capacity Ö Disk model Ö Disk DMA mode and capacity Ö Firmware Version Ö Serial Number Ö Fan Status and Temperature Status A full list of LCD display messages is given in Appendix C ...

Страница 32: ...ce a failed disk in a R5 spare array The hot spare disk will be brought on line automatically The alarm can be silenced by pressing the Enter Mute button to the right of the display Swapping drives The hot swap function for R5 arrays enables failed disks to be swapped while the array is powered on RAID rebuilding will be processed automatically in the background and the RA4000e Series will record ...

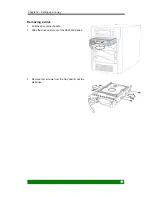
Страница 33: ...Chapter 4 Setting up an array 33 Removing a drive 1 Pull the drive carrier handle 2 Slide the drive carrier out of the RA4000e Series 3 Remove four screws from the tray and lift out the disk drive ...

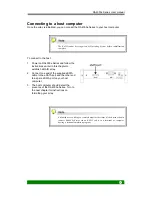
Страница 34: ...ctions earlier in this chapter to establish a RAID array 2 Connect one end of the supplied eSATA cable to the eSATA port and the other end to a spare eSATA port on your host computer 3 The host computer should detect the presence of the RA4000e Series Turn to the next chapter for instructions on formatting your array Advanced users wishing to remotely monitor the status of their array should conne...

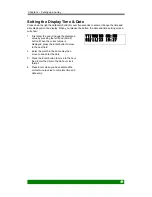
Страница 35: ... 1 First enter the year Change the displayed value by pressing the left hand Scroll button When the correct value is displayed press the Enter button to move to the next field 2 Enter the month in the same way then move to and enter the date 3 Press the Enter button to move to the hour filed Enter the time in the 24 hour clock format 4 Press Enter when you have entered the correct minute value to ...

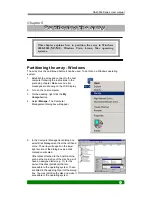
Страница 36: ...ake sure no error messages are showing on the LCD display 2 Turn on the host computer 3 On the desktop right click the My Computer icon 4 Select Manage The Computer Management dialog box will appear 5 In the Computer Management dialog box select Disk Management from the left hand menu The array will appear in the lower right section of the dialog box as a disk marked unallocated Other disks attach...

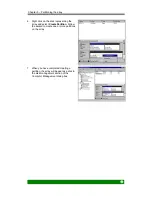
Страница 37: ... representing the array and select Create Partition Follow the wizard to create one or more partitions on the array 7 When you have completed creating a partition the array will appear as a disk in the disk management section of the Computer Management dialog box ...

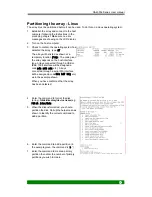
Страница 38: ...n the host interface type Arrays connected through a USB or IEEE 1394 interface will be assigned a code sda sdb sdc etc Arrays connected through a serial ATA interface will be assigned a code hde hdf hdg etc as in the example shown When you have confirmed that the array has been detected 4 Enter the command to format the disk array fdisk directory device name e g fdisk dev hde 5 When the disk is f...

Страница 39: ...9 8 Enter the command to create a Linux second extended file system on the array In the example the command is mke2fs directory device mke2fs dev hde 9 Assign the array a location Enter mount directory device location mount dev hde tmp ...

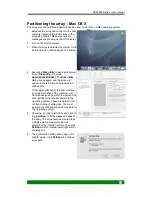
Страница 40: ... box appears and the array will appear in the left menu of window as an untitled disk Other disks attached to the host machine such as main drive of the machine will have an assigned name for the parts of the disk partition that are accessible to the operating system These are listed in the left hand menu of dialog box You must partition the disk and make it accessible to the operating system 5 Ch...

Страница 41: ...on will then begin and process is been showing as creating partition map in lower right corner of dialog box 8 When you have completed creating a partition the array will appear as a disk in storage list in left menu and be put on desktop as shortcut ...

Страница 42: ... disk number and select the MBR Master Boot Record partition style Click OK to partition If over 2TB capacity is needed please choose GPT GUID Partition Table to partition 5 In the drive box to the right shows Unallocated right click and select New Simple Volume 6 The New Simple Volume Wizard dialog box will appear click Next to continue 7 After selecting the partition type specify the partition s...

Страница 43: ...array you should replace the failed disk Data rebuilding will then begin Ö For a R5 hot spare array data will be rebuilt automatically to the hot spare disk There is no need to immediately replace the failed drive Ö The capacity of new DISK you installed must equal or larger than the smallest disk in the RA4000e Series Otherwise it will be rejected by the RA4000e Series though it has no any damage...

Страница 44: ...ou really want to create a new RAID Please choose Yes by right button the initialization will then begin Ö Please notice that the procedure will erase all data of the four disks 8 The host computer cannot detect the RA4000e Series What should I do Ö Make sure the host interface connection cable is attached securely to ports on and the host and is not damaged Ö Check the display for error messages ...

Страница 45: ...functioning disk continues to function at its new location the original disk was faulty and should be replaced If the functioning disk does not function at any of the three other locations the drive carriers for those location or the RA4000e Series is faulty Perform the next step Ö Swap the functioning drive carrier in the same way to find out if the drive carriers or the RA4000e Series Replace an...

Страница 46: ...ginal disk 3 is put into tray 2 and the original disk 2 is not plugged or failed Ö Condition 3 R A I D F a i l C o d e 2 Solution To create a new RAID or you should call AVerMedia product support center to try to save the data from system Ö Condition 4 B a t t e r y F a i l e d Note Battery is low missing or failed Solution Please contact with your distributor or vendor to change a new battery Ö C...

Страница 47: ...mbined with a body of Array Management Software Array Management Software controls the disks and presents them to the array operating environment as one or more virtual disks Firmware See Array Management Software Host Computer Any computer system to which disks are directly attached and accessible for I O Mainframes and servers as well as workstations and personal computers can all be considered ...

Страница 48: ...ID level offer different data throughput speeds and fault tolerance data redundancy RAID 0 does not feature redundant information but is nonetheless considered a special type of RAID Serial ATA Serial Advanced Technology Attachment Serial ATA often abbreviated as SATA or S ATA is an advance on the commonly used Parallel ATA interface for data storage devices Serial ATA allows data transfer up to 1...

Страница 49: ... message will be next A V e r M e d i a I n i t i a l i z e D i s k s Over 2TB capacity setting E n a b l e o v e r 2 T P r e s s E N T s e l e c t If you would like to enable the function of support over 2TB capacity press the button ENT to select this function the next message will be displayed At this condition user presses the scroll buttons the below messages will be displayed E n a b l e o v...

Страница 50: ...tion and move to the next operation RAID initialization started After select YES system will automatically enter the RAID initialization state by showing the disk initialization progress on the LCD display R A I D I N I T x x x T o t a l x x x x G B Where xx x represents the percentage of RAID capacity being initialized RAID initialization completed without error If there is no error during initia...

Страница 51: ...y After the system is powered on with all 4 disks successfully initialized it will display the following message A V e r M e d i a R e a d y h h m m Where hh mm represents the hour and minutes of current time if being correctly set RAID and disk status messages Under system ready condition if user presses the MENU button one by one the LCD will display message in the following sequence RAID level ...

Страница 52: ...re F a n 3 6 0 0 r p m T e m p e r a t u r e 4 0 C Error and failure messages Error or failure messages will be displayed on LCD panel under the following conditions Disk failure message if one of the 4 disks fails in the operation D I S K x F a i l u r e Disk bad sector messages D I S K x b a d Y T o t a l b a d x x DISK x bad Y It means disk x has Y bad sector Total bad xx it means total xx bad ...

Страница 53: ...rs count to determine which DISK has the maximum bad sectors and then the controller will kicked it out RAID failure message if the RAID crashes and the data cannot be recovered R A I D F a i l C o d e 0 Code 0 represents not enough number of function disks for a RAID to operate R A I D F a i l C o d e 1 1 3 X 4 Code 1 represents the disk sequence is wrong with current sequence displayed within Ex...

Страница 54: ... users choose one of the following options Shut down RA4000e Series and tune the RAID level selectors to R5 Re plug the four disks and re create the RAID to R0 but data in the R5 disks will be lost Fan failure message fan can not function normally F A N F a i l 1 0 0 r p m Where the speed of failed fan is 100 rpm Overheat message will be displayed when temperature 50 o C T e m p e r a t u r e 5 1 ...

Страница 55: ... x R e b u i l d 1 0 0 x x x G B O K If the capacity of newly installed disk diskx 80GB in the example below is less than the minimum capacity required for rebuild the LCD panel will display the following message D x R e b u i l d F a i l 8 0 G B 1 2 0 G B If there are too many bad sectors detected in the newly installed disk during rebuilding process the LCD panel will display the following messa...

Страница 56: ... D D H H M M x x x x x x x x x x To press the MENU button to select between 0 to 9 and press the Enter button to confirm your selection and move to the next operation Start by adjusting the year YY then move to the month MM the day DD and finally the hour HH and minute MM the time is measured in the 24 hour clock format Pressing the Enter button on the final selection will set the time and date ...

Страница 57: ...rminal that supports ANSI terminal emulation Other terminal programs may be used in place of HyperTerminal to communicate with the RA4000e Series However the setup process for other terminal software may differ from that outlined in this chapter Array data and configurations are not affected by updating of firmware HyperTerminal is bundled as standard with Microsoft Windows operating systems It wi...

Страница 58: ... information about your location Enter a name to identify the connection e g and select an icon to represent the connection Press OK 5 The Connect to dialog box appears Select COM1 or COM2 from the Connect using dropdown menu depending on which port is linked to Click OK 6 The COM Properties dialog box will appear Set the following values Bits per second 19 200 Data bits 8 Parity None Stop bits 1 ...

Страница 59: ...1 to download firmware Enter 1 to Download Firmware ESC exit r reset Version Boot 01 a 04 Downloading Code 11 Locate the updated firmware file to send If using HyperTerminal go to the Transfer menu and select Send Text File 12 Send the firmware file as a text file The file will start to download 13 When the file has downloaded After restarted the firmware updating is finished and you can check it ...

Отзывы: