background image

AVerTV 6 

13 

17. 

 (Record) 

Switch to DVR mode and record the current program or video into your 
hard drive. 

18. MUTE 

Turn on/off the sound. 

19. CH 

/


Go up or down to the next active channel. 

20. SNAPSHOT 

Capture the on-screen image to a bitmap file. 

21. DISPLAY 

Display information. 

22. 

TV/FM


Switch between available signal sources. 

3.6  Changing TV Monitor Resolution 

To switch the resolution of the TV monitor, 
simply right click on the TV monitor. When a 
pop-up menu appears, point to 

Video

 and 

choose an appropriate resolution (320x240, 
640x480, 720x480, 720x576). 


3.7  Resizing the TV Monitor Window 

To enlarge or reduce the size of the TV Monitor window, click and drag the lower right 
edge of the window. 

Double-click the TV Monitor window to display it in full screen or click the Full Screen 
button 

 on the Control Panel.  

When in full screen mode, just double-click anywhere on the screen to revert to the 
normal TV window size. 

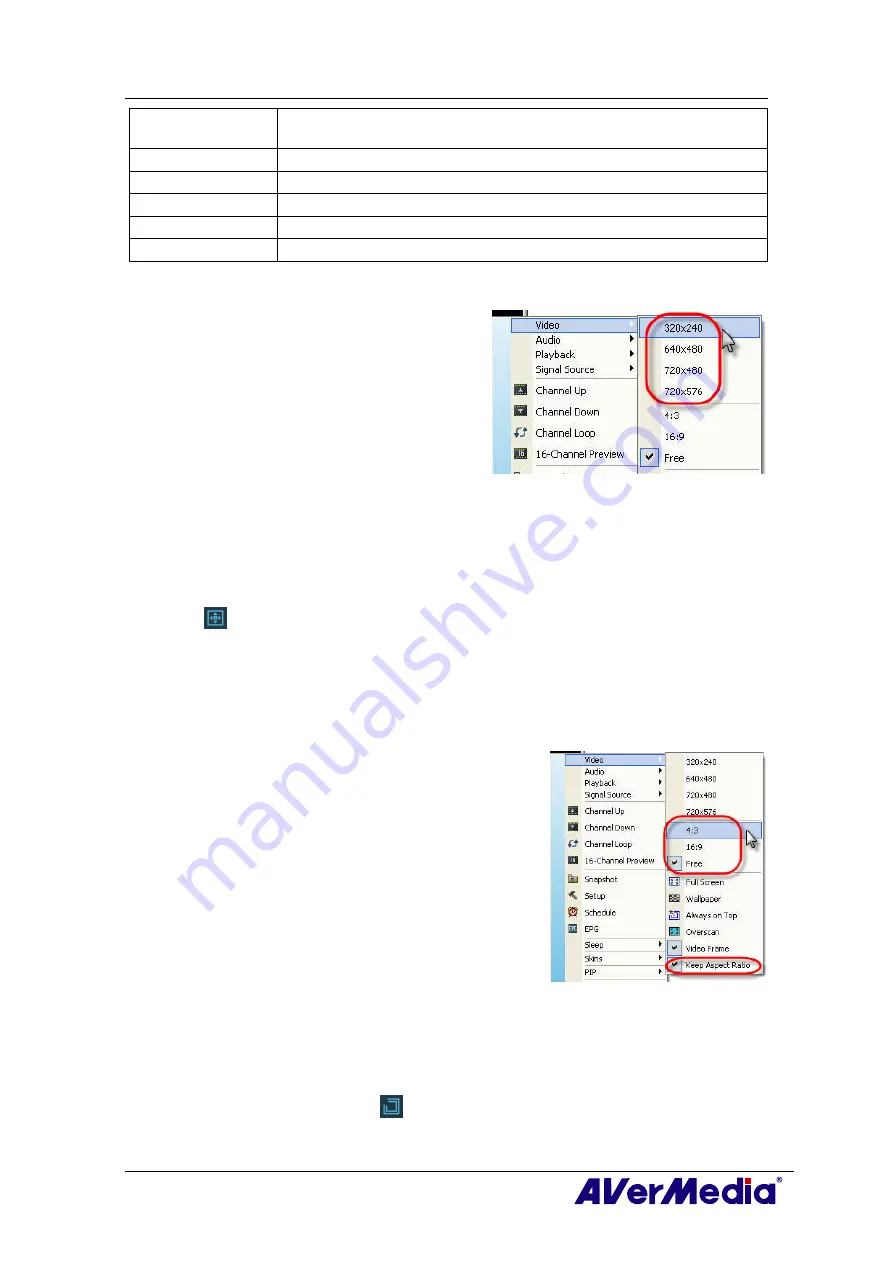
3.8  Changing Display Aspect Ratio 

Aspect ratio indicates the ratio of the width of an image 
to its height. To switch the aspect ratio of the display, 
Right click on the TV monitor. When a pop-up menu 
appears, point to 

Video

 and choose a desired option.  

4:3 and 16:9 is the two most common aspect ratio of 
home video. You can choose 

Free

 to adjust the aspect 

ratio as you want. Or select 

Keep Aspect Ratio 

to 

preserve the original width and height of an image.  


3.9  Always on Top 

To make the TV monitor window float over the top of other program windows, right-click 
on the TV monitor. In the pop-up menu, point to Video and choose Always on Top. 
OR,  

Click the 

Always on Top

 button 

 on the Control Panel.  

Содержание AVerTV 6 E501R

Страница 1: ...eliability however no responsibility is assumed for inaccuracies The information contained in this documentation is subject to change without notice COPYRIGHT 2007 by AVerMedia TECHNOLOGIES Inc All ri...

Страница 2: ...3 5 4 Remote Control Buttons Model 4 12 3 6 Changing TV Monitor Resolution 13 3 7 Resizing the TV Monitor Window 13 3 8 Changing Display Aspect Ratio 13 3 9 Always on Top 13 3 10 Setting Windows Power...

Страница 3: ...Skipping Unwanted Channels 32 5 6 Adding a Radio Frequency 32 5 7 Modifying a Channel Name 32 5 8 Adding and Deleting Channel Groups 33 5 9 Customizing Audio Recording Settings 33 Chapter 6 TimeShift...

Страница 4: ...mize the Display Mode 44 9 1 2 Overview 45 9 1 3 Toolbar Buttons 46 9 1 4 LED Lamp 46 9 1 5 Using Teletext 47 Chapter 10 Scheduler 49 10 1 Schedule Management 49 10 2 Adding Schedules 50 Chapter 11 Ho...

Страница 5: ...V Cardbus Plus Model No E501R TV System Digital TV DVB T ATSC DVB S Analog TV NTSC PAL SECAM B G SECAM D K Audio Mode Stereo Mono SAP FM Radio Support Not Support Remote Control Support Model 1 Model...

Страница 6: ...miss your favorite ball games soaps or game shows anymore because the TimeShift function performs background recording of a TV program This means you can return and watch from the part of the program...

Страница 7: ...the application click Start point to Programs choose AVerMedia AVerTV 6 and then click AVerTV 6 Another way is to double click the AVerTV 6 program icon on the desktop Or you can double click the AVe...

Страница 8: ...ase make sure that your country region is correct For more information please refer to Scanning Channels in Chapter 4 2 On this page choose the TV option to search only for air channels or select CATV...

Страница 9: ...Show Hide Video Frame 4 Stop 11 Minimize 5 TimeShift 12 Full Screen 6 Record 13 Exit 7 Volume The Control Panel provides button controls for selecting channels adjusting volume capturing images and mo...

Страница 10: ...isplay 16 consecutive TV channels on the TV Monitor window 6 Channel Up Down Go to the next upper or lower active channel 7 Mute Turn off the sound 8 Setup Allows you to Scan channels Set the Windows...

Страница 11: ...ed parts while at the same time recording is in progress Freeze the TimeShift temporarily 24 Next File Play the next file in the playlist 25 Previous File Play the previous file in the playlist 26 Sto...

Страница 12: ...rol can only be used on AVerMedia AVerTV 6 application 3 5 1 Remote Control Buttons Model 1 1 2 3 4 5 6 7 Button Description 1 Power Turn on off the application 2 VOL Volume up down 3 Source Switch be...

Страница 13: ...ext page of the corresponding color according to this button 11 SLEEP Go to the next file in the playlist Set the time to put your computer in Stand By or Hibernate mode Jump to the Teletext page of t...

Страница 14: ...rrent program or video into your hard drive 19 MUTE Turn on off the sound 20 CH Go up or down to the next active channel 21 SNAPSHOT Capture the on screen image to a bitmap file 22 DISPLAY Display inf...

Страница 15: ...cording to this button 11 Forward Advance the playback Jump to the Teletext page of the corresponding color according to this button 12 Next File Go to the next file in the playlist Jump to the Telete...

Страница 16: ...d Advance the playback Jump to the Teletext page of the corresponding color according to this button 11 Next File Go to the next file in the playlist Set the time to put your computer in Standby or Hi...

Страница 17: ...he TV Monitor window to display it in full screen or click the Full Screen button on the Control Panel When in full screen mode just double click anywhere on the screen to revert to the normal TV wind...

Страница 18: ...s icon on the left pane 2 By default the system is set to enable the Stand By Hibernation option What you have to do is to choose the desired power saving settings If your computer has problem with be...

Страница 19: ...the center of the screen 3 Set the time you want by pressing the Wake Up button continuously For more information please refer to the table below Then the application will be turned on automatically...

Страница 20: ...down list select your country or region c Click Apply to save the settings 2 Then select Analog TV or Programs On this page choose the TV option to search only for air channels or select CATV to scan...

Страница 21: ...ation section Then the Advance Program Configuration dialog box will appear 2 If you don t want to miss any channels click All Frequencies Scan 3 When a warning message appears click Yes to continue t...

Страница 22: ...e video file format you wish to use for saving the recorded video file 4 You can use the default format or select New to create your own file format This picture is only for reference 5 Click New and...

Страница 23: ...tandard VCD frame size and frame rate are 352 x 240 pixels at 29 97 fps for NTSC and 352 x 288 pixels at 25 fps for PAL DVD When you choose this format the recorded video file will be saved in MPEG 2...

Страница 24: ...first We recommend downloading the DivX codec from www divx com or XviD codec from www xvid org Then install the codec 2 Next run the AVerTV 6 and click the Setup button In the Setup dialog box click...

Страница 25: ...fer to the section titled Recording Setting in Chapter 6 2 The codecs are not developed by AVerMedia Therefore AVerMedia could not guarantee the function of MPEG 4 recording 4 1 4 Fine Tuning Color an...

Страница 26: ...Factory Setting 4 1 5 Enhancing the Video Quality This function can reduce noise Choose an appropriate option listed below z Video Quality Enhancement Enable Activate to improve the video quality z V...

Страница 27: ...w you can delete the unwanted programs by clearing the check box 6 Click Apply to save the settings and click OK to exit the current dialog box Or you can click Cancel to revert to the original settin...

Страница 28: ...you select the Filter button located on the bottom right corner of the program panel the system will hide all the pay channels in the program list Filter function is only available for digital TV 4 4...

Страница 29: ...o save the settings and click OK to exit the dialog box Or you can press Cancel to abort without saving 4 6 Modifying a program list name Surely you can change a program list name To rename a program...

Страница 30: ...annel in the Program Information section 2 Clear the Enable check box so that you will not access that channel when you press Channel Up Down buttons 3 However you can still see the channel in your pr...

Страница 31: ...annel Preview function can display 16 TV channels on screen at the same time You can see clearly which TV programs are currently showing on these channels To preview the channels 1 Click to open the N...

Страница 32: ...originally selected TV channel 4 10 Changing the OSD Attributes Click the Setup button and in the Setup dialog box click on the Personalise icon on the left pane In this page you can customize menu e...

Страница 33: ...Mixer icon on the left pane This function provides a variety of sound effects including Dolby Surround Incredible Mono and Incredible Stereo You can also drag the slider to control the Stereo Bass and...

Страница 34: ...ore To change back to live TV click the Video Source button 1 2 3 4 5 6 7 8 9 11 13 12 10 16 15 14 17 18 19 20 21 22 23 24 25 26 This picture is only for reference 1 Signal Status Enable or Disable Re...

Страница 35: ...tings and click OK to exit the current dialog box To abort the settings click Cancel 5 3 Manually Scanning Specific FM Channels Instead of scanning all channels you can choose to manually scan one or...

Страница 36: ...ill be removed indicating that the channel will be excluded from your channel list and that you won t be able to access and hear them through the Channel Up Down button 5 6 Adding a Radio Frequency If...

Страница 37: ...this new channel group For more information refer to How to Auto Scan FM Radio Channels 4 To add more channel groups repeat steps 2 to 3 To delete a channel group 1 Click the Setup button and in the...

Страница 38: ...he settings To abort this operation click Cancel 6 If you want to change the settings of your own file format click Modify or you can click Delete to remove the unwanted file format that you created e...

Страница 39: ...advance forward rewind and more 1 2 3 4 5 6 7 8 This picture is only for reference BUTTON FUNCTION 1 Backward Click to move backward in intervals 2 Playback Seek Drag the slider tab to move to any pa...

Страница 40: ...ng settings This picture is only for reference 2 By default TimeShift performs recording of the TV program by creating a temporary video file and deletes this file once you click the Stop button If yo...

Страница 41: ...n release the mouse button 3 You can also click the Backward button to move backward in fixed intervals until you reach the part where you left off 4 To advance forward and skip some parts of the reco...

Страница 42: ...move backward in intervals 2 Playback Seek Drag the slider tab to move to any part of the recorded file 3 Volume Drag your mouse up down to increase decrease the volume level 4 Mute Turn off the sound...

Страница 43: ...el Note To hide the sound of the TV program when recording click the Mute button on the Control Panel 7 3 Using the Recording Function To record a TV Radio program that you want do the following 1 Cli...

Страница 44: ...ight corner Bottom left Corner Display the PIP window on the bottom left corner Bottom right Corner Display the PIP window on the bottom right corner Movable Resize the PIP window and separate it from...

Страница 45: ...Panel The Album will then appear displaying thumbnails of the captured image BUTTON 1 Wallpaper 2 Save as 3 Remove 4 Remove All To capture another image click the Snapshot button on the Control Panel...

Страница 46: ...ge Then specify a file name for saving the captured image 5 Choose the image size In the Size section select the Standard option and choose a desirable image size from the drop down list If you want t...

Страница 47: ...Pictures box specify the number of images you want to capture 3 In the Interval Time box specify the interval between captures For instance if you specify 10 seconds an image will be captured every 10...

Страница 48: ...vailable if there is no such service provided in your area 9 1 Teletext 9 1 1 Customize the Display Mode 1 Click the Setup button and in the setup dialog box click the Teletext icon in the left pane 2...

Страница 49: ...em 2 Toolbar It includes buttons that gives quick access to perform certain frequently used functions from the Menu Bar 3 Status Bar The status bar is located in the lower left corner of the window It...

Страница 50: ...n the history list The command is usable after one or more back steps in the history list TV Scale Changes the proportion of the Teletext window to 4 by 3 Always On Top Makes Teletext Window float ove...

Страница 51: ...numeric buttons of your keyboard or AVerMedia TV remote control y Press the positive or negative button to move to the succeeding or preceding teletext page Copying a Teletext Page 1 Simply click and...

Страница 52: ...and click OK Opening a Teletext Page 1 Choose Open from the File menu or press Ctrl O 2 From the Open dialog box select the file containing the teletext page you want and click OK Opening Another Tele...

Страница 53: ...Current Time 2 Selected Schedule The check box next to the Program column as shown at right indicates the schedule will be executed at a preset time Once the application starts to execute a scheduled...

Страница 54: ...e screen To immediately watch or listen to the TV Radio program which is being recorded just double click this icon 5 In the After Record Schemes it automatically switches to the selected power contro...

Страница 55: ...and time Choose Everyday to perform schedule everyday at a preset time 8 If you choose Activate AVerTV in step 4 click Insert to complete the settings If you choose Record or Silent Record you need t...

Страница 56: ...review Press to perform 16 Channel Preview function on your numeric keypad Volume Press to increase or decrease the volume level LEFT RIGHT ARROW Rewind Fast Forward Press to rewind or fast forward fo...

Страница 57: ...lease make sure that you have already connected to the Internet To contact the customer service 1 Right click on the TV monitor window When a menu list pop up choose About as shown at right 2 When a i...

Отзывы: