Avermedia AVerDiGi EXR6008 Скачать руководство пользователя страница 47


5.1 

Familiarizing the WebViewer Buttons 

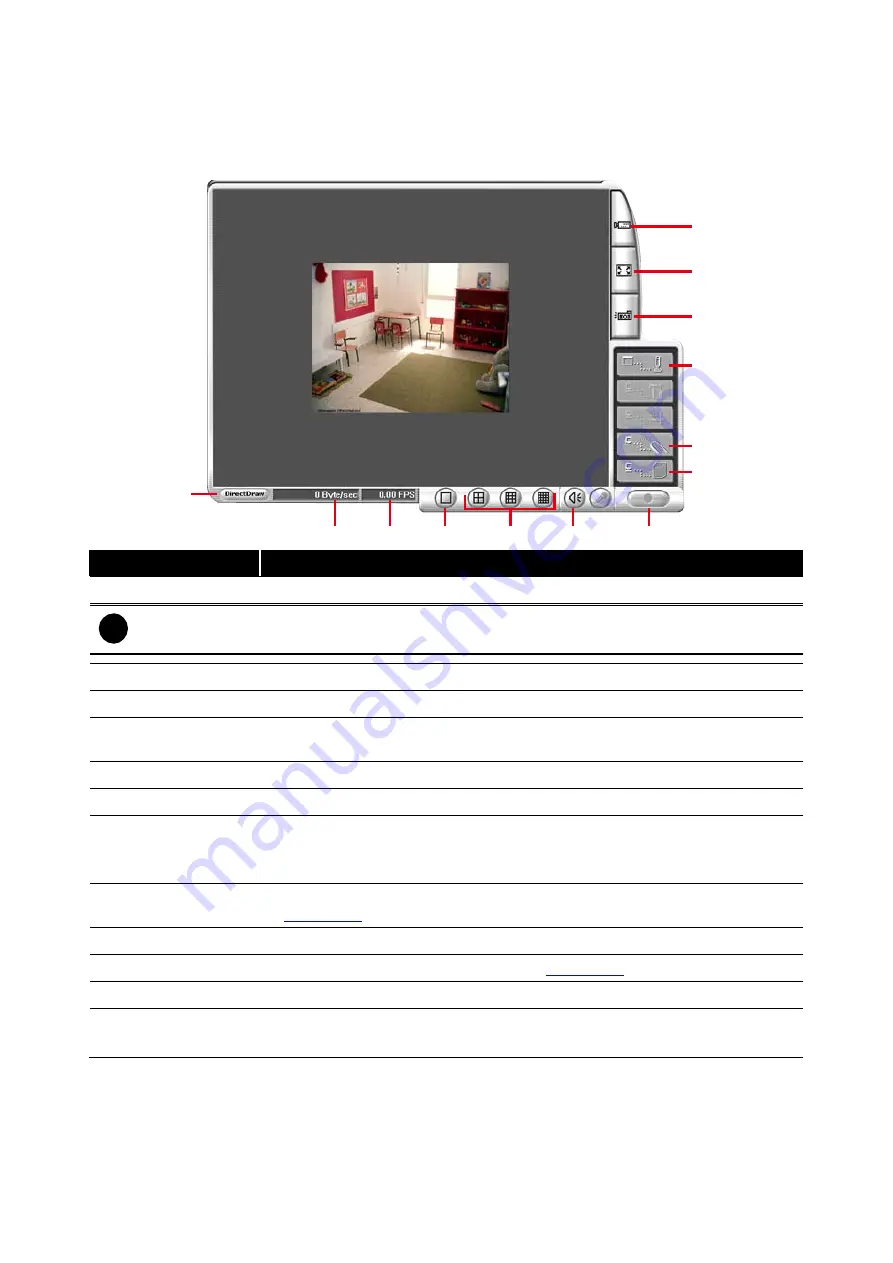
Right-clicking on the WebViewer video screen, enables you to start video recording, change video 

quality, switch camera and enable/disable DirectDraw.   

(1)

(2)

(3)

(4)

(5)

(6)

(7)

(8)

(9)

(10)

(11)

(12)

(13)


 Name 

Function 

(1) DirectDraw 

Enhance the video quality.   

i


Not all graphic cards can support this function. If you can not see the screen display correctly 
or screen is messed, please check with VGA card vendor. 


(2) Received file size 

Indicate the size of the data being sent per second. 

(3) Camera frames 

Indicate the number of frames per second. 

(4) One screen view 

To view single camera view on screen. User can right click on the screen to 
switch to different camera view. 

(5) Split screen view 

To view all cameras on screen simultaneously. 

(6) Audio 

Enable/disable remote sound. 

(7) Record 

Start to record the video of the selected camera in AVI format. Directly click 
screen to select the channel that user wants to record and press 

Record


button. 

(8) Remote Console 

Initiate Remote Console. It allows you to control DVR server (see also 

Chapter 5.2

). 

(9) Event Log Viewer 

Display the Event logs, Operation logs, System logs, and Network logs. 

(10) PTZ Control 

Initiate PTZ camera controller(see also 

Chapter 5.3

(11) Snapshot 

Capture and save the screen shot in *.bmp format. 

(12) Full screen 

Use the entire area of the screen to only display the video. 

To return, Right click the mouse or press ESC on the keyboard. 

42 

Содержание AVerDiGi EXR6008

Страница 1: ...AVerMedia AVerDiGi EXR6008 User Manual...

Страница 2: ...lied is made with respect to the contents of this documentation its quality performance merchantability or fitness for a particular purpose Information presented in this documentation has been careful...

Страница 3: ...IF THERE IS ANY DAMAGE SHORTAGE OR INAPPROPRIATE ITEM IN THE PACKAGE PLEASE CONTACT WITH YOUR LOCAL DEALER WARRANTY VOID FOR ANY UNAUTHORIZED PRODUCT MODIFICATION NOTICE INFORMATION IN THIS DOCUMENT I...

Страница 4: ...sing DVR Unit for First Time 14 2 2 Familiarizing the Buttons in Preview Mode 16 2 2 1 Familiarizing the Buttons in PTZ Camera Controller 17 2 2 2 Using Event Log Viewer 18 2 3 Familiarizing the Butto...

Страница 5: ...ote Playback 46 5 4 1 Familiarizing the Local Playback Buttons 48 5 4 1 1 To Cut and Save the Wanted Portion of the Recorded Video 49 5 4 2 Familiarizing the RealTime Playback Buttons 50 5 4 3 Familia...

Страница 6: ...UP to 2 MegaPixel IP camera supported Gigabit LAN supported TV and VGA output supported Front panel LCD display supported 8 Sensor in and 8 Relay out supported Hot key on remote controller for auto sa...

Страница 7: ...ex USB pen drive external hard disk keyboard mouse and so on 2 IR Sensor Receive signal from the remote control to operate the DVR unit 3 IR Sensor port For extended IR sensor cable optional 4 Power O...

Страница 8: ...ack To reverse playback To play the recorded video 10 To start recording video 11 To enable network connection 12 To reset alarm status 13 Cancel a selection In PTZ mode To move PTZ camera lens to lef...

Страница 9: ...amera Adjust the PTZ camera lens to the position that user wants and then press number button 1 8 to save the preset position see also Chapter 2 1 3 2 When the PTZ camera in PTZ mode press preset posi...

Страница 10: ...itch to select the video output Make sure to set the video output before turning on the unit VGA DVR output the video to a LCD monitor or a CRT monitor TV NTSC DVR output the video to a TV and video s...

Страница 11: ...ity of the hard disk function or its compatibility In no event AVerMedia shall be liable for damages with respect to any business interruption of clients lost profits loss of programs or other data on...

Страница 12: ...disk drawer over and screw hard disk with screws 7 And then close the removable hard disk drawer cover 8 Slide the drawer back 9 Lock the removable hard disk drawer keylock 10 Power on the removable h...

Страница 13: ...stall the hard disk 1 Loosen all screws and push the cover backward and lift 2 Loosen the screws of holder in order to take out the hard disk rack 3 Take out the hard disk rack from DVR unit and slide...

Страница 14: ...7 Plug anther side of SATA cable into hard disk 8 Screw tight the hard disk rack inside the DVR unit 9 Push the cover forward and secure the cover 9...

Страница 15: ...use IR Sensor Extend Cable Optional DVR Remote Controller RM AJ 2 FN I D 16 2 3 1 4 13 14 15 5 6 8 7 9 10 11 12 ENTE R M ENU RECOR D AUT OSC AN P T Z PRESET ZOOM REW PLAY PAUS E FF A B A B ZO O M _ FO...

Страница 16: ...Sensor 7 signal G Sensor 3 ground G Sensor 7 ground 4 Sensor 4 signal 8 Sensor 8 signal G Sensor 4 ground G Sensor 8 ground 1 6 2 Relay Pin Definition Relay Pin Definition Relay Pin Definition C1 Rel...

Страница 17: ...e PTZ camera lens to the left To move the selection to the right 7 To move the PTZ camera lens to the right To zoom in view of PTZ camera 8 To zoom out view of PTZ camera To speed up movement of PTZ c...

Страница 18: ...nd full screen see also Chapter 1 7 16 A functional key for different function control Press and function button to enable functions and press again to exit Switch to single screen display mode Switch...

Страница 19: ...s as same as remote control i For the first time using DVR unit using mouse and keyboard to setup all configurations 2 1 1 Using DVR Unit for First Time 1 Connect the mouse and keyboard to DVR unit th...

Страница 20: ...w steps to setup date and time a Click Setup and enter the password b In Time section click Setting button of System Time c Select the date and adjust the time and then click OK 7 Connecting the IP ca...

Страница 21: ...rea you want to enlarge When you are in single and full screen mode partial enlarges does not support 3 Record Start stop video recording 4 Network Enable disable remote system access This feature all...

Страница 22: ...ontroller 1 11 2 3 4 5 6 7 8 9 10 Name Function 1 Close Exit PTZ camera controller 2 Setup Configure PTZ cameras 3 AutoPan Operate the PTZ cameras automatically based on the selected camera group pres...

Страница 23: ...n interface The Event log viewer window will show up 2 Select the Date to view 3 To filter the records select and click the select button to display Event System Operation Network or All 4 Use the scr...

Страница 24: ...the time in 24 hour clock The blue bar on top of the hour button indicates that there is a recorded video file on that period of time While the red bar indicates that you are currently viewing the re...

Страница 25: ...Capture and save the screen shot in jpg format 11 Full screen View in full screen To return press the right button of the mouse or ESC on the keyboard or click the arrow icon When you switch to full...

Страница 26: ...t without saving 1 2 3 4 5 6 7 8 9 10 11 1 Storage Path Set the directory on where to save the data In case you have more than one storage path the system automatically saves the data to the next stor...

Страница 27: ...Playback Mode Select the mode of playback the video Select date and time Select the date and time which user wants to playback Play the last file Automatically playback the video from the last hour In...

Страница 28: ...e For example if the time zone is in U S Eastern the time offset is 1 hour 11 Firmware Upgrading the firmware of DVR system 1 Click Update button a Firmware Upgrade windows will show up 2 The local si...

Страница 29: ...uggest disabling it so that the system won t detect it as video loss error 3 Camera Display Enable disable to show the video Even if the video of the selected camera is hidden you can still record the...

Страница 30: ...esolution and Channel of the IP camera 4 Enter IP address and connecting port in IP Camera Site column 5 Also user can enter URL of IP camera instead of IP address 6 If the IP camera has authority req...

Страница 31: ...ule button and select the Recording Mode and then click on the time or day blocks When the system starts recording a red triangle mark would appear at the upper left corner of the screen The recording...

Страница 32: ...g DVR server from the remote location via internet Click Setting to setup DVR IP Static IP Assigns a constant IP address for the DVR system IP Address Assign a constant IP address which a real IP addr...

Страница 33: ...Upgrade Configuration A port is using for the remote firmware upgrade through network 5 WebViewer Configuration Activate Enable Anonymous Login to remotely access the DVR server without the need of p...

Страница 34: ...ideo You can playback the backup files using QPlayer applications on the PC When you back up the recorded file QPlayer applications are automatically included in the backup folder With QPlayer it is t...

Страница 35: ...on that period of time While the red colored column indicates on where to start playing the recorded video file 6 Open Access the backup video file 7 Status bar Display the recorded date time and play...

Страница 36: ...2 if it captures lots of movement Click the arrow icon to escape from full screen display mode 17 Watermark DVR supports watermark checking to identify the authenticity of playback video DVR program c...

Страница 37: ...searching The video search would stop at the frame that matches the condition To keep on searching click You may also set to search and list all the result Just check the List box In the Search Durati...

Страница 38: ...number 2 Enter relay name in Name column 3 The system automatically detects the card and input number In the Content section enter Description of relay 4 In the test section click Test to trigger rel...

Страница 39: ...all conditions 5 In 4 Camera section select and click on the camera number 01 to 08 in Motion Detected and Video Loss to set the condition for the system to alarm 6 In 5 Sensor select and click on the...

Страница 40: ...e Relay Output check box click Detail 2 In the Alarm Relay dialog box select from the available relay list and in the ON column set to enable disable the relay operation when the alarm is activated 3...

Страница 41: ...ras 3 In the Frame Rate selection select As Setting to record the number of frames based on the Recording Setting 4 In the Start Record prior text box mark and set the number in second for the program...

Страница 42: ...d video to CMS when the alarm is activated Beside the Send to CMS check box click Detail In the CMS Setting select the camera to enable disable sending the video to CMS Enable All to select all camera...

Страница 43: ...38 3 9 User Setup Only superuser can access User Setting and change the password of SuperUser and User Click OK to exit and accept the setting and Cancel to exit without saving the setting...

Страница 44: ...of the video file Previous Go back to the previous frame Rewind Wind back the video file Pause Temporary stop playing the video file Play Play the video file Faster Play the video file at the speed o...

Страница 45: ...u may move the bar to seek at any location of the track 20 iStable To reduce the jolt in the recorded video also see Chapter 7 1 21 Add Setting Include the new setting to the temporary setting block 2...

Страница 46: ...d be able to connect and login afterwards For Windows 2000 click Yes when the Security Warning dialog box appears For Windows XP click Install when the Internet Explorer Security Warning dialog box ap...

Страница 47: ...on screen User can right click on the screen to switch to different camera view 5 Split screen view To view all cameras on screen simultaneously 6 Audio Enable disable remote sound 7 Record Start to...

Страница 48: ...o enable disable viewing the camera Click Add Server and select the server type between DVR and IP Cam to add Click Delete Server to delete the selected item Click Import to load the previous saved li...

Страница 49: ...er from a remote location via internet connection 7 Setup Configure the Remote Console setting see also Chapter 5 2 1 8 PTZ Access PTZ control panel EXR supports IP camera PTZ function see Chapter 5 3...

Страница 50: ...Delete Enable network storage Select the Enable network storage check box to send the recorded video in network attached storage i To add network storage the Internet storage drive folder must be map...

Страница 51: ...s manually to produce clear image 5 Camera preset position number Move the PTZ camera to the preset point The reset point 1 9 is based on the user has setup by remote control at local site 5 4 Using t...

Страница 52: ...e blue block to select and open the recorded file The blue block turns red when it is selected The block that appears in white doesn t have data You can only select one block when you choose Download...

Страница 53: ...ata within the hour there will be no color bar on top of the hour button While the red bar indicates that you are currently viewing the recorded video file 4 Playback Control Buttons Begin Move at the...

Страница 54: ...ayback compact mode To return press the right button of the mouse or ESC on the keyboard 5 4 1 1 To Cut and Save the Wanted Portion of the Recorded Video 1 Use the Playback Control buttons or drag the...

Страница 55: ...s frame Slower Play the recorded video file at the speed of 1 2x 1 4x or 1 8x Rewind Wind back the recorded video file Pause Briefly stop playing the recorded video file Play Play the recorded video f...

Страница 56: ...me frame i The Hour buttons represent the time in 24 hour clock The blue bar on top of the hour button indicates that there is a recorded video file on that period of time While the red bar indicates...

Страница 57: ...lip 1 Use the Playback Control buttons or drag the bar on the playback progress bar and pause on where you want to start the cut Then click Segment to set the begin mark 2 Use the Playback Control but...

Страница 58: ...to access the following dialog First input the MAC address of your DVR system as CD Key number and select the product name The CD Key of MAC address input format shall be 12 digits without colon or hy...

Страница 59: ...ervice Port The following table shows the ports that DVR server uses for certain network service Port Variable Remote Console 5550 Y WebViewer 80 Y CM3000 80 Y Firmware Update 5005 Y DVR DDNS Upload D...

Страница 60: ...ction keys and descriptions Function Keys Description Q Exit System F1 Display system information F2 Start recording F3 Enable network function F4 Access system settings F5 Switch to playback mode F7...

Страница 61: ...ith product 4 AVerMedia does not warrant that this product will meet your requirements it is your responsibility to determine the suitability of this product for your purpose WHAT WE WILL AND WILL NOT...

Отзывы: