background image


See photographs on page 6 


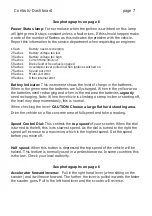
Power Status lamp: 

For normal use when the ignition is switched on this lamp 

will light green. It stays constant unless a fault arises. If this should happen make 
a note of the number of flashes as this indicates the problem with the vehicle. 
Report this information to the service department when requesting an engineer. 
 

1 flash  

Battery needs recharging 

2 flashes 

Battery voltage too low 

3 flashes 

Battery voltage too high 

4 flashes 

Current time limit out 

5 flashes 

Brake fault or freewheel engaged 

6 flashes 

Accelerator lever pulled in when ignition switched on 

7 flashes 

Speed pot error 

8 flashes 

Motor volt error 

9 flashes 

Other internal error  


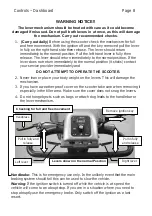
Battery Indicator: 

This instrument shows the level of charge in the batteries. 

When in the green area the batteries are fully charged. When in the yellow area 
the batteries need recharging and when in the red area the batteries 

urgently


need recharging. Note: When the vehicle is climbing a steep incline or starting off, 
the level may drop momentarily, this is normal. 

When checking the level- 

CAUTION: Choose a large flat hard standing area.


Drive the vehicle on a flat concrete area at full speed and take a reading.   


Speed Control Dial: 

This controls the 

top speed

 of your scooter. When the dial 

is turned to the left, this is its slowest speed. As the dial is turned to the right the 
speed will increase to a maximum, which is the highest speed. Set the speed 
before you move off.  


Half speed: 

When this button is depressed the top speed of the vehicle will be 

halved. This feature is normally used in a pedestrian area. In some countries this 
is the law. Check your local authority.


See photographs on page 6  

Accelerator forward/reverse:  

Pull in the right hand lever (when sitting on the 

scooter) and it will move forward. The further the lever is pulled inwards the faster 
the scooter goes. Pull in the left hand lever and the scooter will reverse.  


           Controls- Dashboard 


         page 7 

Содержание Quingo CLASSIC

Страница 1: ...7 Stadium Way Cradock Road Industrial Estate Luton Bedfordshire LU4 0JF United Kingdom www quingo co com WHILE THE INFORMATION CONTAINED IN THIS BROCHURE IS CORRECT AT THE TIME OF PRINTING ADVANCED V...

Страница 2: ...nformation within this document If any information is not clear contact your service provider immediately This Document must remain with the vehicle throughout its life Product Model Number Serial Num...

Страница 3: ...r 11 Freewheel Device Quingo Quingo 12 Freewheel Device Quingo Sport 13 Anti Tip Devices 14 Quingo Adjustments 15 Seating Tiller adjustments 16 to 19 Transporting the Classic Plus 20 to 23 Transportin...

Страница 4: ...imensions should be checked before purchase The Quingo Classic and Quingo Plus are intended for indoor outdoor use the Sport for outdoor use only The Quingo Classic is rated 4mph for pavement use and...

Страница 5: ...uct Charging procedure The driver to be given a copy of the handbook Before the additional driver is allowed on their own check they are capable physically and mentally to drive the vehicle safely 201...

Страница 6: ...by law and your scooter has been tested to the required level For a full technical explanation see Page 31 in this document WARNING Even though your vehicle meets the requirements it is recommended t...

Страница 7: ...Quick Reference Page 5 Tiller Basket QSS Quintell Stabilising System Rear Cover Footrest Lights Indicators Headrest Armrest Seat Adjustments...

Страница 8: ...with the controls Do not attempt to drive the vehicle before reading the rest of this Handbook Power status lamp see flash codes page 7 Battery level indicator Speed control Emergency Handbrake Horn L...

Страница 9: ...when in the red area the batteries urgently need recharging Note When the vehicle is climbing a steep incline or starting off the level may drop momentarily this is normal When checking the level CAUT...

Страница 10: ...Never lean or place your body weight on the levers This will damage the mechanism 3 If you have a weather proof cover on the scooter take care when removing it especially in the tiller area Make sure...

Страница 11: ...tically switch off when the ignition switch is in the off position Horn Press the button and the horn will sound Ignition Switch Always remember to remove key when not in use Do not leave the ignition...

Страница 12: ...o the Quingo Classic and Quingo Plus Pages 20 21 show the seat and battery removal for the Sport These components are very heavy and should only removed or replaced by a competent person Quingo Sport...

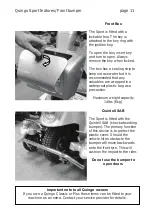
Страница 13: ...oof plastic bag as a precaution Maximum weight capacity 14lbs 6kg Quintell SAB The Sport is fitted with the Quintell SAB shock absorbing bumper The primary function of this device is to protect the pl...

Страница 14: ...d stops the scooter rolling forward or backward The third is the regenerative brake This works when you release the accelerator lever The faster you release the lever the faster the machine slows down...

Страница 15: ...The second is the electromagnetic brake or Automatic handbrake When you move off this releases automatically When the scooter stops it engages automatically and stops the scooter rolling forward or ba...

Страница 16: ...d tip backwards the castor wheels will restrict the angle of the vehicle TYPE B Type B has a patented feature that engages the 2 wheels when descending a slope or kerb Should the anti tip wheels come...

Страница 17: ...tiller to suit This places the weight forward which aids comfort to the rider and enhances stability especially when going uphill The person shown has assumed the correct seating position as shown in...

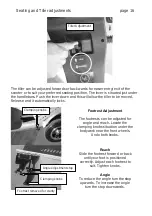
Страница 18: ...omatically locks Tiller Adjustment Footrest Adjustment The footrests can be adjusted for angle and reach Locate the clamping knobs situation under the bodywork near the front wheels Undo both knobs Re...

Страница 19: ...height of the armrest undo clamp knob raise or lower the armrest to suit Check daily for tightness To adjust width undo clamp knob and pull each armrest outwards or inwards to suit width To remove arm...

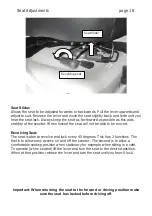
Страница 20: ...Revolving Seat The seat is able to revolve and lock every 45 degrees This has 2 functions The first is to allow easy access on and off the scooter The second is to allow a comfortable seating position...

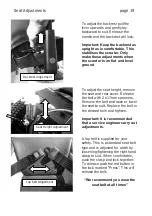
Страница 21: ...height remove the seat and rear cover Release the bolt with 2 x 17mm spanners Remove the bolt and raise or lower the seat to suit Replace the bolt in the desired hole and tighten Important It is reco...

Страница 22: ...he tiller Check the opening of the car is large enough to take the height of the vehicle Transporting the Quingo Classic Plus page 20 Remove basket pull upwards Use the backrest adjustment lever to Th...

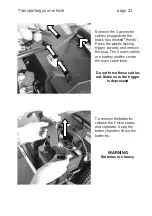
Страница 23: ...tic locking trigger inwards and remove the plug The 2 outer cables are battery and the centre the main cable loom Do not force these cables out Make sure the trigger is depressed To remove the batteri...

Страница 24: ...unting WARNING When assembling the scooter do not forget to reconnect this component and test before replacing the rear cover Rear Brake only Cable nipple Release lever Cable nipple Please note that t...

Страница 25: ...ling the frames WARNING Make sure this pin is fully inserted after assembly To separate the frames hold the seat stem with one hand and push the rear frame back Lift the front frame from the location...

Страница 26: ...n loading any vehicle using an approved set of vehicle ramps Ask your service provider for details and how to load the vehicle safely Transporting the Quingo Sport page 24 Remove mirrors 39 100cm 35 8...

Страница 27: ...to the battery Top socket on Sport Once the charger is connected switch on the mains The power on light illuminates red when switched on The charger lamp starts yellow changes to green when charged c...

Страница 28: ...Do not leave the charger switched off with the plug connected to the vehicle This will discharge the batteries to zero 6 Charge the batteries in a well ventilated area 7 Do not charge the batteries in...

Страница 29: ...We do not recommend the vehicle is used on this type of road but if it is essential the beacon must be fitted Ask your service provider for details This is not a requirement for other roads or pavemen...

Страница 30: ...Front basket is secure 10 Accelerates and brakes correctly Important Possible faults reporting them to your service provider As you get used to your vehicle you will get a feel for how it behaves If...

Страница 31: ...le judder or cut out Short Range Check If the red charging lamp stays on after all night charging it may be a defective or worn out battery Incorrect charging Solution Freewheel is engaged Batteries f...

Страница 32: ...ers The product is designed for single person use only Keep all packaging well away from children Disposal The equipment wrapping is potentially recyclable The metal parts should be used for scrap met...

Страница 33: ...ess weight Do not modify the vehicle as this will render your warranty void Make sure the battery charger is disconnected Make sure you have adjusted the seat as instructed in this manual get comforta...

Страница 34: ...the vehicle will cut out leaving you stranded Lean back when going downhill turn the speed control dial to low Do not drive across a slope at an angle always drive straight up and down the slope NEVER...

Страница 35: ...canopies can affect the handling of the vehicle in strong winds See page 27 How long will my batteries last and what range can I expect This is a very difficult question and not one that has a straigh...

Страница 36: ...free of charge Batteries found to be damaged due to incorrect charging or maintenance will not be covered by the warranty 5 To apply the warranty conditions should your vehicle require attention unde...

Страница 37: ...or damage Make sure you understand what you are covered for Before you book an engineer for a possible fault make sure there is a legitimate problem If the engineer does not find anything wrong you wi...

Страница 38: ...y Electromagnetic brake operation Freewheel operation Frame for damage or cracks General corrosion All operational controls work correctly Battery condition and charger operation Tighten all nuts bolt...

Страница 39: ...nal repair or service work 1st service Engineers Name Engineers Signature 2nd service Engineers Name Engineers Signature 3rd service Engineers Name Engineers Signature 5th service Engineers Name Engin...

Страница 40: ...able and useful immunity level against interference from radio wave sources the higher the immunity level the greater protection Your scooter has been tested and found to meet the required immunity le...

Страница 41: ...ootplate Note on Range The above range figures are theoretical produced in accordance with ISO 7176 4 ISO 7176 4 specifies a method for determining the theoretical distance range of electrically power...

Страница 42: ...ifies a method for determining the theoretical distance range of electrically powered wheelchairs and scooters by measuring energy consumed over a specified distance It is applicable to electrically p...

Страница 43: ...7 Stadium Way Cradock Road Industrial Estate Luton Bedfordshire LU4 0JF United Kingdom www quingo co com WHILE THE INFORMATION CONTAINED IN THIS BROCHURE IS CORRECT AT THE TIME OF PRINTING ADVANCED V...

Отзывы: