background image

©

 2014 Avaya Inc.

All Rights Reserved.

Notice

While reasonable efforts have been made to ensure that the

information in this document is complete and accurate at the time of

printing, Avaya assumes no liability for any errors. Avaya reserves

the right to make changes and corrections to the information in this

document without the obligation to notify any person or organization

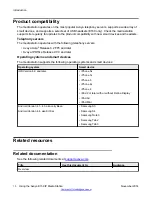
of such changes.

Documentation disclaimer

“Documentation” means information published by Avaya in varying

mediums which may include product information, operating

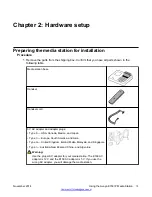
instructions and performance specifications that Avaya may generally

make available to users of its products and Hosted Services.

Documentation does not include marketing materials. Avaya shall not

be responsible for any modifications, additions, or deletions to the

original published version of documentation unless such

modifications, additions, or deletions were performed by Avaya. End

User agrees to indemnify and hold harmless Avaya, Avaya's agents,

servants and employees against all claims, lawsuits, demands and

judgments arising out of, or in connection with, subsequent

modifications, additions or deletions to this documentation, to the

extent made by End User.

Link disclaimer

Avaya is not responsible for the contents or reliability of any linked

websites referenced within this site or documentation provided by

Avaya. Avaya is not responsible for the accuracy of any information,

statement or content provided on these sites and does not

necessarily endorse the products, services, or information described

or offered within them. Avaya does not guarantee that these links will

work all the time and has no control over the availability of the linked

pages.

Warranty

Avaya provides a limited warranty on Avaya hardware and software.

Refer to your sales agreement to establish the terms of the limited

warranty. In addition, Avaya’s standard warranty language, as well as

information regarding support for this product while under warranty is

available to Avaya customers and other parties through the Avaya

Support website: 

http://support.avaya.com

 or such successor site as

designated by Avaya. Please note that if you acquired the product(s)

from an authorized Avaya Channel Partner outside of the United

States and Canada, the warranty is provided to you by said Avaya

Channel Partner and not by Avaya.

Licenses

THE SOFTWARE LICENSE TERMS AVAILABLE ON THE AVAYA

WEBSITE, 

HTTP://SUPPORT.AVAYA.COM/LICENSEINFO

 OR

SUCH SUCCESSOR SITE AS DESIGNATED BY AVAYA, ARE

APPLICABLE TO ANYONE WHO DOWNLOADS, USES AND/OR

INSTALLS AVAYA SOFTWARE, PURCHASED FROM AVAYA INC.,

ANY AVAYA AFFILIATE, OR AN AVAYA CHANNEL PARTNER (AS

APPLICABLE) UNDER A COMMERCIAL AGREEMENT WITH

AVAYA OR AN AVAYA CHANNEL PARTNER. UNLESS

OTHERWISE AGREED TO BY AVAYA IN WRITING, AVAYA DOES

NOT EXTEND THIS LICENSE IF THE SOFTWARE WAS

OBTAINED FROM ANYONE OTHER THAN AVAYA, AN AVAYA

AFFILIATE OR AN AVAYA CHANNEL PARTNER; AVAYA

RESERVES THE RIGHT TO TAKE LEGAL ACTION AGAINST YOU

AND ANYONE ELSE USING OR SELLING THE SOFTWARE

WITHOUT A LICENSE. BY INSTALLING, DOWNLOADING OR

USING THE SOFTWARE, OR AUTHORIZING OTHERS TO DO SO,

YOU, ON BEHALF OF YOURSELF AND THE ENTITY FOR WHOM

YOU ARE INSTALLING, DOWNLOADING OR USING THE

SOFTWARE (HEREINAFTER REFERRED TO

INTERCHANGEABLY AS “YOU” AND “END USER”), AGREE TO

THESE TERMS AND CONDITIONS AND CREATE A BINDING

CONTRACT BETWEEN YOU AND AVAYA INC. OR THE

APPLICABLE AVAYA AFFILIATE (“AVAYA”).

Avaya grants you a license within the scope of the license types

described below, with the exception of Heritage Nortel Software, for

which the scope of the license is detailed below. Where the order

documentation does not expressly identify a license type, the

applicable license will be a Designated System License. The

applicable number of licenses and units of capacity for which the

license is granted will be one (1), unless a different number of

licenses or units of capacity is specified in the documentation or other

materials available to you. “Software” means Avaya’s computer

programs in object code, provided by Avaya or an Avaya Channel

Partner, whether as stand-alone products, pre-installed , or remotely

accessed on hardware products, and any upgrades, updates, bug

fixes, or modified versions thereto. “Designated Processor” means a

single stand-alone computing device. “Server” means a Designated

Processor that hosts a software application to be accessed by

multiple users. “Instance” means a single copy of the Software

executing at a particular time: (i) on one physical machine; or (ii) on

one deployed software virtual machine (“VM”) or similar deployment.

License types

Designated System(s) License (DS). End User may install and use

each copy or an Instance of the Software only on a number of

Designated Processors up to the number indicated in the order.

Avaya may require the Designated Processor(s) to be identified in

the order by type, serial number, feature key, Instance, location or

other specific designation, or to be provided by End User to Avaya

through electronic means established by Avaya specifically for this

purpose.

Concurrent User License (CU). End User may install and use the

Software on multiple Designated Processors or one or more Servers,

so long as only the licensed number of Units are accessing and using

the Software at any given time. A “Unit” means the unit on which

Avaya, at its sole discretion, bases the pricing of its licenses and can

be, without limitation, an agent, port or user, an e-mail or voice mail

account in the name of a person or corporate function (e.g.,

webmaster or helpdesk), or a directory entry in the administrative

database utilized by the Software that permits one user to interface

with the Software. Units may be linked to a specific, identified Server

or an Instance of the Software.

Copyright

Except where expressly stated otherwise, no use should be made of

materials on this site, the Documentation, Software, Hosted Service,

or hardware provided by Avaya. All content on this site, the

documentation, Hosted Service, and the Product provided by Avaya

including the selection, arrangement and design of the content is

owned either by Avaya or its licensors and is protected by copyright

and other intellectual property laws including the sui generis rights

relating to the protection of databases. You may not modify, copy,

reproduce, republish, upload, post, transmit or distribute in any way

any content, in whole or in part, including any code and software

unless expressly authorized by Avaya. Unauthorized reproduction,

transmission, dissemination, storage, and or use without the express

written consent of Avaya can be a criminal, as well as a civil offense

under the applicable law.

Third Party Components

“Third Party Components” mean certain software programs or

portions thereof included in the Software or Hosted Service may

contain software (including open source software) distributed under

third party agreements (“Third Party Components”), which contain

terms regarding the rights to use certain portions of the Software

(“Third Party Terms”). As required, information regarding distributed

Linux OS source code (for those Products that have distributed Linux

OS source code) and identifying the copyright holders of the Third

Party Components and the Third Party Terms that apply is available

in the Documentation or on Avaya’s website at: 

http://

support.avaya.com/Copyright

 or such successor site as designated

by Avaya. You agree to the Third Party Terms for any such Third

Party Components.

Note to Service Provider

The Product or Hosted Service may use Third Party Components

subject to Third Party Terms that do not allow hosting and require a

Service Provider to be independently licensed for such purpose. It is

your responsibility to obtain such licensing.

Preventing Toll Fraud

“Toll Fraud” is the unauthorized use of your telecommunications

system by an unauthorized party (for example, a person who is not a

corporate employee, agent, subcontractor, or is not working on your

company's behalf). Be aware that there can be a risk of Toll Fraud

associated with your system and that, if Toll Fraud occurs, it can

Содержание E159

Страница 1: ...Using the Avaya E159 IP Media Station Release 1 1 Compas 166810 November 2014 ...

Страница 2: ...tion or other materials available to you Software means Avaya s computer programs in object code provided by Avaya or an Avaya Channel Partner whether as stand alone products pre installed or remotely accessed on hardware products and any upgrades updates bug fixes or modified versions thereto Designated Processor means a single stand alone computing device Server means a Designated Processor that...

Страница 3: ...owing two conditions 1 This device may not cause interference and 2 This device must accept any interference including interference that may cause undesired operation of the device Le présent appareil est conforme aux CNR d Industrie Canada applicables aux appareils radio exempts de licence L exploitation est autorisée aux deux conditions suivantes 1 L appareil ne doit pas produire de brouillage e...

Страница 4: ...pter 3 Smart device and media station activation 21 Downloading the media station app 21 Connecting smart devices with Bluetooth pairing 21 Connecting the media station to a smart device as a USB accessory 22 Registering the media station app and signing in the first time 23 Media station registration 24 Adding or changing the voice mail telephone number 25 Chapter 4 Navigation 26 Displays 26 Disp...

Страница 5: ...sting the volume while on a call 40 Muting and unmuting the microphone 41 Listening to music from the smart device 41 Control of the audio stream 41 Transferring the audio output between the media station and a smart device 42 Signing into the app 43 Signing out from the app 44 Chapter 6 Maintenance 45 Updating the media station app 45 Removing and replacing a cable sleeve 45 Chapter 7 Troubleshoo...

Страница 6: ...cribes how to use product features and capabilities Intended audience This document is intended for people who want to learn how to use product features and capabilities 6 Using the Avaya E159 IP Media Station November 2014 Comments infodev avaya com ...

Страница 7: ...ide options to hold calls make or receive second calls transfer calls and set up a three way conference call A charging station for your smart device A Bluetooth enabled speakerphone The capability to make calls through a SIP line or through the smart device cellular network Gigabit Ethernet connectivity with an internal switch for connecting a PC through the media station The Avaya E159 IP Media ...

Страница 8: ...at are compatible with sockets used in several countries and regions With this power arrangement you can charge your smart devices when you connect your devices to the media station Smart devices charge more quickly when using the media station AC adapter than when using only PoE Note Some smart devices require more charging power than the media station provides Your smart device might charge slow...

Страница 9: ...th the media station Avaya recommends that you disable Avaya EC500 If you do not disable Avaya EC500 the following might occur You receive a SIP call on the media station at the same time you receive a cellular network call on your smartphone If you try to answer the SIP call by pressing the Call Volume button or picking up the handset you connect to the cellular network call This interaction occu...

Страница 10: ... later Operating systems and smart devices The media station supports the following operating systems and smart devices Operating system Smart device iOS Version 6 0 and later iPhone 5s iPhone 5c iPhone 5 iPhone 4s iPhone 4 iPad 2 or later with or without Retina Display iPad Air iPad Mini Android Version 4 1 4 3 aka Jelly Bean Android Version 4 4 aka Kit Kat Samsung S3 Samsung S4 Samsung Note 3 Sa...

Страница 11: ...os Avaya Mentor videos provide technical content on how to install configure and troubleshoot Avaya products About this task Videos are available on the Avaya Support website listed under the video document type and on the Avaya run channel on YouTube Procedure To find videos on the Avaya Support website go to support avaya com and perform one of the following actions In Search type Avaya Mentor V...

Страница 12: ...nal injury if rubbed across your hand or face while using the handset Make sure that you keep small pieces of metal away from the handset Do not open the base handset or charger Ensure that no liquid comes into contact with the product Do not expose the device to excessive smoke dust mechanical vibration or shock Use only the cables adapters and batteries supplied Warning Use the proper AC adapter...

Страница 13: ... plugs Type A USA Canada Mexico and Japan Type C Europe South America and Asia Type G United Kingdom Ireland Malta Malaysia and Singapore Type I Australia New Zealand China and Argentina Warning Use the proper AC adapter for your media station The E169 AC adapter is 12 V and the E159 AC adapter is 5 V If you use the wrong AC adapter you will damage the media station November 2014 Using the Avaya E...

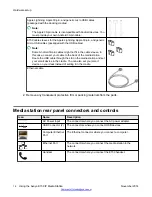
Страница 14: ... your smart device in the cradle You can also set your smart device on your desk instead of setting it in the cradle Ethernet cable 2 Remove any transparent protective film or packing materials from the parts Media station rear panel connectors and controls Icon Name Description AC Power Input The connector where you connect the AC power adapter USB Connector 2 The connectors where you connect USB...

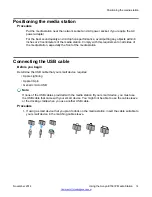
Страница 15: ...begin Determine the USB cable that your smart device requires Apple Lightning Apple 30 pin Generic micro USB Note If none of the USB cables provided with the media station fit your smart device you must use the USB cable that came with your smart device You might not be able to use the cable sleeve or the docking cradle when you use another USB cable Procedure 1 If using a smart device that you pl...

Страница 16: ...mart device 3 Slide the rear portion of cradle to widen the space for the cable sleeve Route the USB end of the cable through the slot inserting the cable sleeve into the slot Hardware setup 16 Using the Avaya E159 IP Media Station November 2014 Comments infodev avaya com ...

Страница 17: ...tion Connecting the handset Procedure 1 Plug one end of the handset cord into the handset 2 Plug one other end of the handset cord into the RJ11 port under the base Connecting the handset November 2014 Using the Avaya E159 IP Media Station 17 Comments infodev avaya com ...

Страница 18: ... into the computer connector at the back of the media station Plug the other end into the Ethernet connector on your PC This connection provides a convenient way to connect your computer to your network You can view network connectivity status using the app under Avaya Media Station Network Connecting to AC power About this task This task is optional if you install the media station on a PoE netwo...

Страница 19: ...ear of the media station and into a wall mount socket Connecting a smart device Procedure 1 Route the USB network and AC power cables under the media station Connecting a smart device November 2014 Using the Avaya E159 IP Media Station 19 Comments infodev avaya com ...

Страница 20: ...d your smart device securely If the media station app is installed on the smart device the app opens when you dock the smart device Otherwise the smart device starts charging Hardware setup 20 Using the Avaya E159 IP Media Station November 2014 Comments infodev avaya com ...

Страница 21: ...Media Station app 4 Tap FREE The icon changes to INSTALL 5 Tap INSTALL The media station app downloads and installs on your smart device Connecting smart devices with Bluetooth pairing Before you begin Download and install the media station app as described in Downloading the media station app on page 21 About this task You must pair the smart device with the media station to create a logical conn...

Страница 22: ... device and the media station app opens You hear a beep and the Bluetooth icon on the smart device shows an active connection 2 On an Android device perform the following steps a Put the media station into pairing mode by pressing and holding the Call Volume button on the media station until you hear a single click After you release the button the media station plays the message Pairing mode waiti...

Страница 23: ...ble The smart device displays a dialog box asking if you want to remember the media station as a USB accessory b Tap the check box to remember the media station and tap OK The smart device displays a dialog box asking if you want to open the media station app when connected to the media station c Tap the check box to always open the media station app and tap OK The media station app opens Register...

Страница 24: ...istration When you sign in with the media station app the media station remains logged on until one of the following happens You sign out of the media station app and the media station unregistration timer expires if administered Important Even if you sign out of the media station app the media station continues to ring on incoming mobile cellular calls The media station is also the default Blueto...

Страница 25: ...es The media station displays the emergency menu on the USB handset Adding or changing the voice mail telephone number Before you begin Ask your system administrator whether you must administer this option About this task The Voice Mail button on the media station only works when the media station is registered Procedure 1 From the media station app tap Settings Account Setup 2 Tap the account nam...

Страница 26: ...se the Call Volume button to scroll through your most recent calls When you make or receive a call the display shows Whether the call is incoming or outgoing The dialed or originating number of the call if available If a name or number is not available the display shows Anonymous If the dialed or originating number is internal to the telephony server the display alternates between the persons name...

Страница 27: ...r unless the caller has privacy enabled Calls outside the telephony server network display the name and the telephone number only if the telephone number is a contact in the smart device Icons Media station app control button descriptions Icon Name Description Favorites Displays your favorite contacts Home iOS Recent calls Android Displays your three most recent calls Call history Displays your fu...

Страница 28: ... mail telephone number The icon lights to indicate that you have new messages Note The LED turns off when you go off hook The following keypad digits control feature menus you can use while on active calls or when calls are ringing at the media station The feature menus are shown on the media station display after you press the Voice Mail button Once the menu is open use the keypad digits shown to...

Страница 29: ...y Description End active call Decline incoming call Merge calls 4 End current call and accept second call End active call when on two active calls 6 End all calls Icons November 2014 Using the Avaya E159 IP Media Station 29 Comments infodev avaya com ...

Страница 30: ... where you can select Call or Call using Cellular to make the call The Call option makes the call over your SIP line The Call using Cellular option makes the call over your wireless carrier s mobile service Note When using a smart device that does not have cellular service the media station makes the call over your SIP line c Tap the call option that you want to use The media station makes the cal...

Страница 31: ...ion makes the call over your SIP line The Call using Cellular option makes the call over your wireless carrier s mobile service Note When using Contacts on an iOS smart phone if you tap the telephone icon instead of the number the smart phone makes the call over your wireless carrier s mobile service Note When using a smart device that does not have cellular service the media station makes the cal...

Страница 32: ...ing a call from your cellular network Ending a call Procedure Perform one of the following actions Press the hang up button on the smart device In handset mode replace the handset on the handset cradle In speakerphone mode press the Call Volume button Press the Voice Mail button followed by keypad digit 3 Making a second call Procedure 1 While on an active call tap add call on the media station ap...

Страница 33: ... dialed 3 After connecting with the second caller you can perform any of the following actions From the media station app tap swap to switch between your two calls While switching between calls you can drop the active call by tapping End From the media station app tap merge to create a conference call From the media station base do any of the following using the Voice Mail button and the keypad di...

Страница 34: ...Call Answer on the media station app You hear the new call on the speakerphone or handset The current call is disconnected From the media station base perform any of the following actions using the Voice Mail button and the keypad digits Press Voice Mail 1 to hold the current call and answer the new call Press Voice Mail 3 to decline the new call Press Voice Mail 4 to end the current call and answ...

Страница 35: ...reating a conference call About this task You can create a conference call between two SIP calls but you cannot merge a SIP call with a mobile call You cannot use the keypad to dial the second number for a conference call Procedure Perform one of the following procedures While on an active call tap add call on the media station app Make a second call using the app dialpad call history or Contacts ...

Страница 36: ...ce Mail 1 The conference call splits and you are connected to one of the parties The display flashes the Pause icon to show which party is on hold b You can swap between the two calls by pressing Voice Mail 1 or press Voice Mail 3 to recreate the conference call Switching between two calls Procedure To move between two calls perform one of the following actions Tap swap on the app Press Voice Mail...

Страница 37: ... call by tapping the number that you want to call One contact might have several numbers Note When using Contacts on an iOS smart phone if you tap the telephone icon instead of the number the smart phone makes the call over your wireless carrier s mobile service Accessing contacts during a call Procedure 1 While on an active call tap Menu to display the call control screen 2 Tap Contacts The app d...

Страница 38: ... calls and cellular network calls Some smart devices also display a list of the three most recent calls See the following description about which devices display the three most recent calls Android devices All Android devices display the three most recent calls in the Home menu of the media station app iPhones The Home menu of the media station app can display the three most recent calls on iPhone...

Страница 39: ...l Press and hold the call entry that you want to call Choose Call to make the call over your SIP network or choose Call using Cellular to make the call over the cellular network of the smartphone On the media station perform the following actions a Press the Call Volume button b Turn the Call Volume button to step through your most recent calls c When the display shows the number you want to call ...

Страница 40: ...ntrols on the media station Ringtone Ring volume Alerts volume Music volume Hearing aid mode Adjusting the volume while on a call Procedure When the media station is ringing or when you are on a call turn the Call Volume button to regulate the volume The volume control icon shows the relative volume of the call On an iOS device the volume control also has a VU Meter function that represents speech...

Страница 41: ...ough the media station or the smartphone Review the following sections to understand how this works SIP calls You can only hear the audio for calls made to or answered from the telephony server on the media station handset or speakerphone If you make or answer a SIP call on a smartphone using the media station app you cannot hear the audio on the smartphone You can only hear the audio on the media...

Страница 42: ... media station the audio automatically transfers from your smartphone to the media station Transferring the audio output between the media station and a smart device While listening to music on a call or watching a video you can transfer audio from the media station to your smart device or from your smart device to the media station Important You cannot transfer the audio output of SIP calls About...

Страница 43: ...he media station The AirPlay control sometimes displays on streaming audio or video apps so you might need to control the transfer from the app On an Android device connected only by Bluetooth open Settings Bluetooth tap the Settings for the media station select the Media audio option and tap OK On an Android device connected by Bluetooth and a USB cable open Settings Bluetooth and turn on Bluetoo...

Страница 44: ...the active account 2 Tap the active account The app displays the basic parameters of the account 3 Tap Sign Out The app displays Offline Disconnected and the green check mark changes to a gray dot Operation 44 Using the Avaya E159 IP Media Station November 2014 Comments infodev avaya com ...

Страница 45: ...e Apple App store or the Google Play store 2 Search for avaya 3 Select the Avaya Media Station app 4 Tap UPDATE The icon changes to INSTALL 5 Tap INSTALL The media station app downloads and installs on your smart device Removing and replacing a cable sleeve Use this procedure to remove and replace a cable sleeve when you change the smartphone you are using Before you begin Disconnect your smartpho...

Страница 46: ...3 Push the cable sleeve out of the media station base 4 Replace the cable sleeve and USB cable Maintenance 46 Using the Avaya E159 IP Media Station November 2014 Comments infodev avaya com ...

Страница 47: ...mpatible with the media station See Product compatibility on page 10 Does the media station operate over a wireless Internet connection No the media station does not support wireless Internet connections How can I find my SIP user name and password Contact your Avaya telephony server administrator How do I make a Bluetooth connection See Connecting smart devices with Bluetooth pairing on page 21 C...

Страница 48: ...edia station app with Avaya apps such as Avaya one X Mobile and Avaya Communicator Avaya one X Mobile and Avaya Communicator do not have native support for managing the media station The apps can use the media station as a Bluetooth speakerphone In the speakerphone mode the media station operates as any other Bluetooth speakerphone The calls are not handled over the SIP line but the wireless carri...

Страница 49: ...necting followed by a high to low tone sound Removing subscriptions 3 Using the media station Call Volume button press and hold the Call Volume button until you hear three clicks The media station plays the message Clearing all subscriptions 4 Using the smart device perform the following actions a Select Settings Bluetooth b Tap the Info icon c Tap Forget this Device The system removes the Bluetoo...

Страница 50: ... Station Network 5 Confirm that the media station has an IP address If the app does not display an IP address you might have to reset the media station to factory defaults Contact your system administrator for support Related Links The media station app displays the Not Connected Network message on page 49 Troubleshooting 50 Using the Avaya E159 IP Media Station November 2014 Comments infodev avay...

Страница 51: ...ia station 15 19 connecting your network to the media station 18 contacts accessing during a call 37 displaying and calling a contact 37 control button descriptions 28 creating a conference call 35 D deleting call history 39 displaying recent calls 38 displaying a contact 37 display panel 26 documentation 10 downloading apps 21 E ending a call 32 F FAQs 47 features 7 forwarding a call 34 H handset...

Страница 52: ... connection 48 replace cable sleeve 45 ring tones 40 S safety guidelines 12 setting registration parameters 23 setting up SIP voice mail 25 signing in 24 signing out 24 43 44 SIP voice mail setting up 25 sounds 40 splitting a conference call 35 storage guidelines 12 support 12 swapping between calls 36 switching between calls 36 T temperature operating and storage 12 transferring a call 34 transfe...

Отзывы: