


16
Access Point 8120 installation
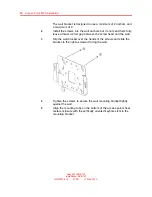
The wall bracket is designed to use a minimum of 2 anchors and
a maximum of 4.
2
Install the screws into the wall anchors but do not seat them fully,
leave at least a 2mm gap between the screw head and the wall.
3
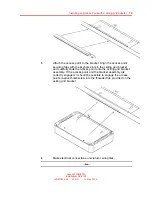
Slip the wall bracket over the heads of the screws and slide the
bracket to the right as viewed facing the wall.
4
Tighten the screws to secure the wall mounting bracket tightly
against the wall.
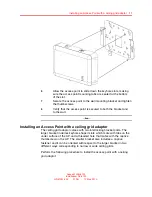
5
Align the mounting tabs on the bottom of the access point sheet
metal enclosure with the vertically oriented keyhole slots in the
mounting bracket.
Avaya WLAN 8100
Installation–AP 8120
NN47251-302
01.AD
10 May 2010
.
Содержание AP 8120
Страница 1: ...Avaya WLAN 8100 Installation AP 8120 Release 1 0 Document Revision 01 AD NN47251 302 ...
Страница 4: ... ...
Страница 20: ...20 Access Point 8120 installation Avaya WLAN 8100 Installation AP 8120 NN47251 302 01 AD 10 May 2010 ...
Страница 22: ...22 Installation tools and utilities Avaya WLAN 8100 Installation AP 8120 NN47251 302 01 AD 10 May 2010 ...