background image

18

Easy Slider - Sliding Gate Opener 

Owner Installation Instructions

Setting travel limits

�� �� � � � �
� � �

�� � � � � � � � �

�� � � �

17

fig

19

fig

20

fig

�� � �� � � �

� � �

� � � � � � � � � � �

�� �

�� � � �

�� �� � � � � � � �
�� � �

�� � � �� � �

�� � � �

18

fig

�� � � �� � �

��� � �

� � � � � � �� �

�� � � �

�� � � � � � �

� � �� � �

�� � � �

� � � � �

� ��

�� � � �

�� � � �

21

fig

Dual leaf gate

This section shows how to set the travel limits for 

a dual leaf gate installation. The procedure can be 

partly completed using a transmitter. In order to use a 

transmitter it must first have at least one of its buttons 

coded to the gate controller. The function assigned 

to the transmitter’s buttons during coding is of no 

concern here as the buttons are temporally assigned 

to OPEN, CLOSE and SET. 

NOTE:

 The limit setting 

procedure can be aborted at anytime by pressing EXIT. 

NOTE:


Gate should be moved manually to half open 

position. When re-engaging opener nudge gate until 

click is heard to confirm pinion gear has engaged fully. 

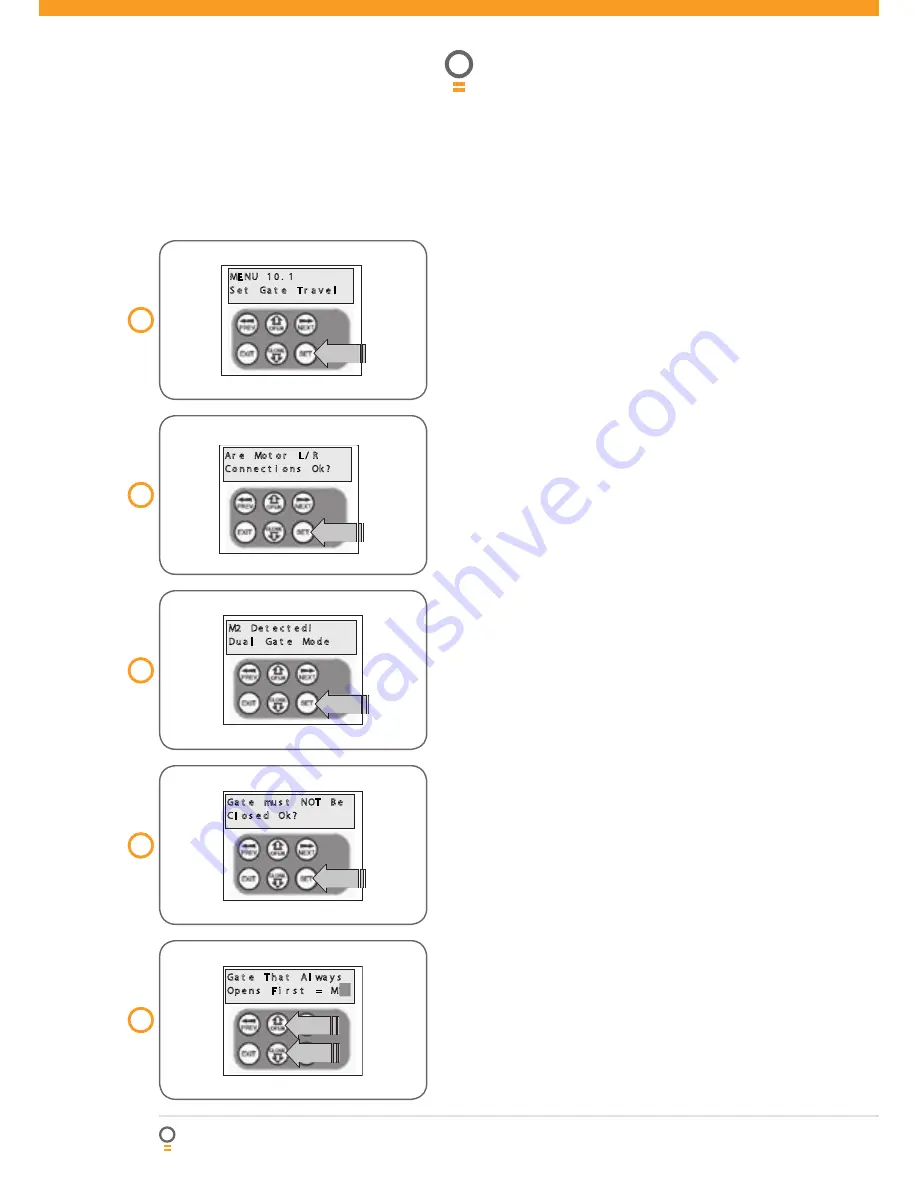
Step 1. Navigating to “set gate travel menu” 

1. Press PREV to navigate to the Menu 10 

(Fig. 17)

2. Press SET to display MENU 10.1. 

3. Press SET again to enter the limit setting procedure. 

Step 2. Setting the left/right connector 

1. Confirm motor connection is set for correct  

sides 

(Fig. 18)

2. Press SET to confirm. 

Step 3. Confirming dual gate mode 

The controller will now determine whether a single or 

dual gate installation is required by trying to detect the 

presence of a second drive unit. As this is a dual gate 

installation, the screen below should be shown. Press 

SET to continue. If Single Gate Mode is displayed then 

check the connections between the two drive units and 

press EXIT to restart from step 2

 (Fig. 19)

Step 4. Confirming gates are not closed 

Before proceeding, the gates must not be in the closed 

position. This is so that each leaf can be moved freely 

without interfering with the other. If the gates are 

closed, partially open them manually, then re-engage 

them. Press SET to continue 

(Fig. 20)

Step 5. Selecting which motor opens first 

during normal operation 

The controller prompts to select which motor will open 

first during normal operation. The selected motor is 

also used for pedestrian access. 

1. Use OPEN or CLOSE to change display  

to M1 or M2 

(Fig. 21)

2. Press SET to save the selection. 

NOTE:

 M1 is selected for the purpose of this 

instruction manual. 

NOTE:

 The motor selected will determine the order 

in which each motor will be processed in the following 

steps. The procedure documented here shows the 

steps for when M1 is selected. If M2 is selected to 

open first, then the displayed motor numbers will be 

the opposite to those shown here.


Содержание Easy Slider

Страница 1: ...Easy Slider INSTALLATION INSTRUCTIONS OWNERS COPY Sliding Gate Opener...

Страница 2: ...t that such may be lawfully excluded hereby expressly disclaims all conditions or warranties statutory or otherwise which may be implied by laws as conditions or warranties of purchase of an Automatic...

Страница 3: ...enu 7 Operating modes 24 Viewing and editing parameter 25 Coding transmitter 26 Transmitter edit procedure 27 Transmitter management 29 Code operation location empty 30 Code operation location used 30...

Страница 4: ...property damage can result from failure to follow this warning Make sure that the safety obstruction detection system is working correctly and is tested every month Test as per the Installation Instru...

Страница 5: ...ls extreme caution is recommended when using auto close mode all safety rules above must be followed In order for the gate opener to sense an object obstructing the gateway some force must be exerted...

Страница 6: ...ers Every time a transmission is made from the remotetransmitter a new security code is generated The number of possible code combinations is over 4 29 billion This greatly enhances the security of th...

Страница 7: ...iewed The display will also show the count down progress of auto close timers Any active input will also be displayed along with the state of various features such as periodic service battery backup o...

Страница 8: ...d ready to be mounted on the fence line An outdoor type 240V AC power outlet is required to powerthe system In a dual leaf gate the slave drive unit is connected tothe master via a ve 5 wire low volta...

Страница 9: ...olid construction concrete brick or steel It must be able to withstand the full force applied to the gate 3 Select a suitable location for mounting the drive unit This position is usually established...

Страница 10: ...ifferent rack make sure that it is Module 4 2 Mark a line 78mm parallel to the face of the gate for the mounting holes when using the ATA plastic rack When using a non ATA rack add your rack width and...

Страница 11: ...of the racks mounting slots The rst section of rack should start 20mm from the edge of the gate 3 Drill and tap for 6mm screws 4 Once the rst section of the rack is mounted on the gate check that it m...

Страница 12: ...al SWP N O input terminal PED N O input terminal PE input jumper remove when 8 is used OPN input jumper remove when 9 is used STP input jumper remove when 10 is used Console Exit button Console Previo...

Страница 13: ...Owner Installation Instructions Easy Slider Sliding Gate Opener 13 Control board layout 01 03 02 04 05 06 07 08 09 10 11 12 13 14 15 16 17 18 19 20 21 24 25 28 22 23 26 27...

Страница 14: ...Counters Menu 8 4 Memory Usage Control input status display See page XX Transmitter testing See page XX Event history display See page XX Periodic service cycle counter See page XX Cycle and event co...

Страница 15: ...er and motor2 slave drive units When dual gates are to be used the master and slave openers are connected via a ve 5 wire cable Fig 07 Ensure that each end of the cable passes through a suitable cable...

Страница 16: ...ngle or dual gates Powering up the Drive Unit 10 g 11 g Single leaf gate This section shows how to set the travel limits for a single gate installation The procedure can be partly completed using a tr...

Страница 17: ...nsmitter Fig 16 2 Press SET to record the OPEN LIMIT or press button 2 on Transmitter NOTE Limit will not be accepted unless the gate is driven in the open direction Automatic limit adjustment and loa...

Страница 18: ...ntroller will now determine whether a single or dual gate installation is required by trying to detect the presence of a second drive unit As this is a dual gate installation the screen below should b...

Страница 19: ...MIT or press button 1 on transmitter Fig 25 2 Press SET to record the OPEN LIMIT for M2 or press button 2 on transmitter Automatic limit adjustment and load pro le After a brief pause the controller w...

Страница 20: ...to navigate to the Menu 10 Fig 26 2 Press SET MENU 10 1 is displayed 3 Press NEXT to go to MENU 10 2 4 Press SET to enter Set Pedestrian procedure Step 2 Setting pedestrian position 1 Press OPEN to m...

Страница 21: ...OSC input Activated by OSC terminal with N O switch or by transmitter button with OSC function assigned If the gate is moving the OSC input will cause the gate to stop The next trigger will move the g...

Страница 22: ...PEN Pedestrian access auto close This mode is selected by entering a non zero time for the Ped n A C parameter When selected the gate will auto close after being opened for pedestrian access unless it...

Страница 23: ...Menu No ON AFTER CYCLE LIGHT TIME Time light remains on for after a cycle 0 255 60 1 Sec 5 ON BEFORE OPEN CYCLE LIGHT TIME Minimum time light is activated for prior to opening 0 255 0 1 Sec 5 ON BEFO...

Страница 24: ...the control board can be shut down without having to disconnect the battery backup system Password protection The password feature enables all parameters and con guration settings to be protected unle...

Страница 25: ...ue to change rapidly The longer the button is held the faster the value changes 6 Press SET to SAVE setting Reload default setting 1 Press NEXT PREV buttons to display LOAD DEFAULT screen 2 Press SET...

Страница 26: ...nsmitter code 1 Controller will prompt to press one of the transmitter s buttons 2 Press the transmitter button you wish to use to operate the Gate Opener e g button 1 Fig 33 3 Press same transmitter...

Страница 27: ...P or DOWN to change the displayed value Fig 37 The available functions are shown below Selecting OFF will prevent the opener responding to that button Available functions VAC Vacation Mode LGT Courtes...

Страница 28: ...ep 5 Selection of id or s n display 1 Press NEXT PREV to move cursor over ID eld 2 Press NEXT to reveal Serial Number Fig 39 The serial number display is provided for additional means of identi cation...

Страница 29: ...sing the list menu 1 Press NEXT to navigate to the Menu 1 Fig 43 2 Press SET to enter the transmitter edit procedure 3 Press NEXT to enter transmitter list and edit mode Fig 44 Used if the transmitter...

Страница 30: ...er s owner Code operation location used If the code operation is selected for a location that already contains a transmitter then the BASIC CODE TRANSMITTER PROCEDURE will be initiated and the new tra...

Страница 31: ...ED SWP OSC CLS STP or OPN wait for the gate to complete its cycle 3 Activate remote code set mode Using a small pin press and hold through the Coding Hole of the existing transmitter for two seconds F...

Страница 32: ...prompts for a transmitter button to be pressed Fig 60 and whether ID or serial numbers are to be displayed The opener will then beep each time a transmission is received If the transmitter button is s...

Страница 33: ...keeps a count of number of times a particular event occurs The list of event counters kept is shown below When this tool is selected the rst event counter is shown Fig 65 Press NEXT or PREV to step th...

Страница 34: ...will also clear the travel limits Menu 9 2 Clr tx ers This option will clear the transmitter storage memory Menu 9 3 Backup tx ers This option saves a copy of the transmitter memory into a memory modu...

Страница 35: ...location of the P E Beam and the manner in which it is installed might not give safety protection at all times Check to make sure that the height of the sensor and type used offers maximum protection...

Страница 36: ...Gate will not open fully Gate limits position need to be reset Reset limits positions See Page XX Opener beeping and gate does not move Disengagement lever opening Disengage connector not plugged in...

Страница 37: ...on Transmitter Codes Transmitter frequency 433 92 MHz Coding type Hopping Code No of code combinations Over 4 29 billion random codes Code generation Non linear encryption algorithm Transmitter batter...

Страница 38: ...screw M6 x 75 10261 35 Spring washer I D 6 10960 37 PCB support 02430 38M Control board CB 11 V 1 02 master 01060 38S Control board CB 11 V 1 02 slave 01062 39M PCB cover assy ESV24 240 master 02490 3...

Страница 39: ...Owner Installation Instructions Easy Slider Sliding Gate Opener 39...

Страница 40: ...nd condition j evidence of unauthorised repairs k any cost relating to damage caused by misuse negligence or failure to maintain the equipment in a proper working order as per clauses d through i l in...

Страница 41: ...hett Victoria Australia 3190 Tel 61 3 9532 2788 Fax 61 3 9532 2799 Web www ata aust com au Email sales ata aust com au March 2005 Automatic Technology Australia Pty Ltd All rights reserved SecuraCode...

Страница 42: ...GATE OPENERS REMOTE CONTROL ACCESS SOLUTIONS Automatic Technology Pty Ltd ABN 11 007 125 368 6 8 Fiveways Boulevard Keysborough Victoria 3173 P 1300 133 944 E sales ata aust com au www ata aust com au...

Отзывы: